¶ Dashboard
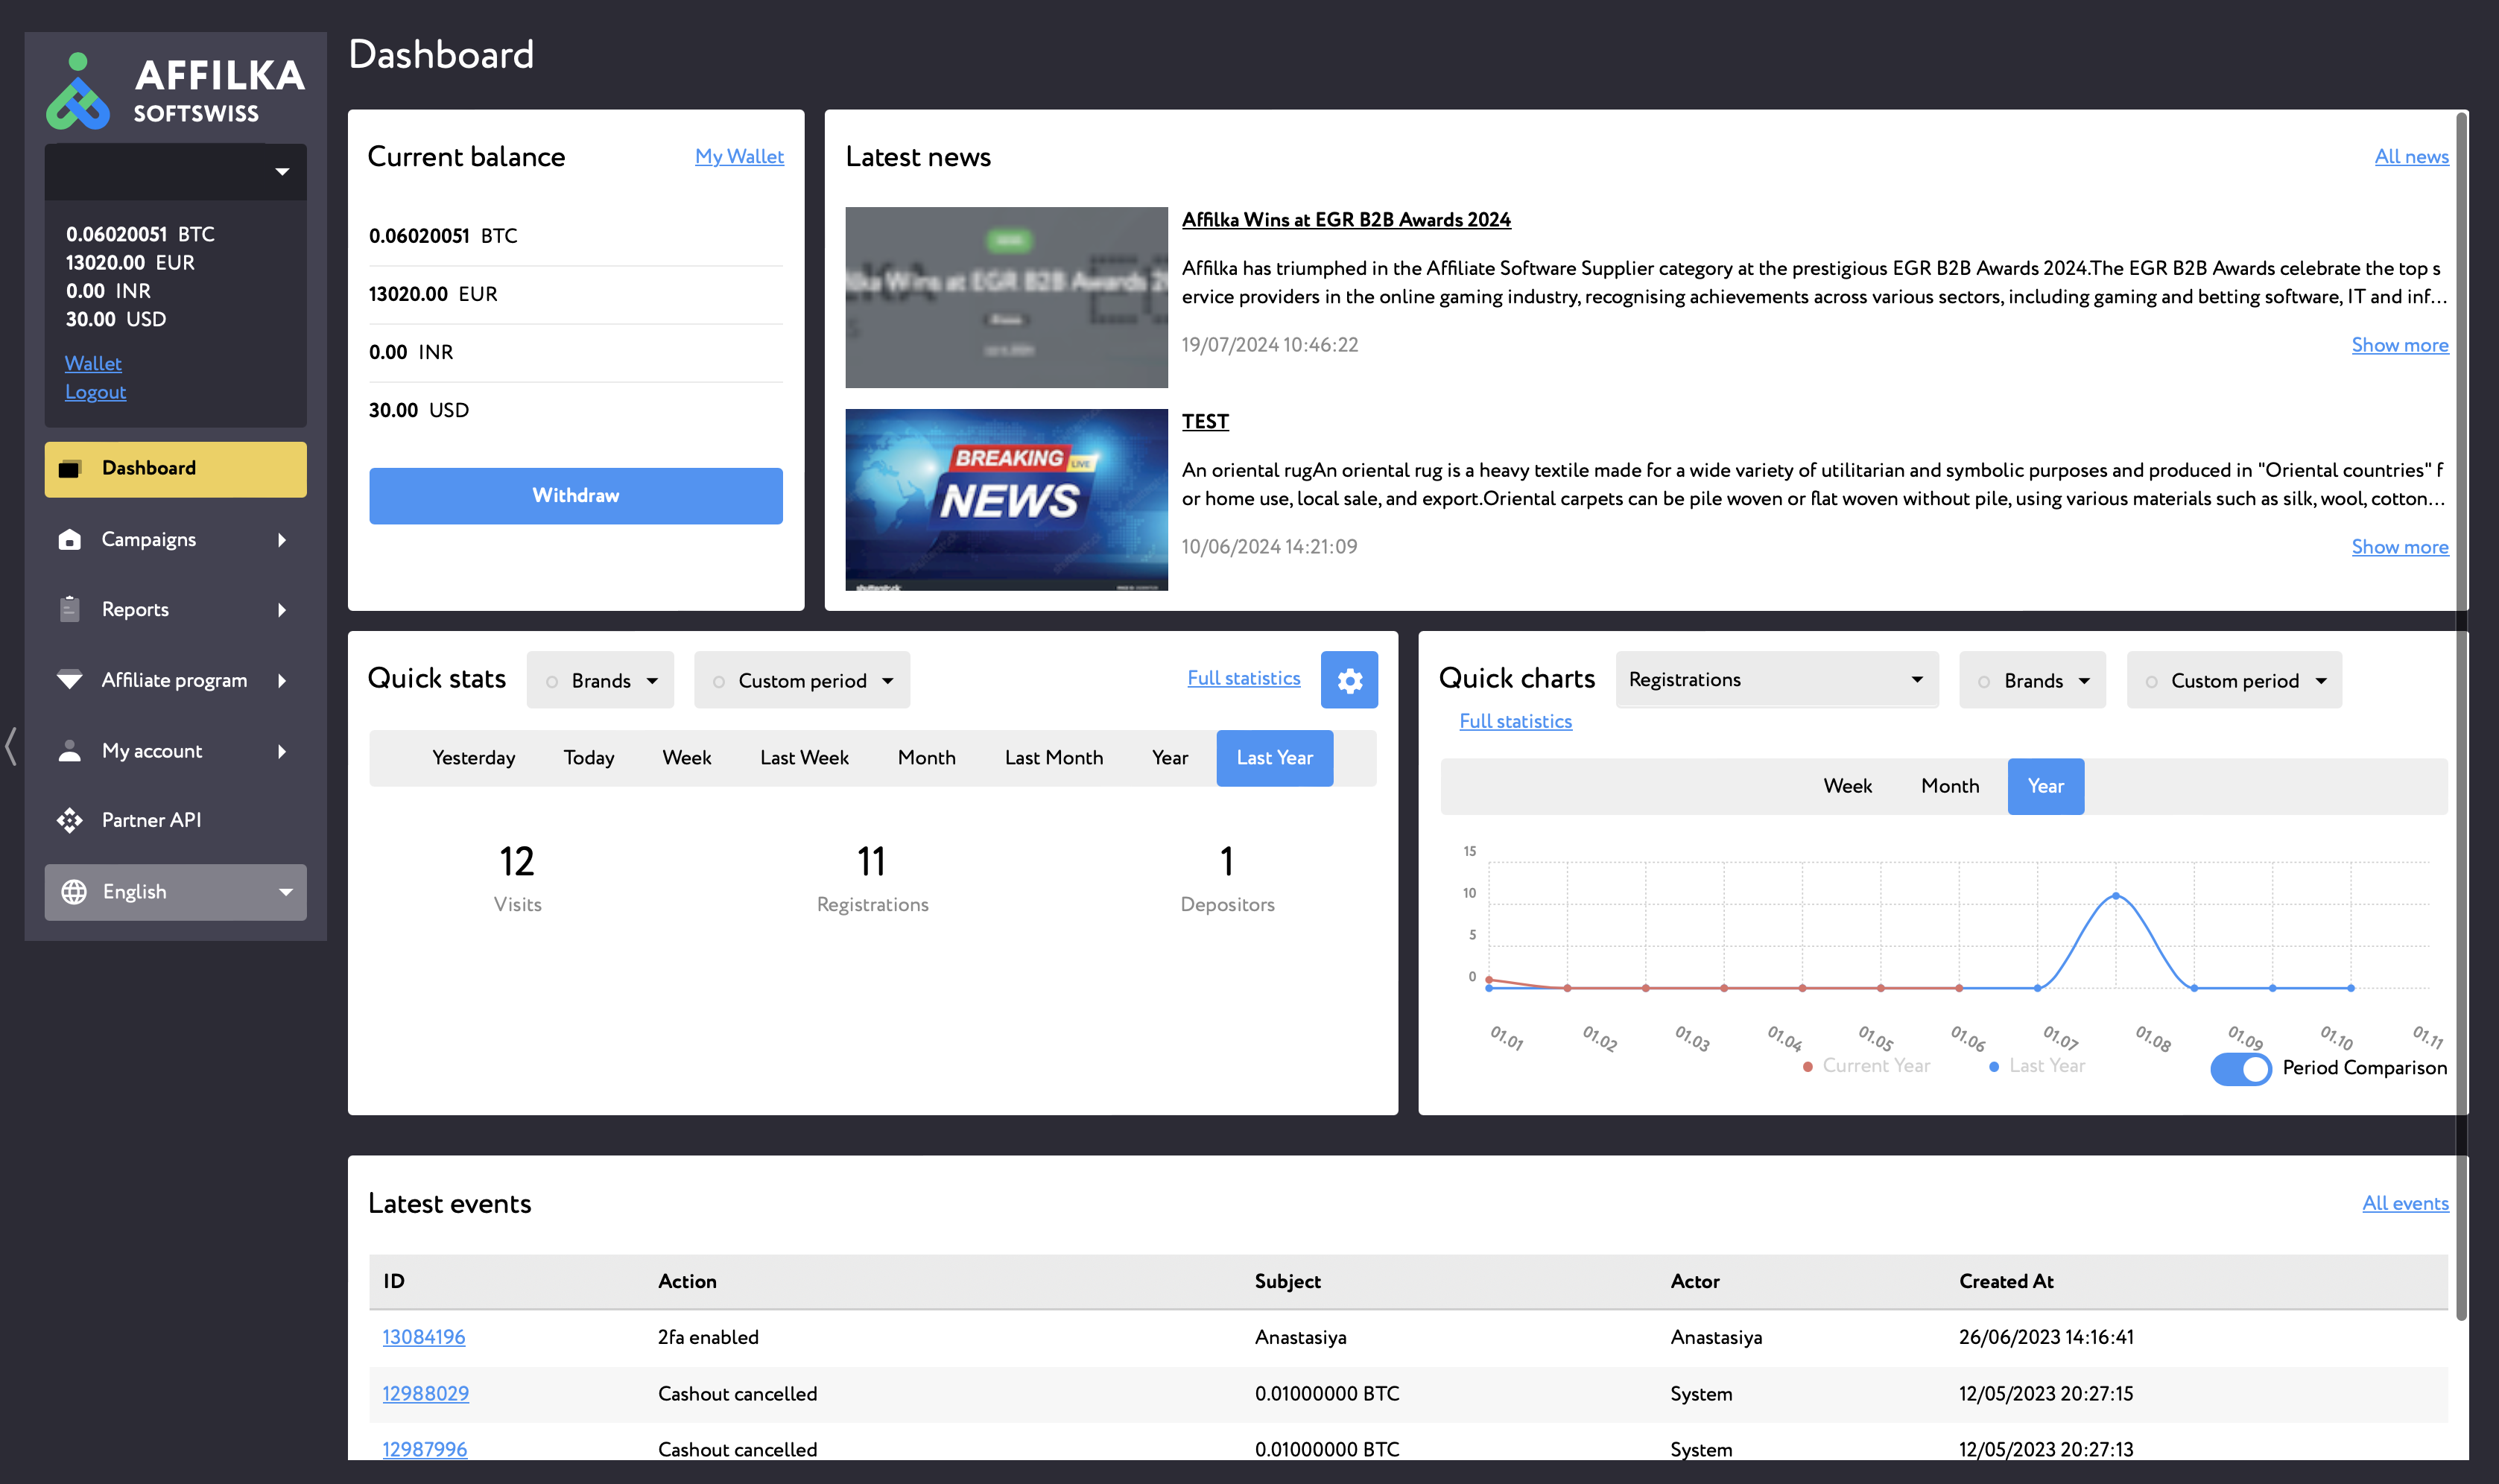
All the quick info is available on the Dashboard:
- your Current Balance in different currencies: these are the funds available for withdrawal. By clicking on the “Withdraw” button, you can request a cash-out right here, provided that you've already submitted your payment details. By clicking on the "My Wallet" link you will be redirected to the /partner/wallet page where you can submit your payment details, request a cash-out and set automatic payment schedules.
- the Latest News section: shows you the latest news published by the Affiliate Program. To view all news, press on the “All news” link in the top right corner of the section. In order to read a specific news article in full, press on the news banner, title or the “Show more” button next to the news article.
- the Quick Stats section: provides a quick summary of your Daily/Weekly/Monthly stats for the current and ended periods. The displayed fields depend on individual project settings. You can customise the Quick Stats on the Dashboard up to your liking by clicking on the "Gear" button in the top right corner of the section. The system will remember your preferences upon future logins (until further change). You can indicate up to nine fields for the Quick Stats section. The data displayed there is converted into the base fiat currency of the affiliate program. By clicking on the "Full Statistics" link you will be redirected to the /partner/report page where you can analyze your stats in more detail. You can also indicate a custom period for the analysis here or analyse specific brand(s) performance.
- the Quick Charts section: provides a graphic insight into your Weekly/Monthly/Yearly stats for the current and ended periods. By default you see 2 period compared to each other. You can disable the second line by switching off the “Period Comparison” toggle switch. You can choose which data you want to see in the chart by choosing the required metric from the drop-down selector on the left. You can also indicate a custom period for the analysis here or analyse specific brand(s) performance.
- the Latest Events section: shows you the latest events that happened within your account. To view all events, press on the “Events” link in the top right corner of the section.
¶ Campaigns tab
¶ My Campaigns
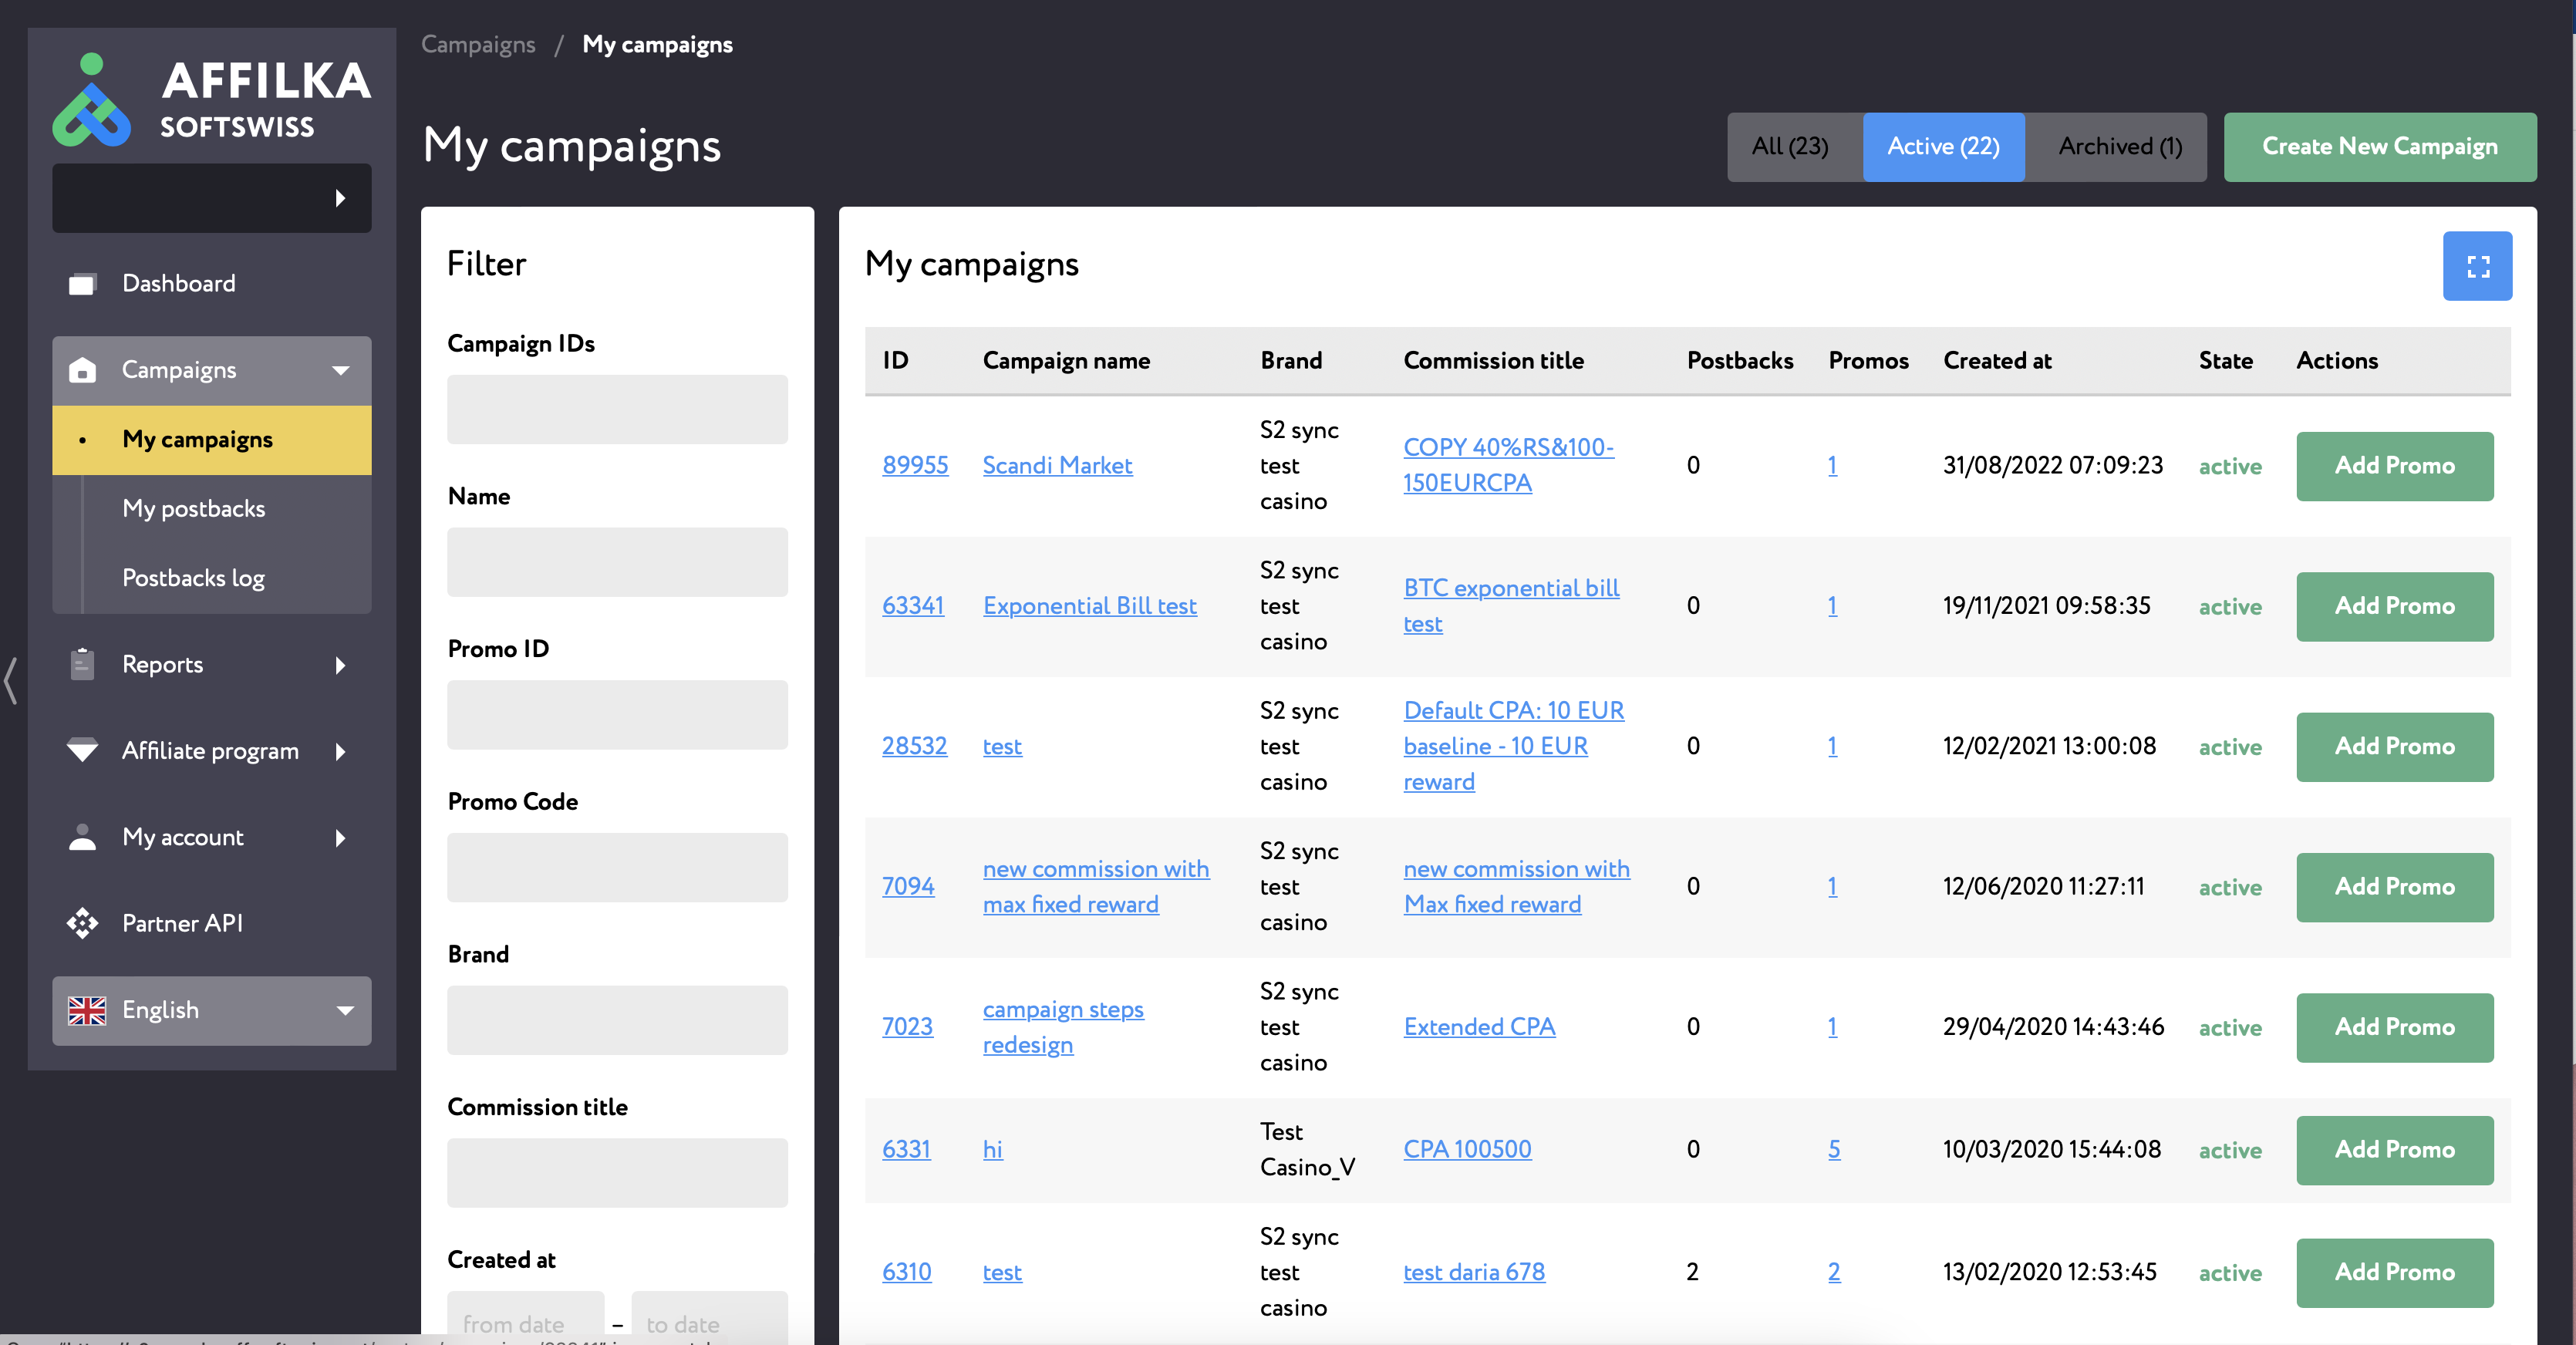
You can view the list of all marketing Campaigns you have created on the /partner/campaigns page in the "Campaigns" tab. The Campaigns are divided into 3 tabs:
- All: represents all campaigns regardless of their state;
- Active: represents only active campaigns;
- Archived: represents only archived campaigns.
You can filter and find campaigns by:
- Campaign IDs: the filter supports multiple values (comma, “Enter” and “Space” keys serve as value delimiters). You can indicate the Campaign IDs you want to find here.
- Campaign name: the filter supports partial search. You can type some campaign name partially and press “Filter”, and you will see all campaigns whose name contains what you’ve just typed.
- Promo IDs: the filter supports multiple values (comma, “Enter” and “Space” keys serve as value delimiters). You can indicate the Promo IDs and find which campaigns these Promos belong to.
- Promo codes: the filter supports multiple values (comma, “Enter” and “Space” keys serve as value delimiters). You can indicate thePromo Codes and find which campaigns these Promos belong to.
- Traffic source: the filter supports multiple values and autosuggest feature. Start typing “Traffic source” type and it will appear in the dropdown selector. You can choose several traffic sources here and the filter will find campaigns with any indicated traffic source.
- Brand: the filter supports multiple values and autosuggest feature. Start typing the name of the brand and it will appear in the dropdown selector. You can choose several brands and the filter will find campaigns in any of the indicated brands.
- Commission title: the filter supports partial search. You can type some commission title partially and press “Filter”, and you will see all campaigns that have an active commission with the title you’ve just typed.
- Created at: the filter allows to indicate date ranges (from…to) when the campaign was created
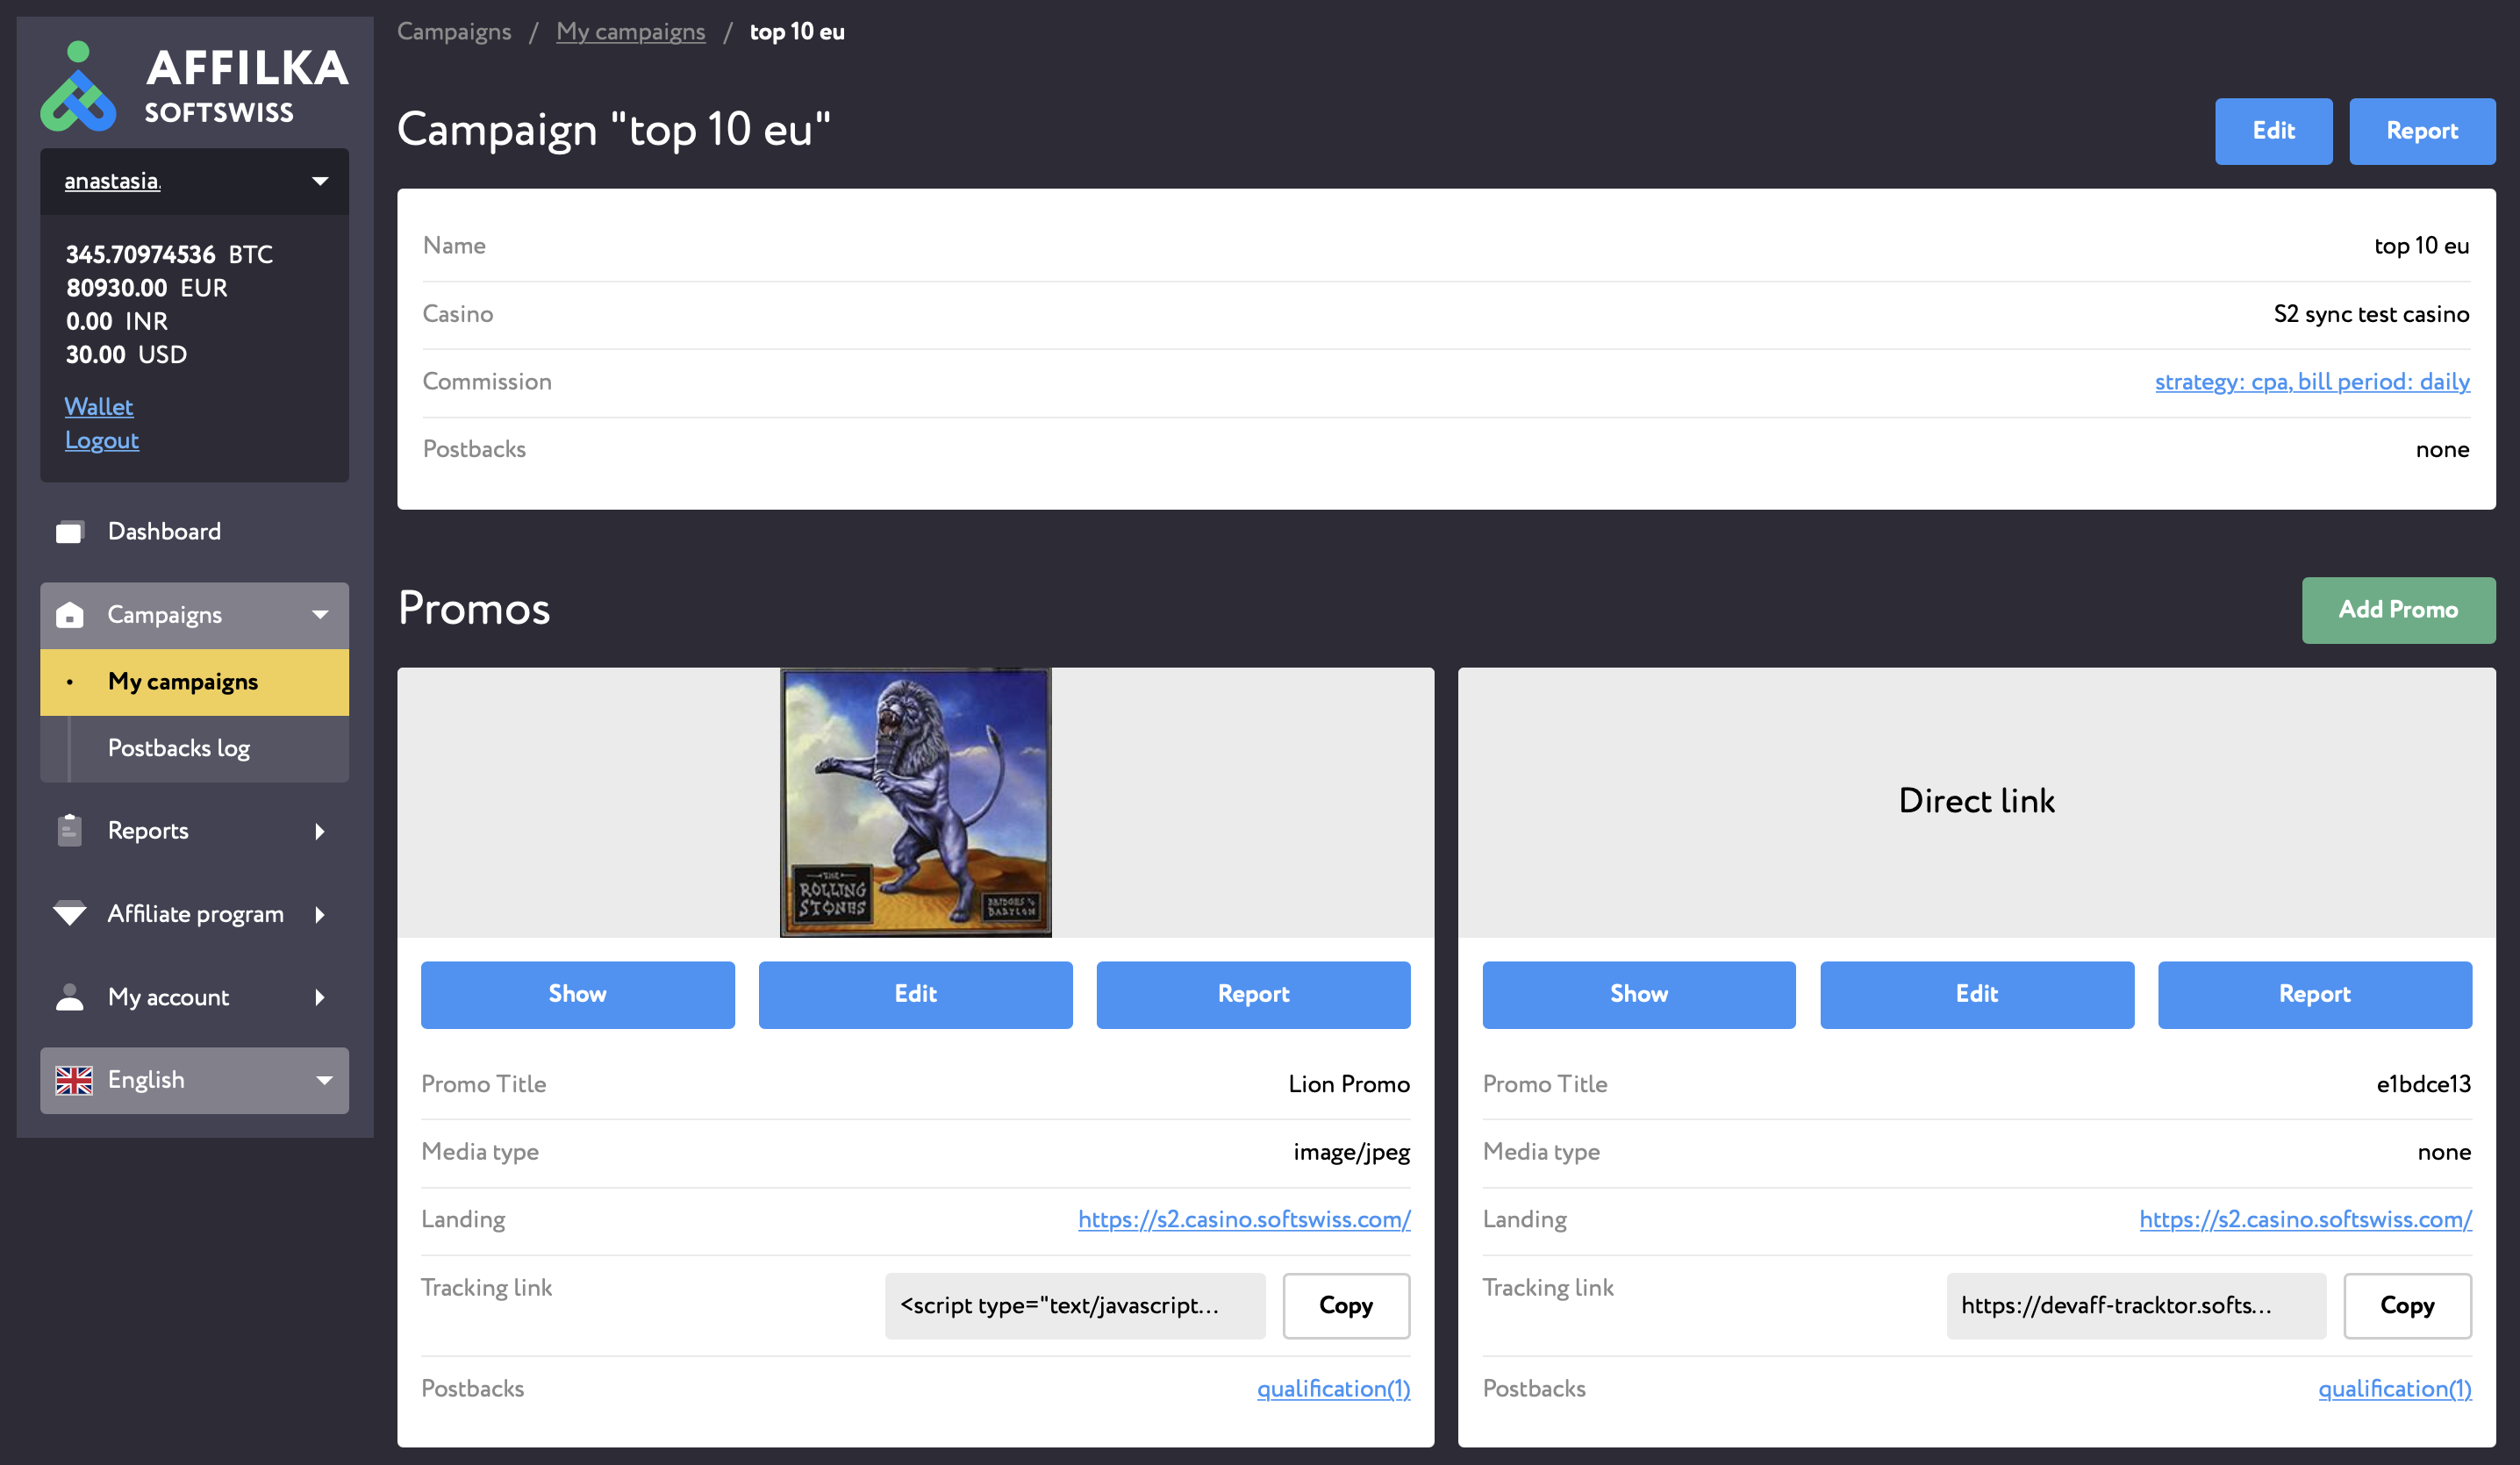
Your postbacks and tracking links can also be reached from this page. Just click on the "Campaign ID" or “Campaign Name” in the table and you will be redirected to the detailed Campaign page where you will find promos and postbacks that relate to this Campaign.
¶ Create Campaign & Get Tracking Link
Press the "Create New Campaign" button in the top right corner of the /partner/campaigns page.
¶ Step 1:
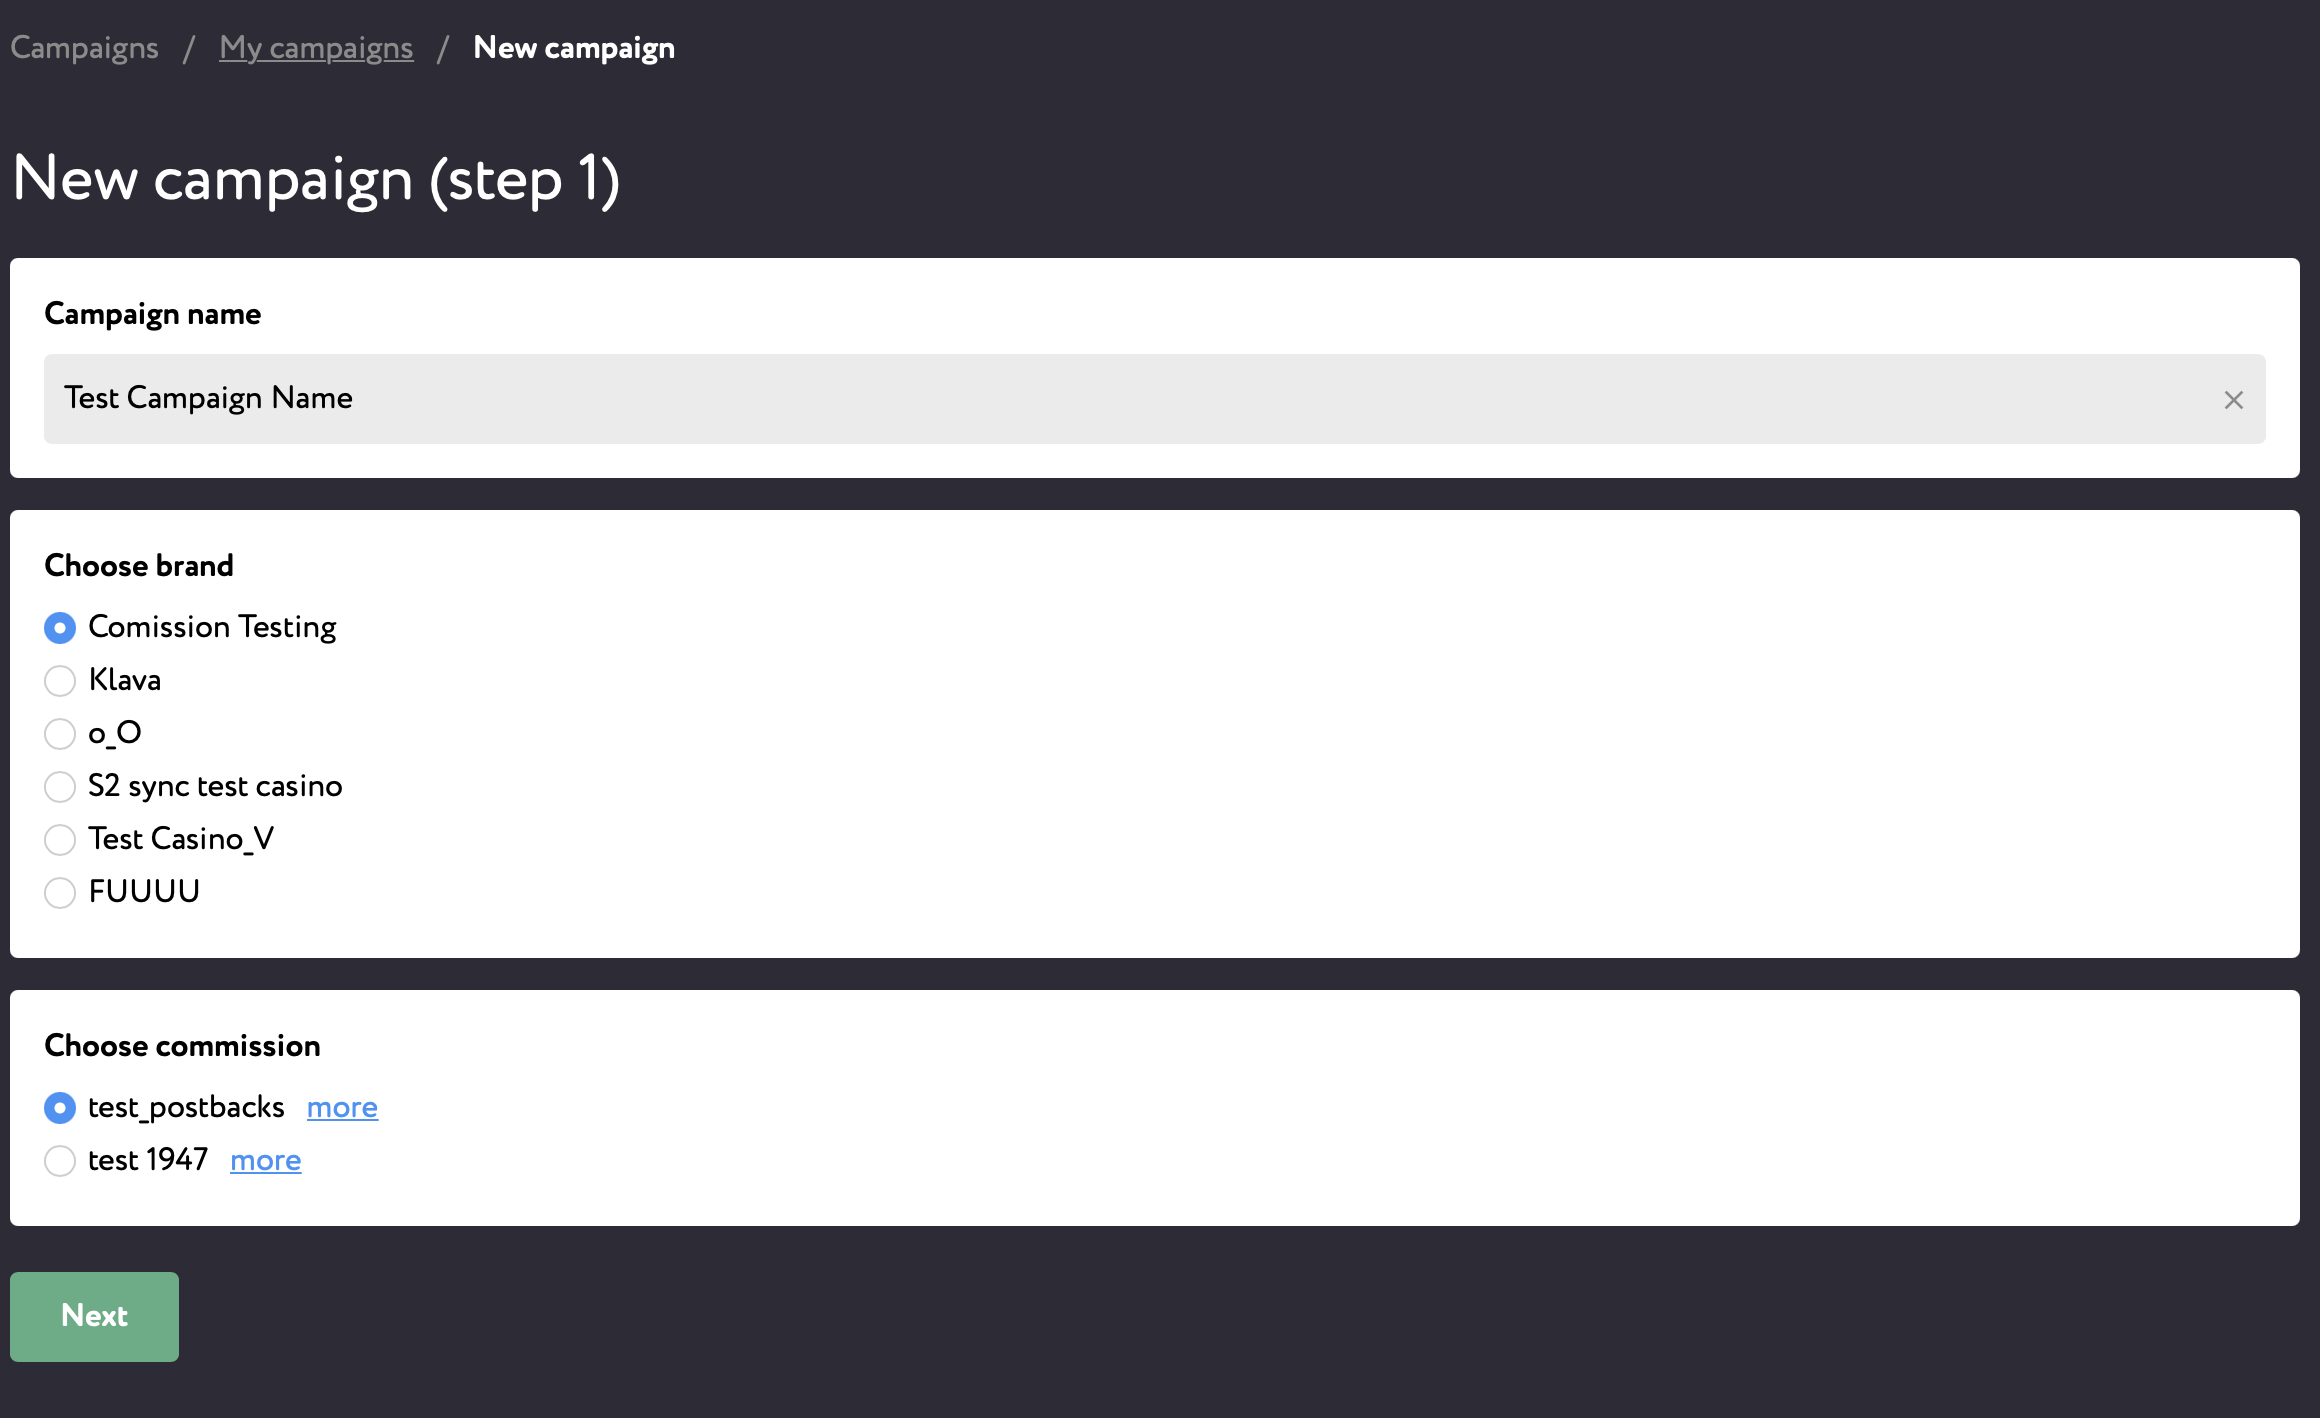
Fill in your Campaign Name, choose the Brand you want to create a Campaign for and select the Commission Plan according to which you will get your rewards.
If the affiliate program features only one brand and you have only one commission plan assigned to you, you will see only one option in each of the corresponding fields.
To view the Commission settings, press on the "more" button next to the Commission Plan name.
¶ Step 2:
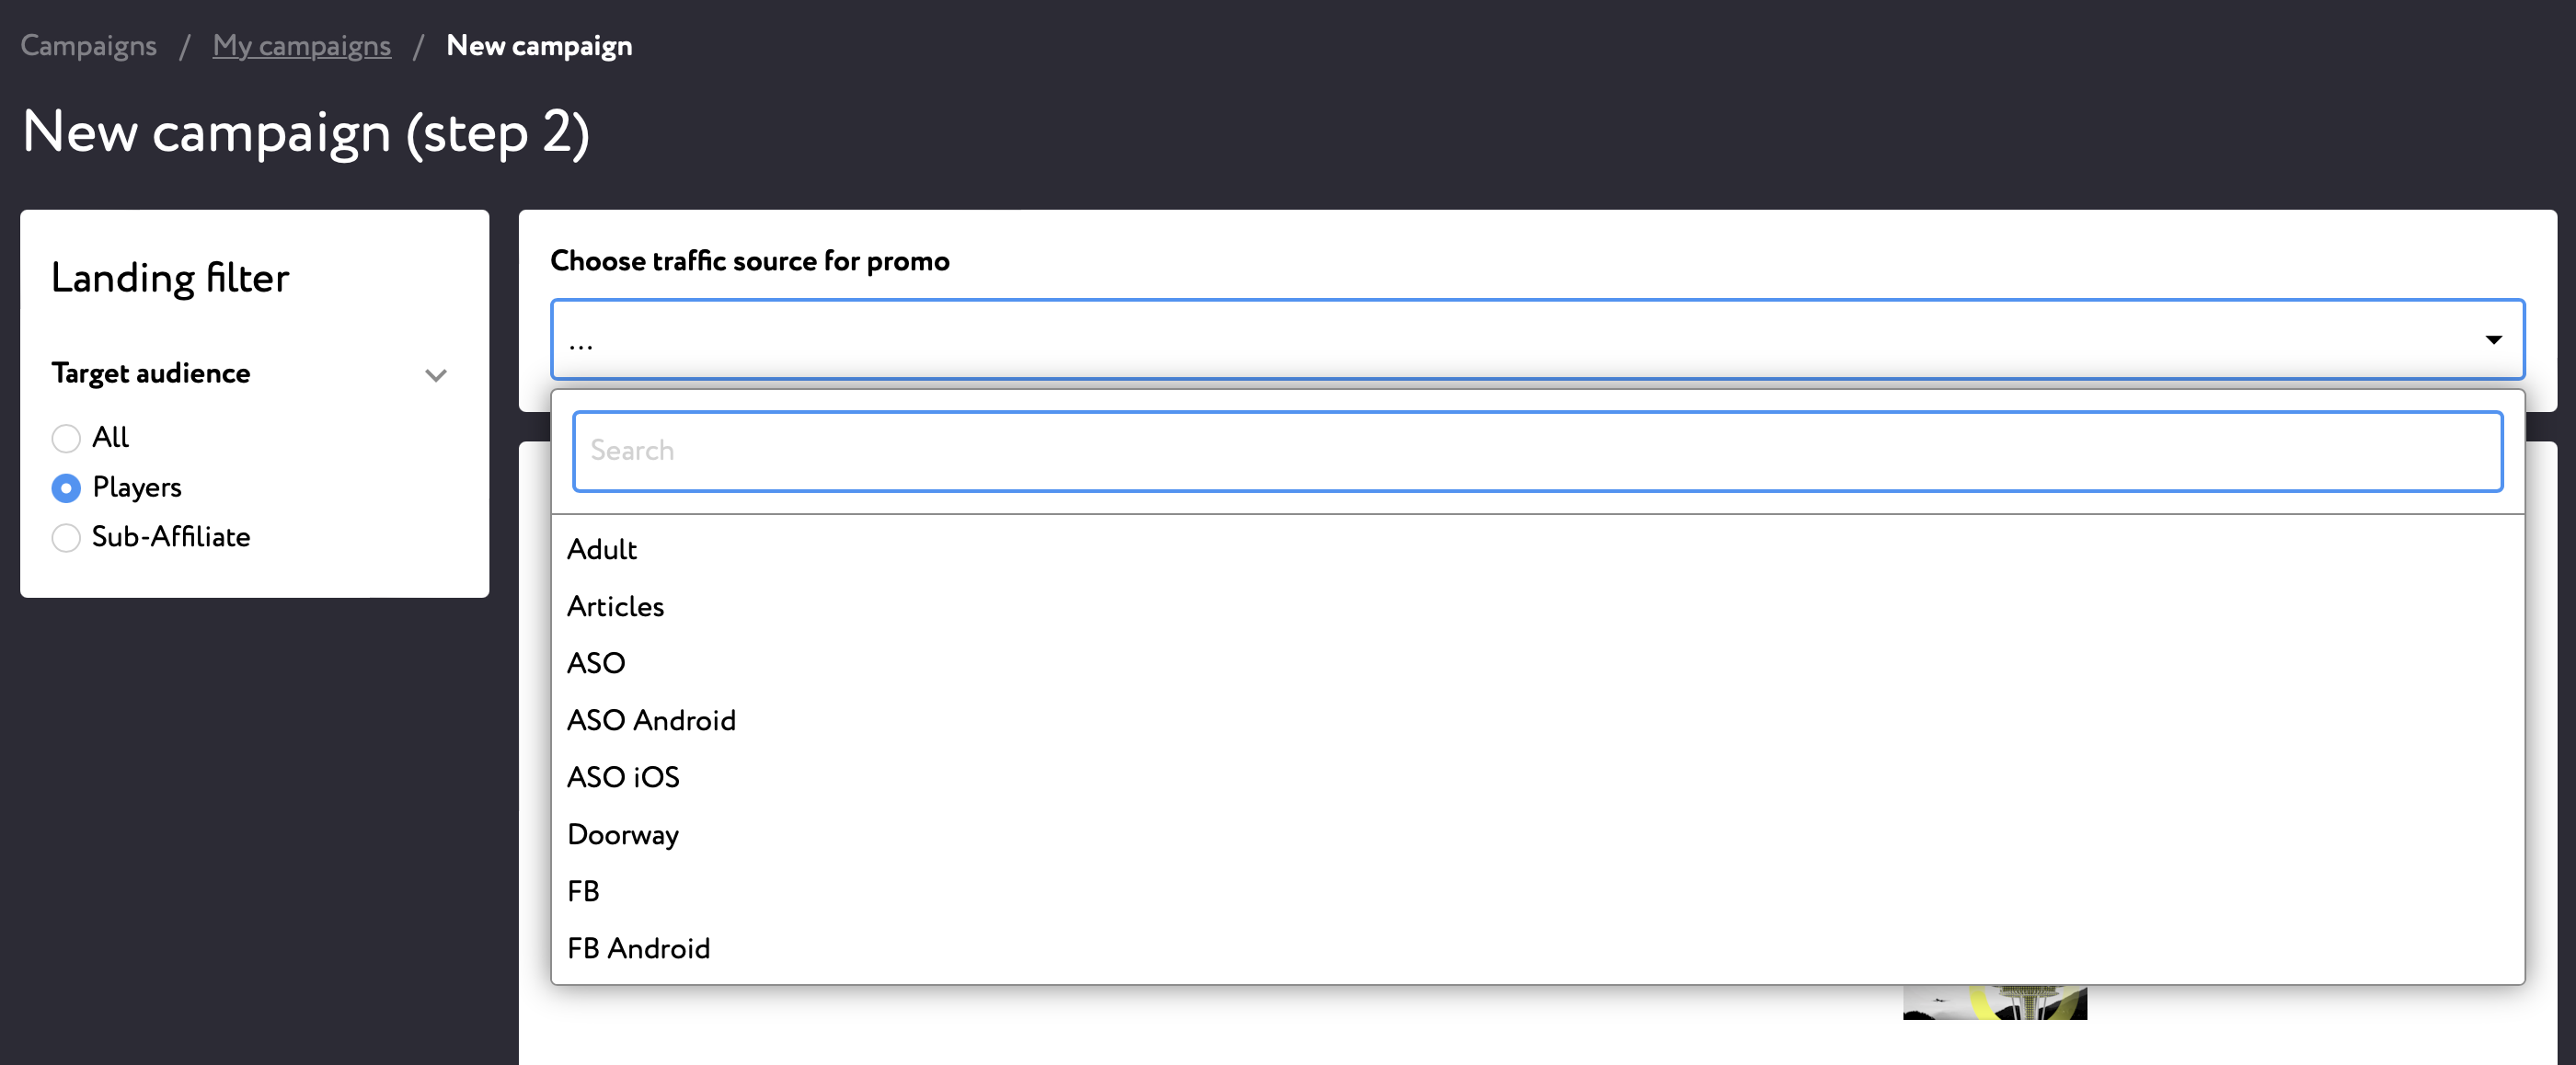
1) Indicate the “Traffic source” which will be used for the referral link you are about to create.
Traffic sources refer to the various channels or methods that guide visitors to a website. These include SEO, social media, email marketing, paid advertising, etc. You will see the list of available options in the dropdown selector.
Please, note! Once indicated, the traffic source can't be changed. If you leave the field empty, you can add it later on. Only one traffic source can be indicated for a referral link.
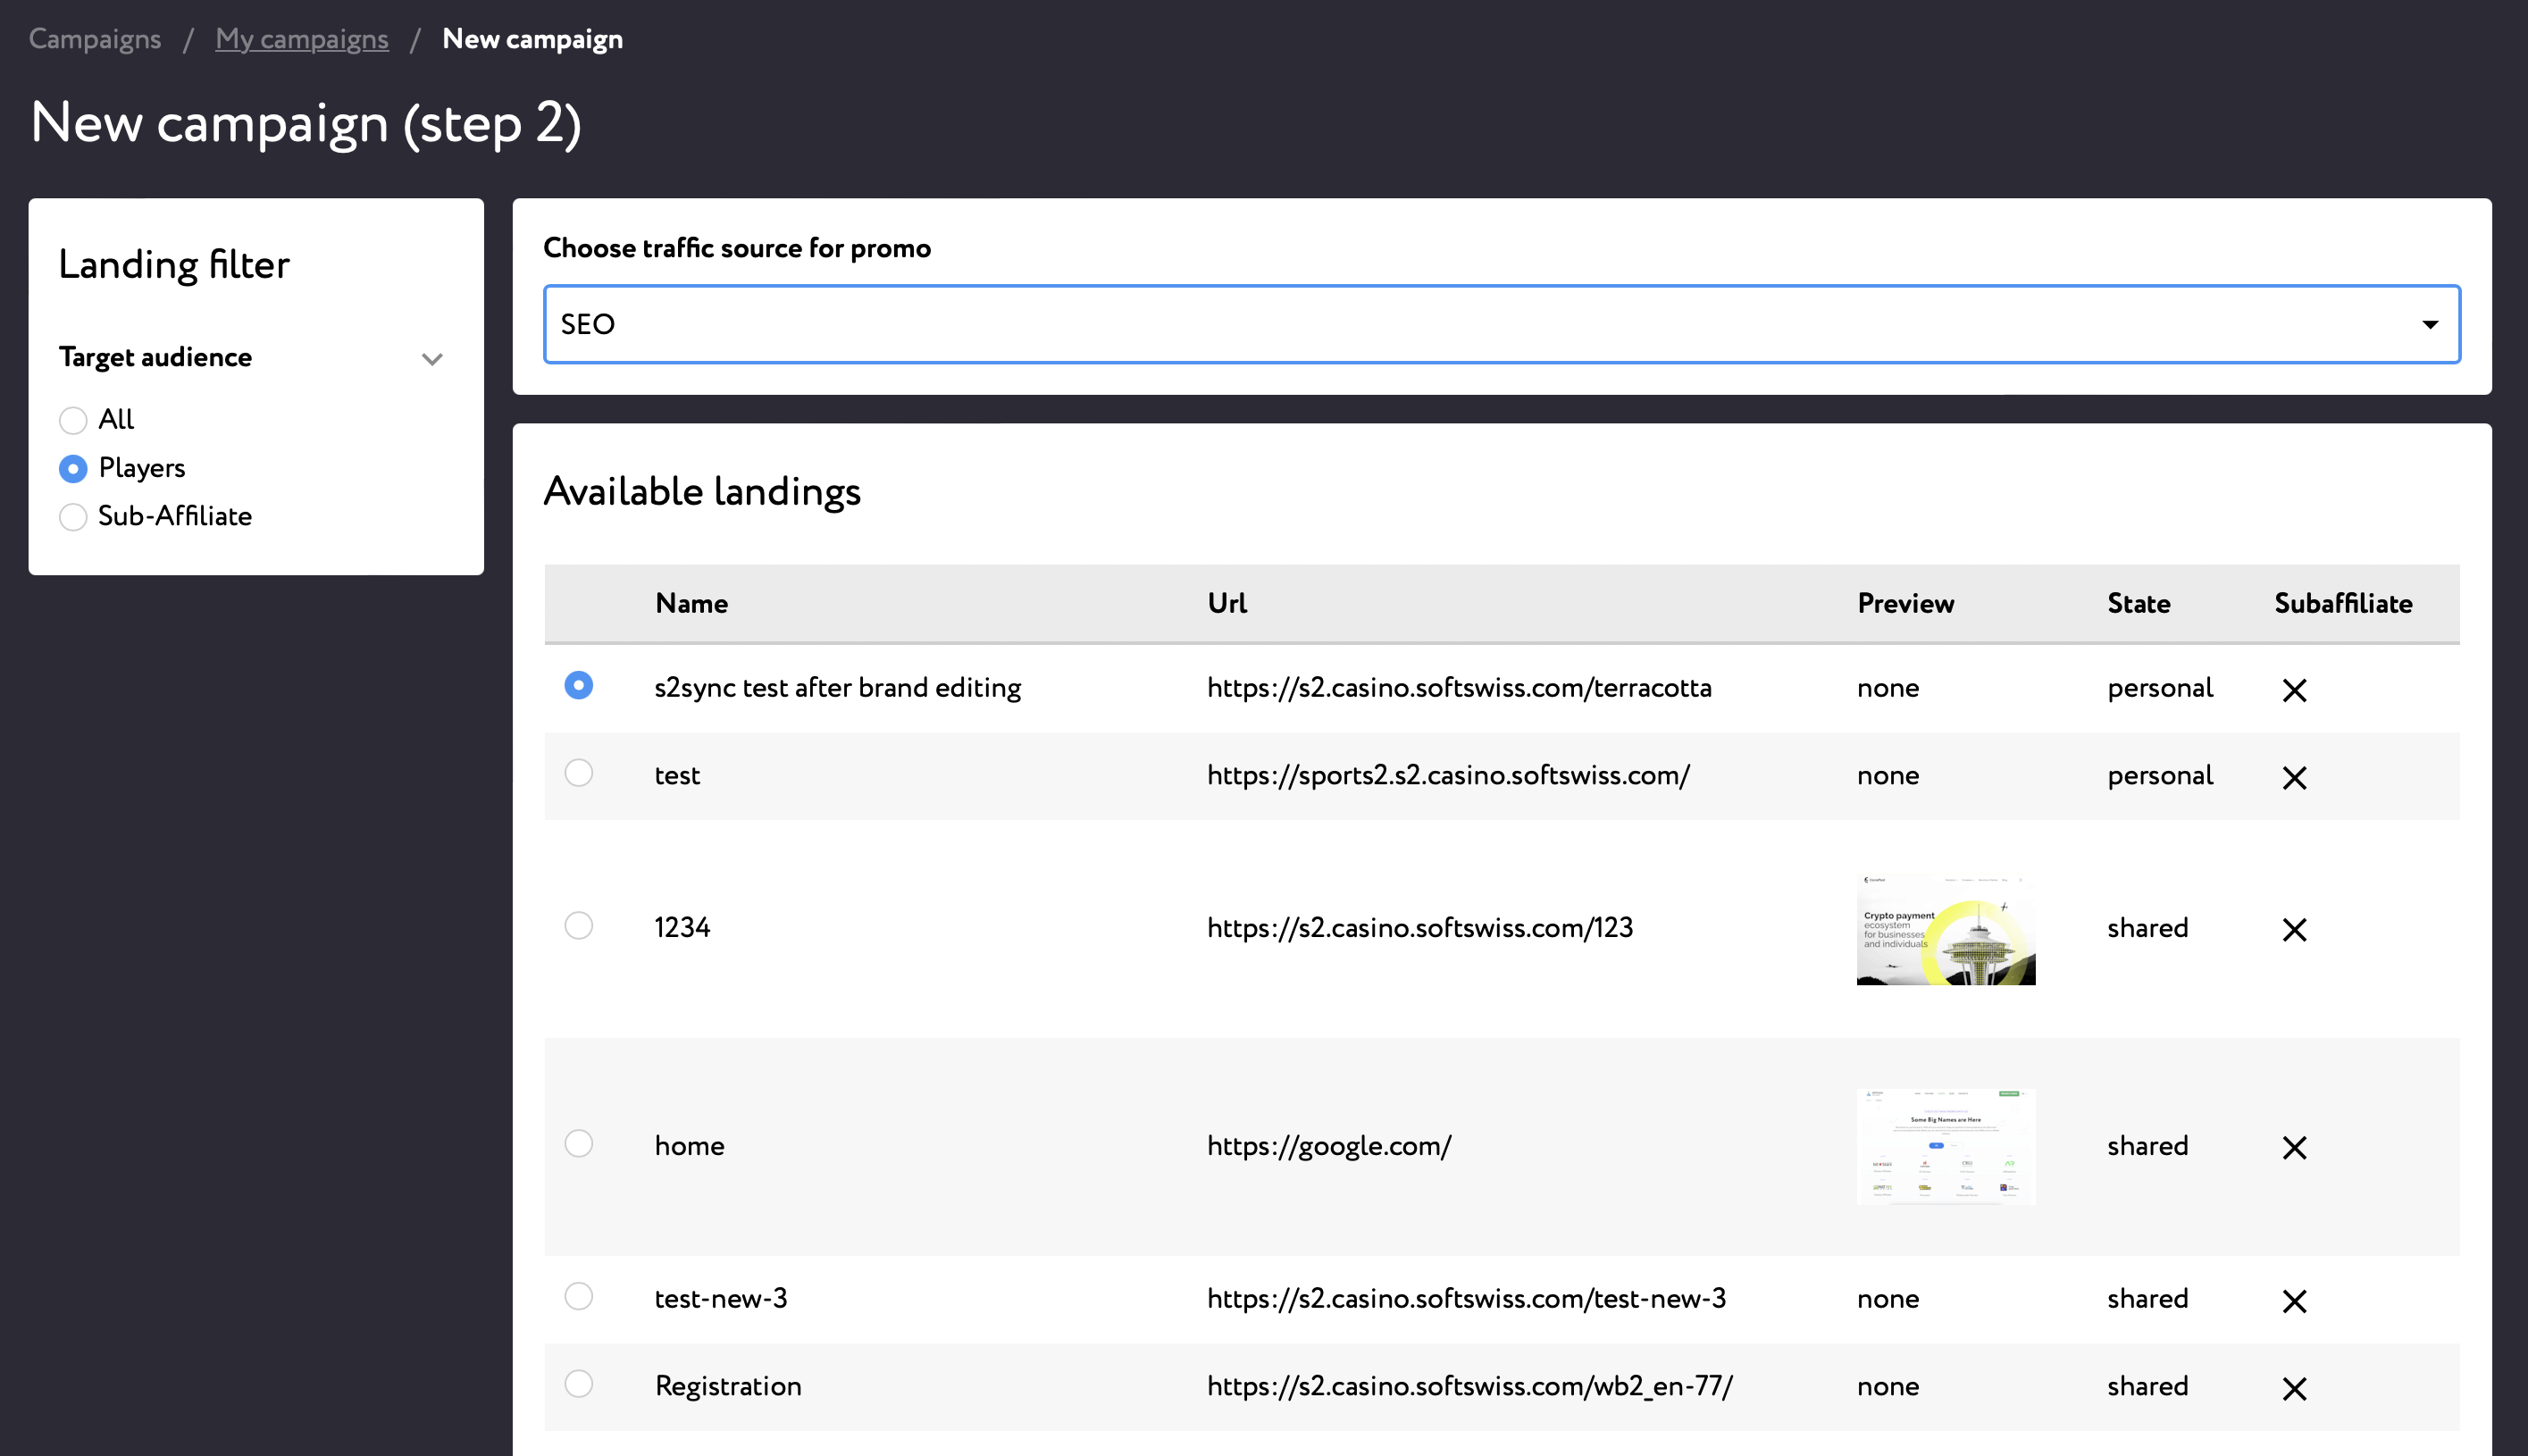
2) Choose the Landing URL to which you will refer your traffic.
You will notice the "Target audience" filter on the left.
If you want to refer new players, please, choose "Players" option. Players will be referred to one of the brand landings created for players.
If you want to refer sub-affiliates to our affiliate program, please, choose "Sub-Affiliates" option. Sub-Affiliates will be referred to the affiliate program landing page where they can register as affiliates. If there are no landings available, it means that the commission plan you've selected does not support sub-affiliate commission plans or that we do not have a sub-affiliate program in place.
3) Once you have indicated the Traffic source and selected a Landing URL, press "Next" at the bottom of the page to proceed to the next step.
¶ Step 3:
Choose Your Banner.
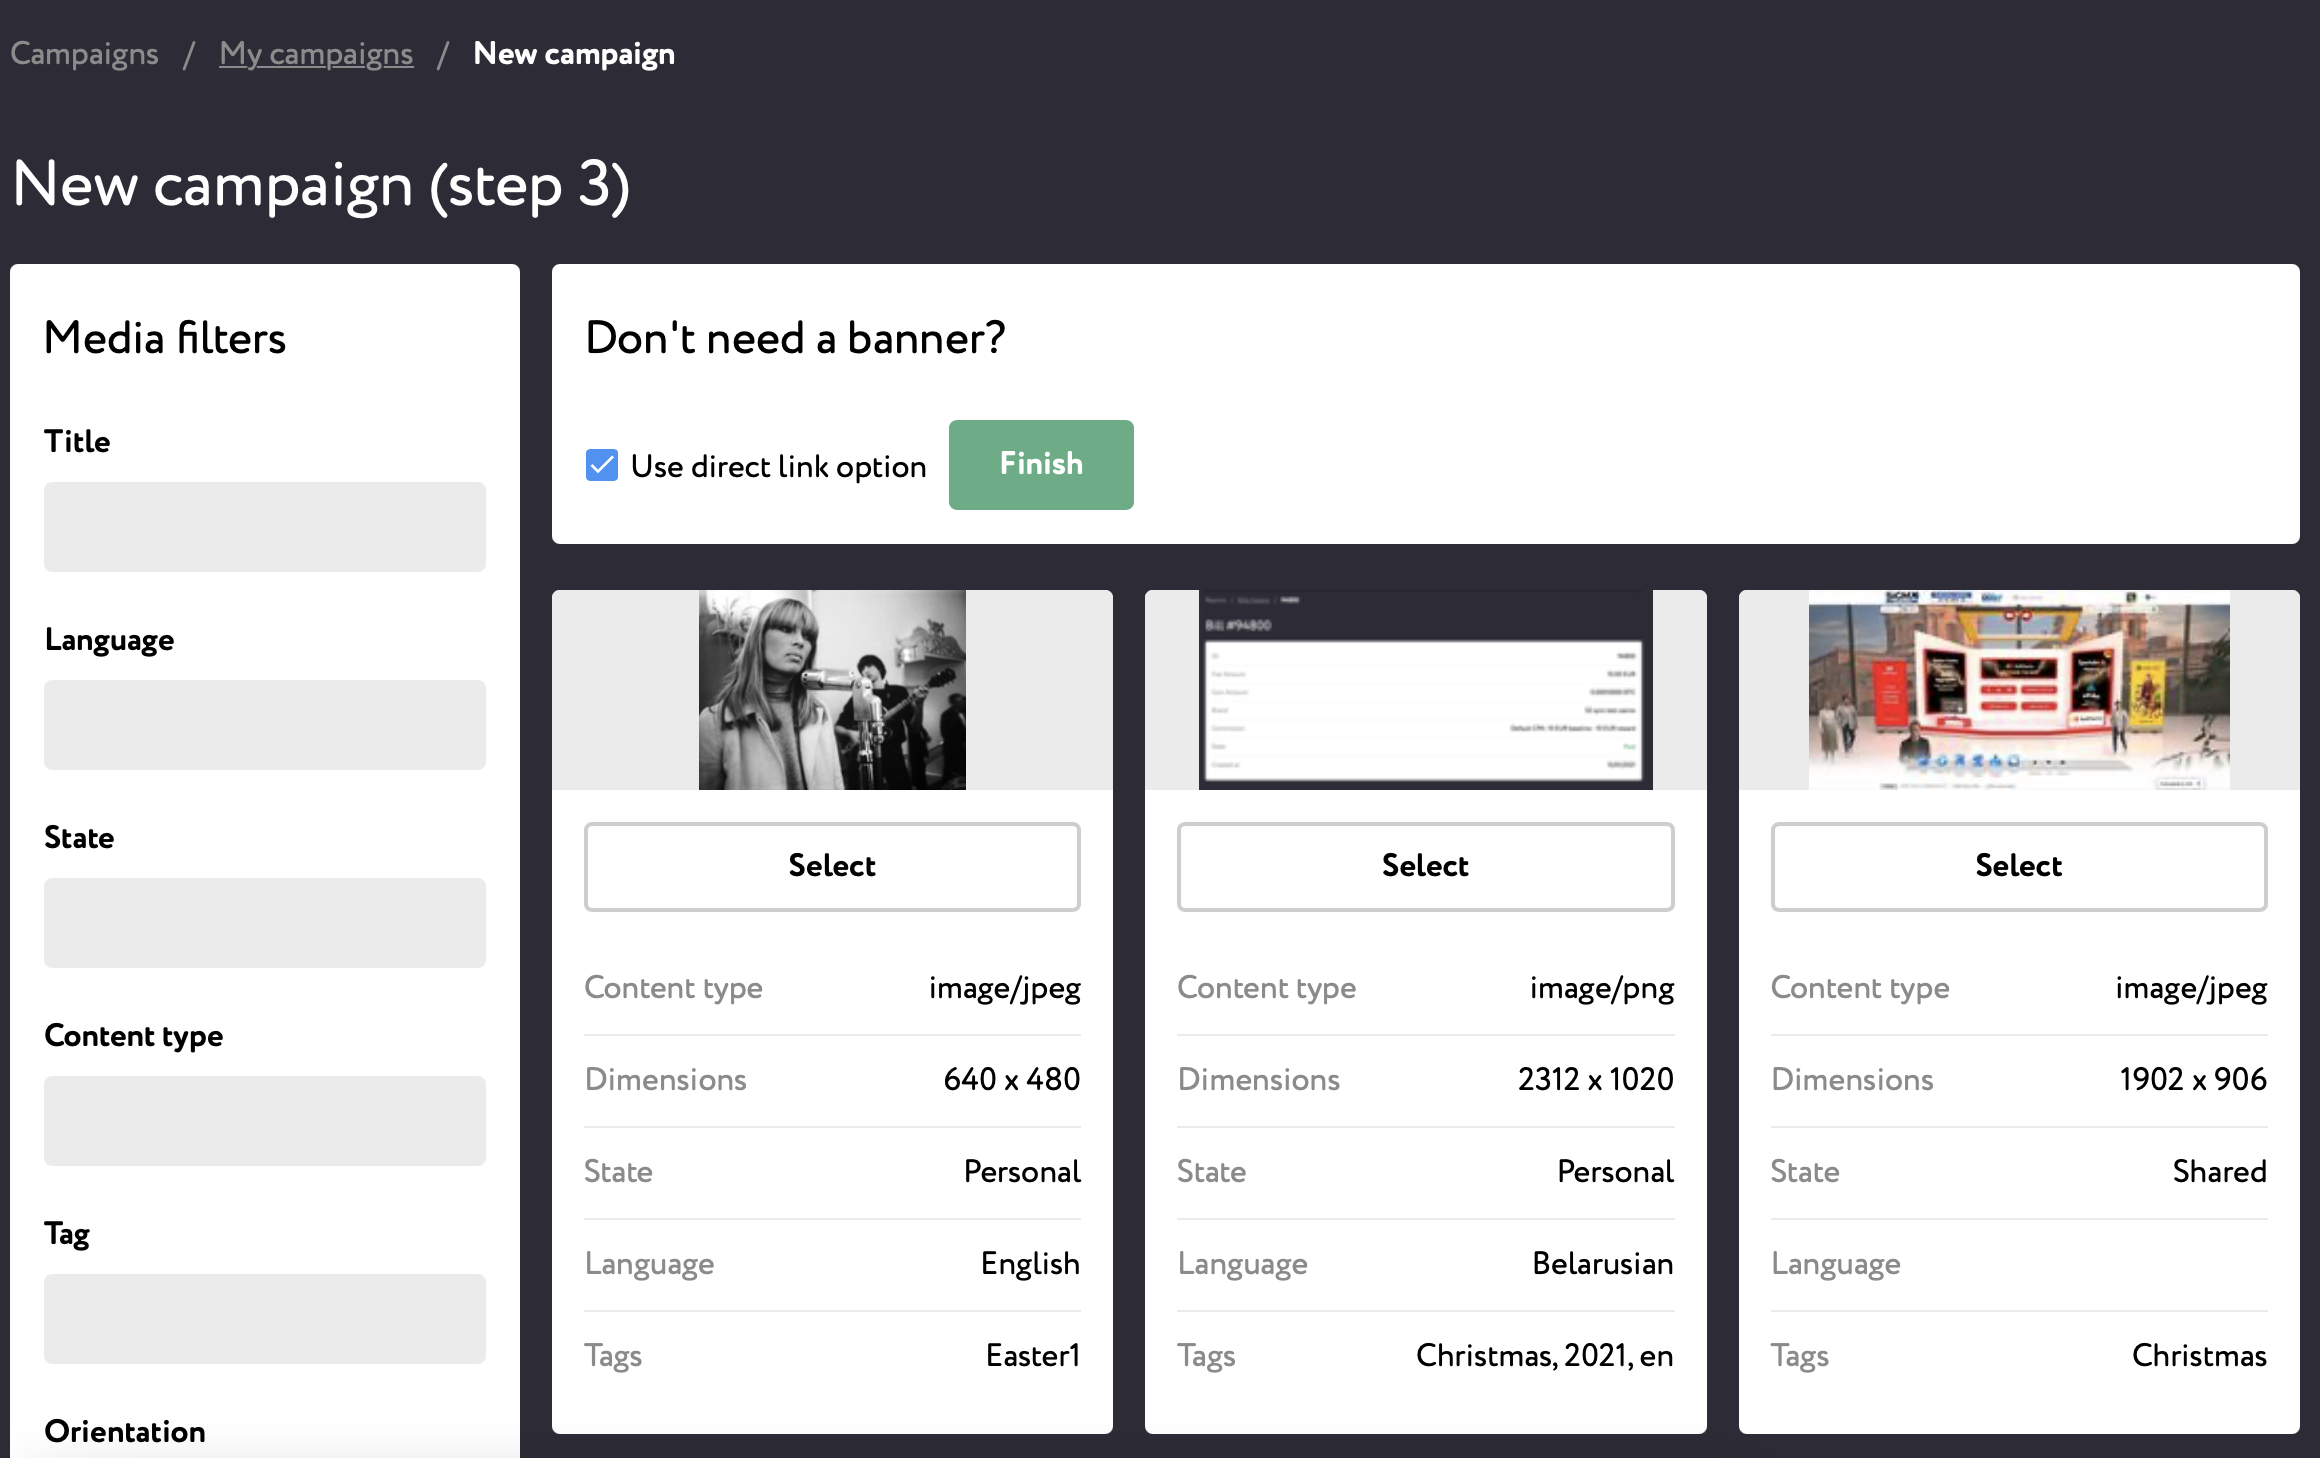
Here you can select the banner which will be part of your tracking link.
If you know what kind of media you're looking for, apply the corresponding filters on the left. The Filters include: title, language, country, tag, file format, privacy state, image resolution, file orientation. Apply the required filters and press "Filter" button at the bottom of the filter pane.
Select the banner on the right.
If you want it to be a direct link without a banner, choose the "Direct Link" option above the banner gallery.
Press "Finish". Your campaign and tracking link are created.
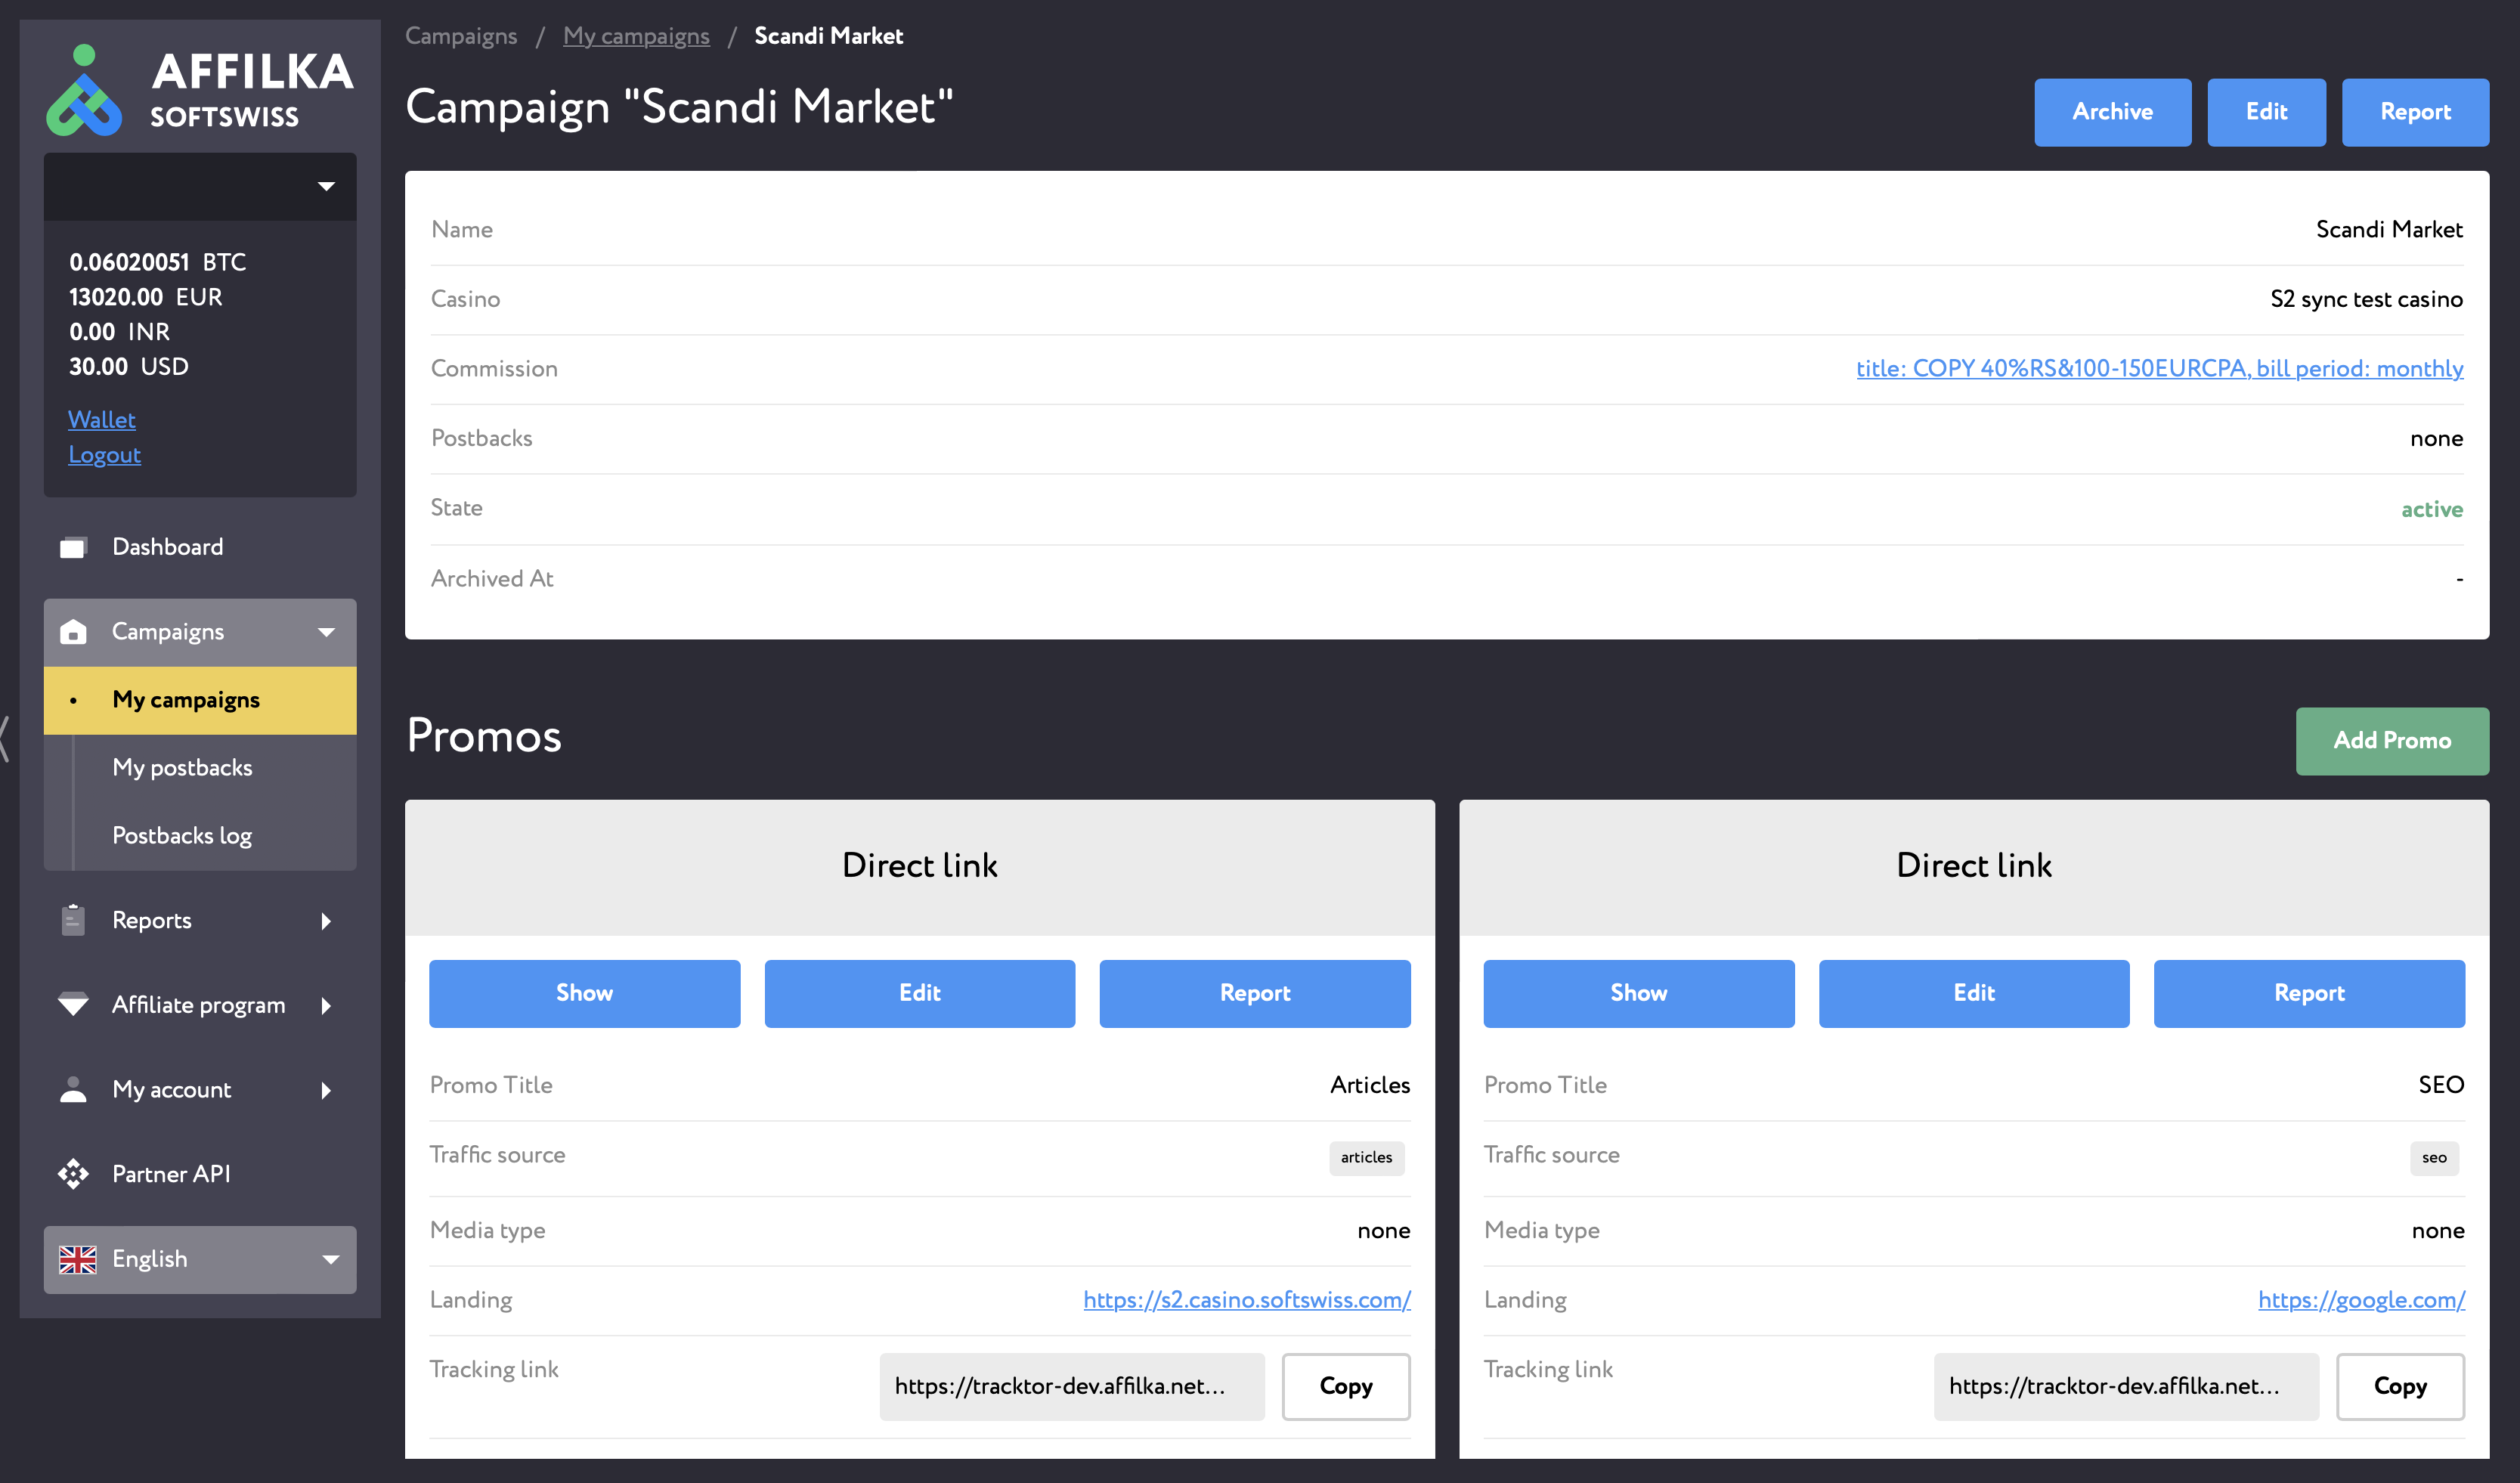
You will see your "Tracking link" on the detailed campaign page in the "Promo" card. Copy the tracking link, paste it on your website and start promoting.
¶ Get Tracking Link & Start Promoting
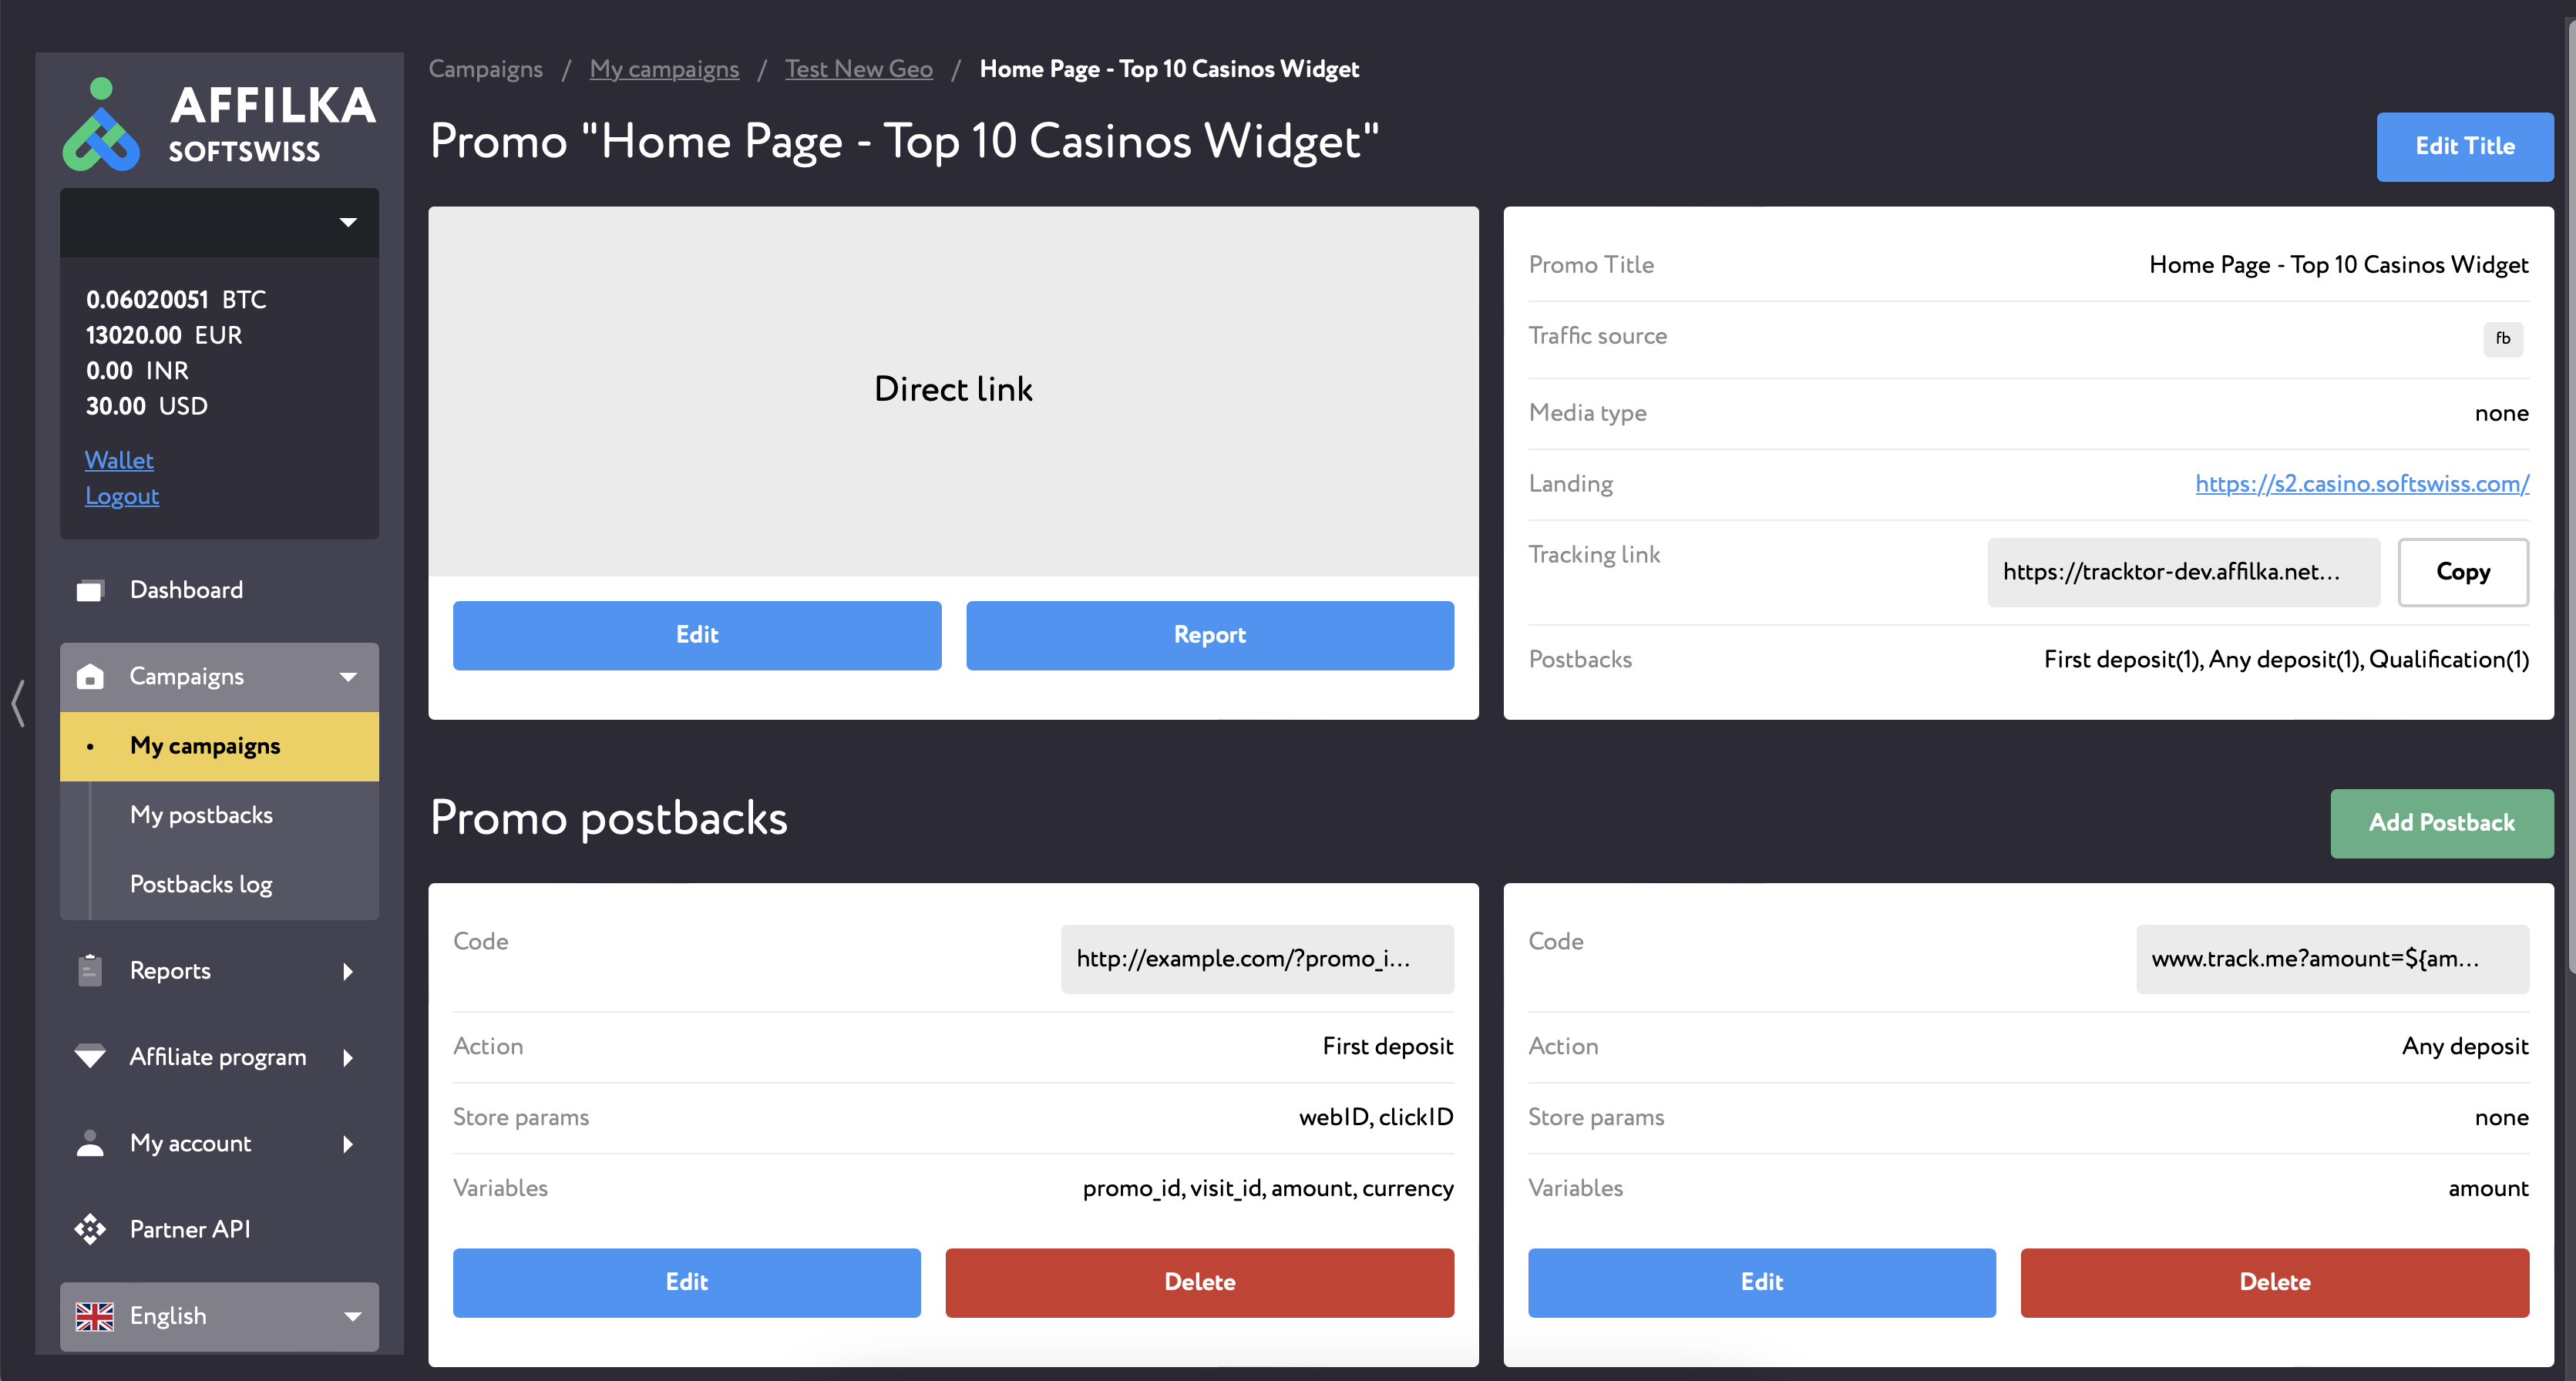
Every "Promo" inside every "Campaign" contains a tracking link which you can use to refer players or sub-affiliates. To extract a tracking link, all you need to do is choose a specific campaign from the list and go to a Detailed Campaign page by clicking on the "More info" button. Here you will see all Promos created for this Campaign and their tracking links. You can copy them, paste on your website and start referring traffic.
¶ Add More Tracking Links into Campaign
To add a new promo (which always means a new tracking link), you can go to a list of campaigns, find the required campaign and press the “Add promo” button next to its name. Or you can go to a detailed campaign page, and press the "Add Promo" button on a detailed campaign page..
Complete steps 2 and 3 described above to configure your promo and press "Submit".
As soon as it is created, you will be taken to a Detailed Promo Page where you can copy the tracking link, change the title of your promo, configure postbacks.
Archive a Campaign
You can archive any campaigns that you no longer wish to use to declutter your active campaigns list.
As soon as you archive a campaign, the following behaviour is applied:
- New promos cannot be created in this campaign, old promos cannot be edited. Old promos continue to be functional (redirects through old referral links still work);
- Campaign Title and Promo Title can be edited;
- New postbacks cannot be created within this campaign and its promos. However, old postbacks continue to be triggered but cannot be edited/deleted.
- The campaign acquires a special State – Archived.
To archive a campaign, click on the “Archive” button in the top right corner of the detailed campaign page.
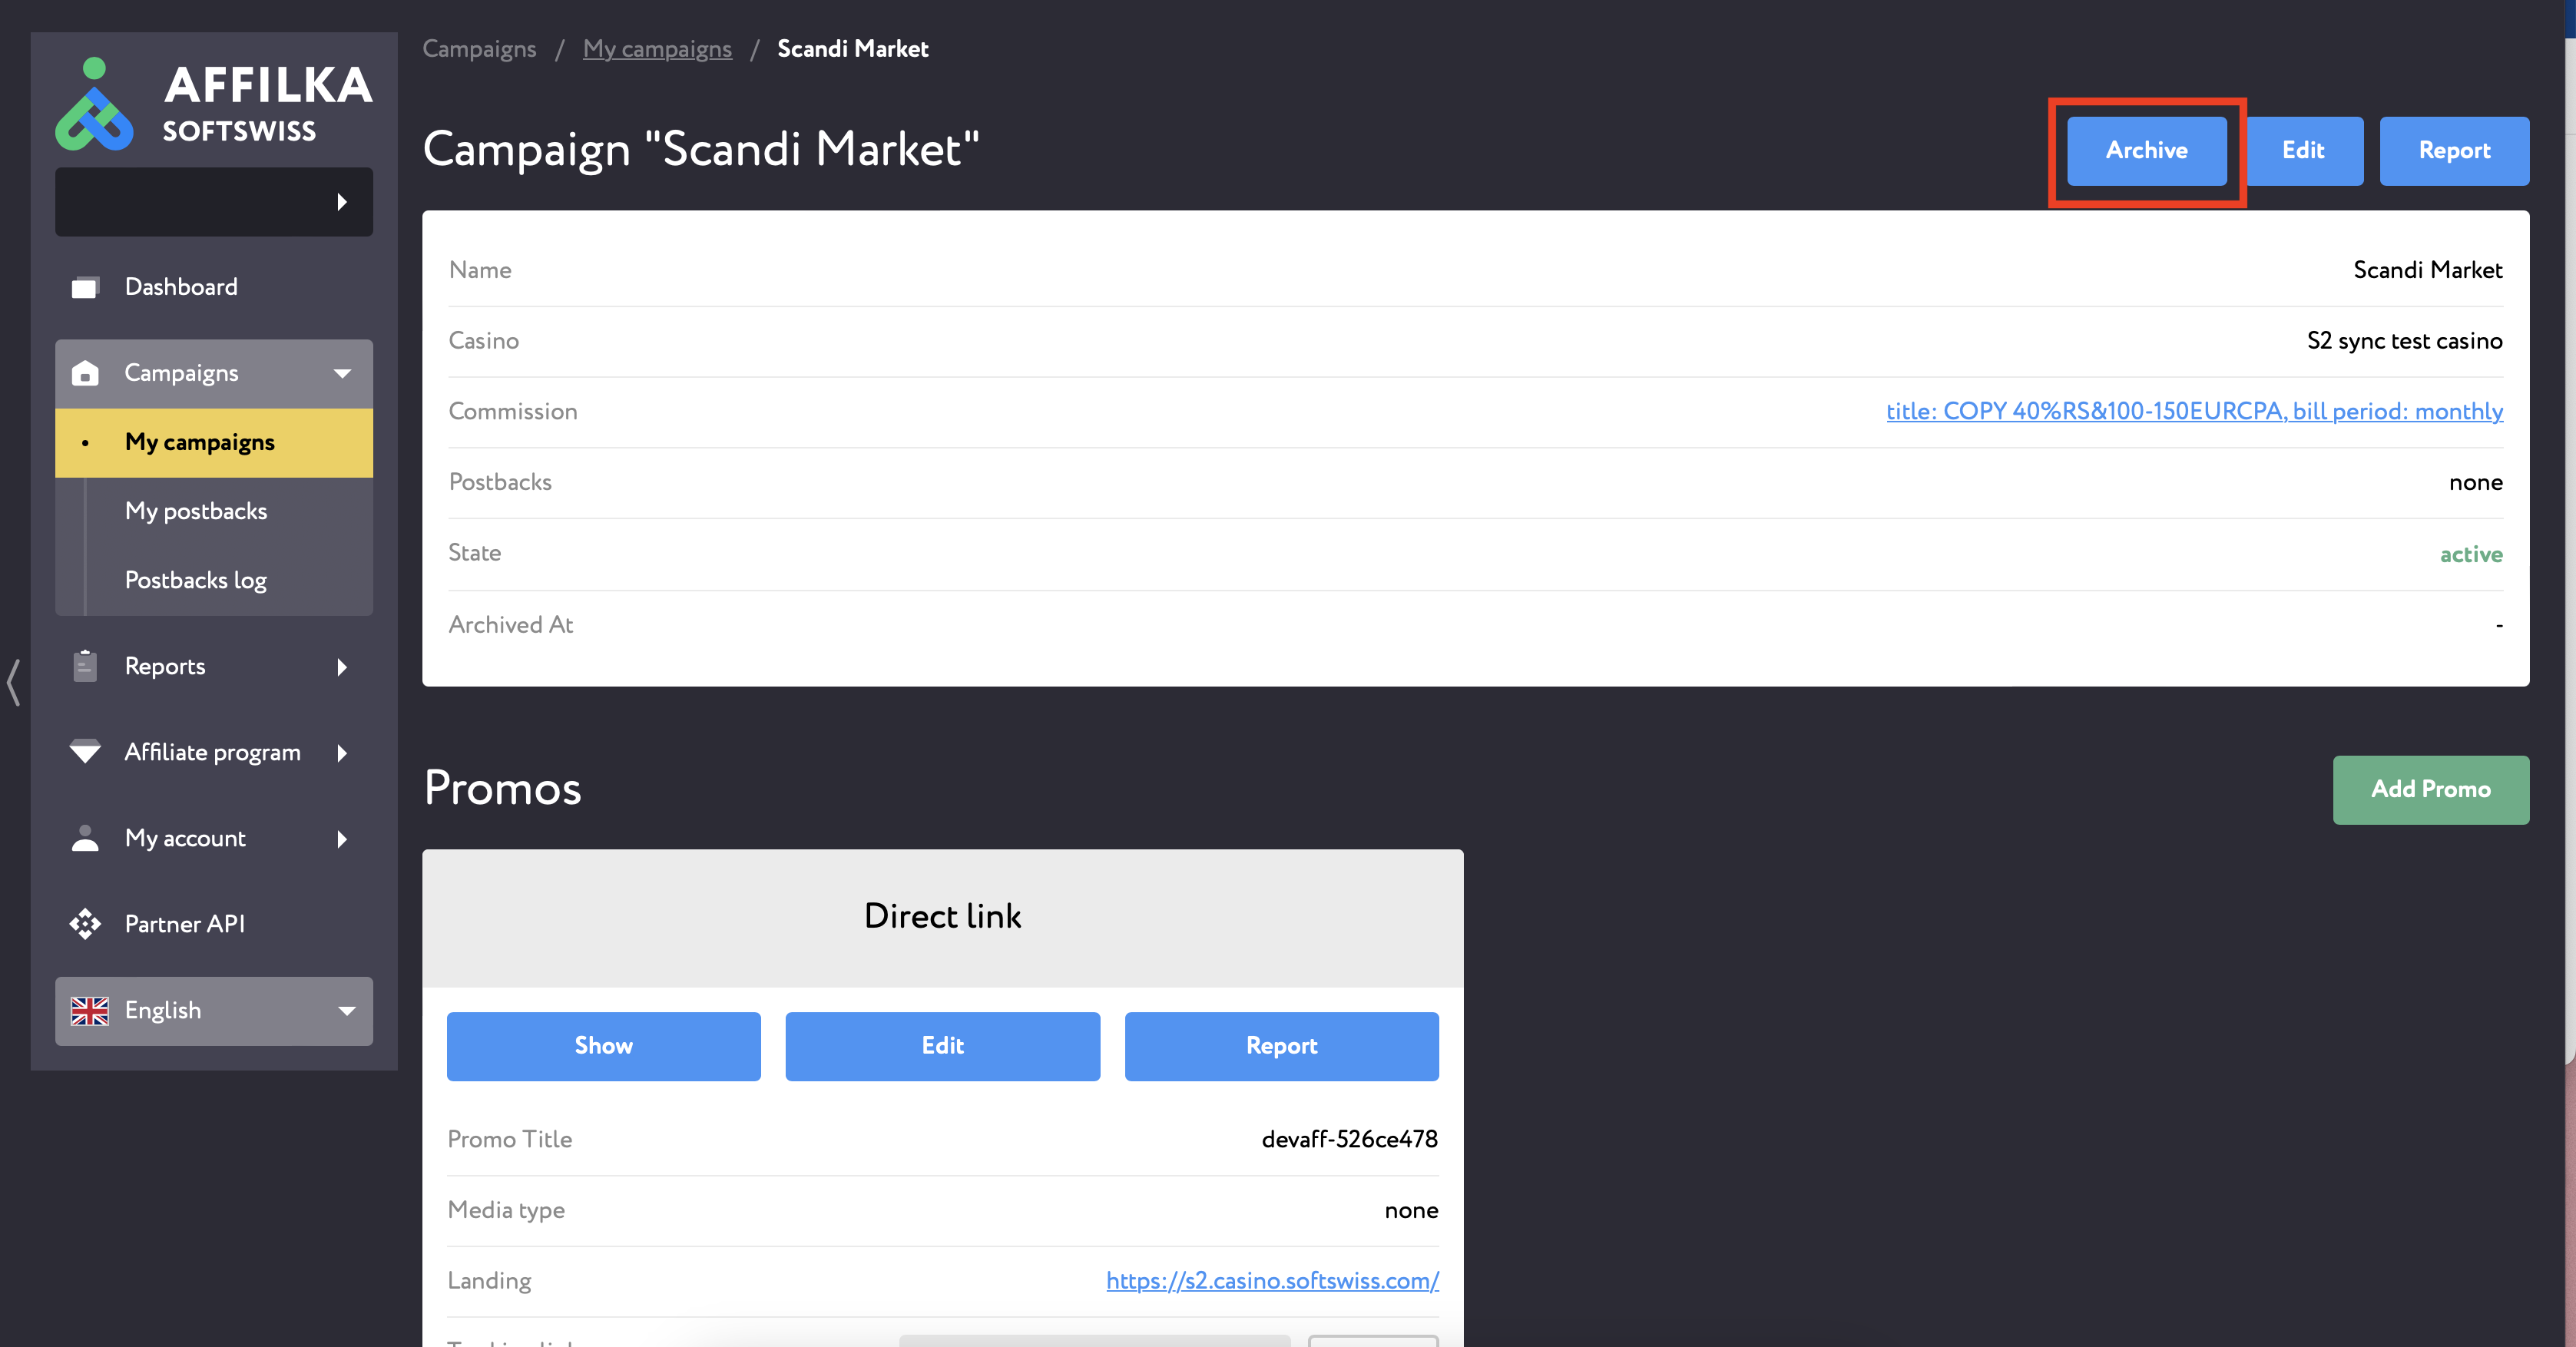
The Archivation action can be undone:
You can unarchive the previously archived campaign by clicking on the "Unarchive" button. As soon as you do that, you will once again be able to create new promos, edit old promos, add/edit postbacks. After the campaign is unarchived it transitions into the "Active" state.
¶ Indicate Traffic Sources for Tracking Links
Traffic sources refer to the various channels or methods that you use to guide visitors to a website. These include SEO, social media, email marketing, paid advertising, etc.
You can indicate which traffic source you will use, when creating a campaign, adding a promo to an existing campaign or editing an existing promo. You will see the list of available options in the dropdown selector.
Please, note! Once indicated, the traffic source can't be changed. If you leave the field empty, you can add it later on. Only one traffic source can be indicated for one referral link – you cannot use several traffic sources for the same link, you need to distinguish them.
¶ My Promos: List of Tracking Links
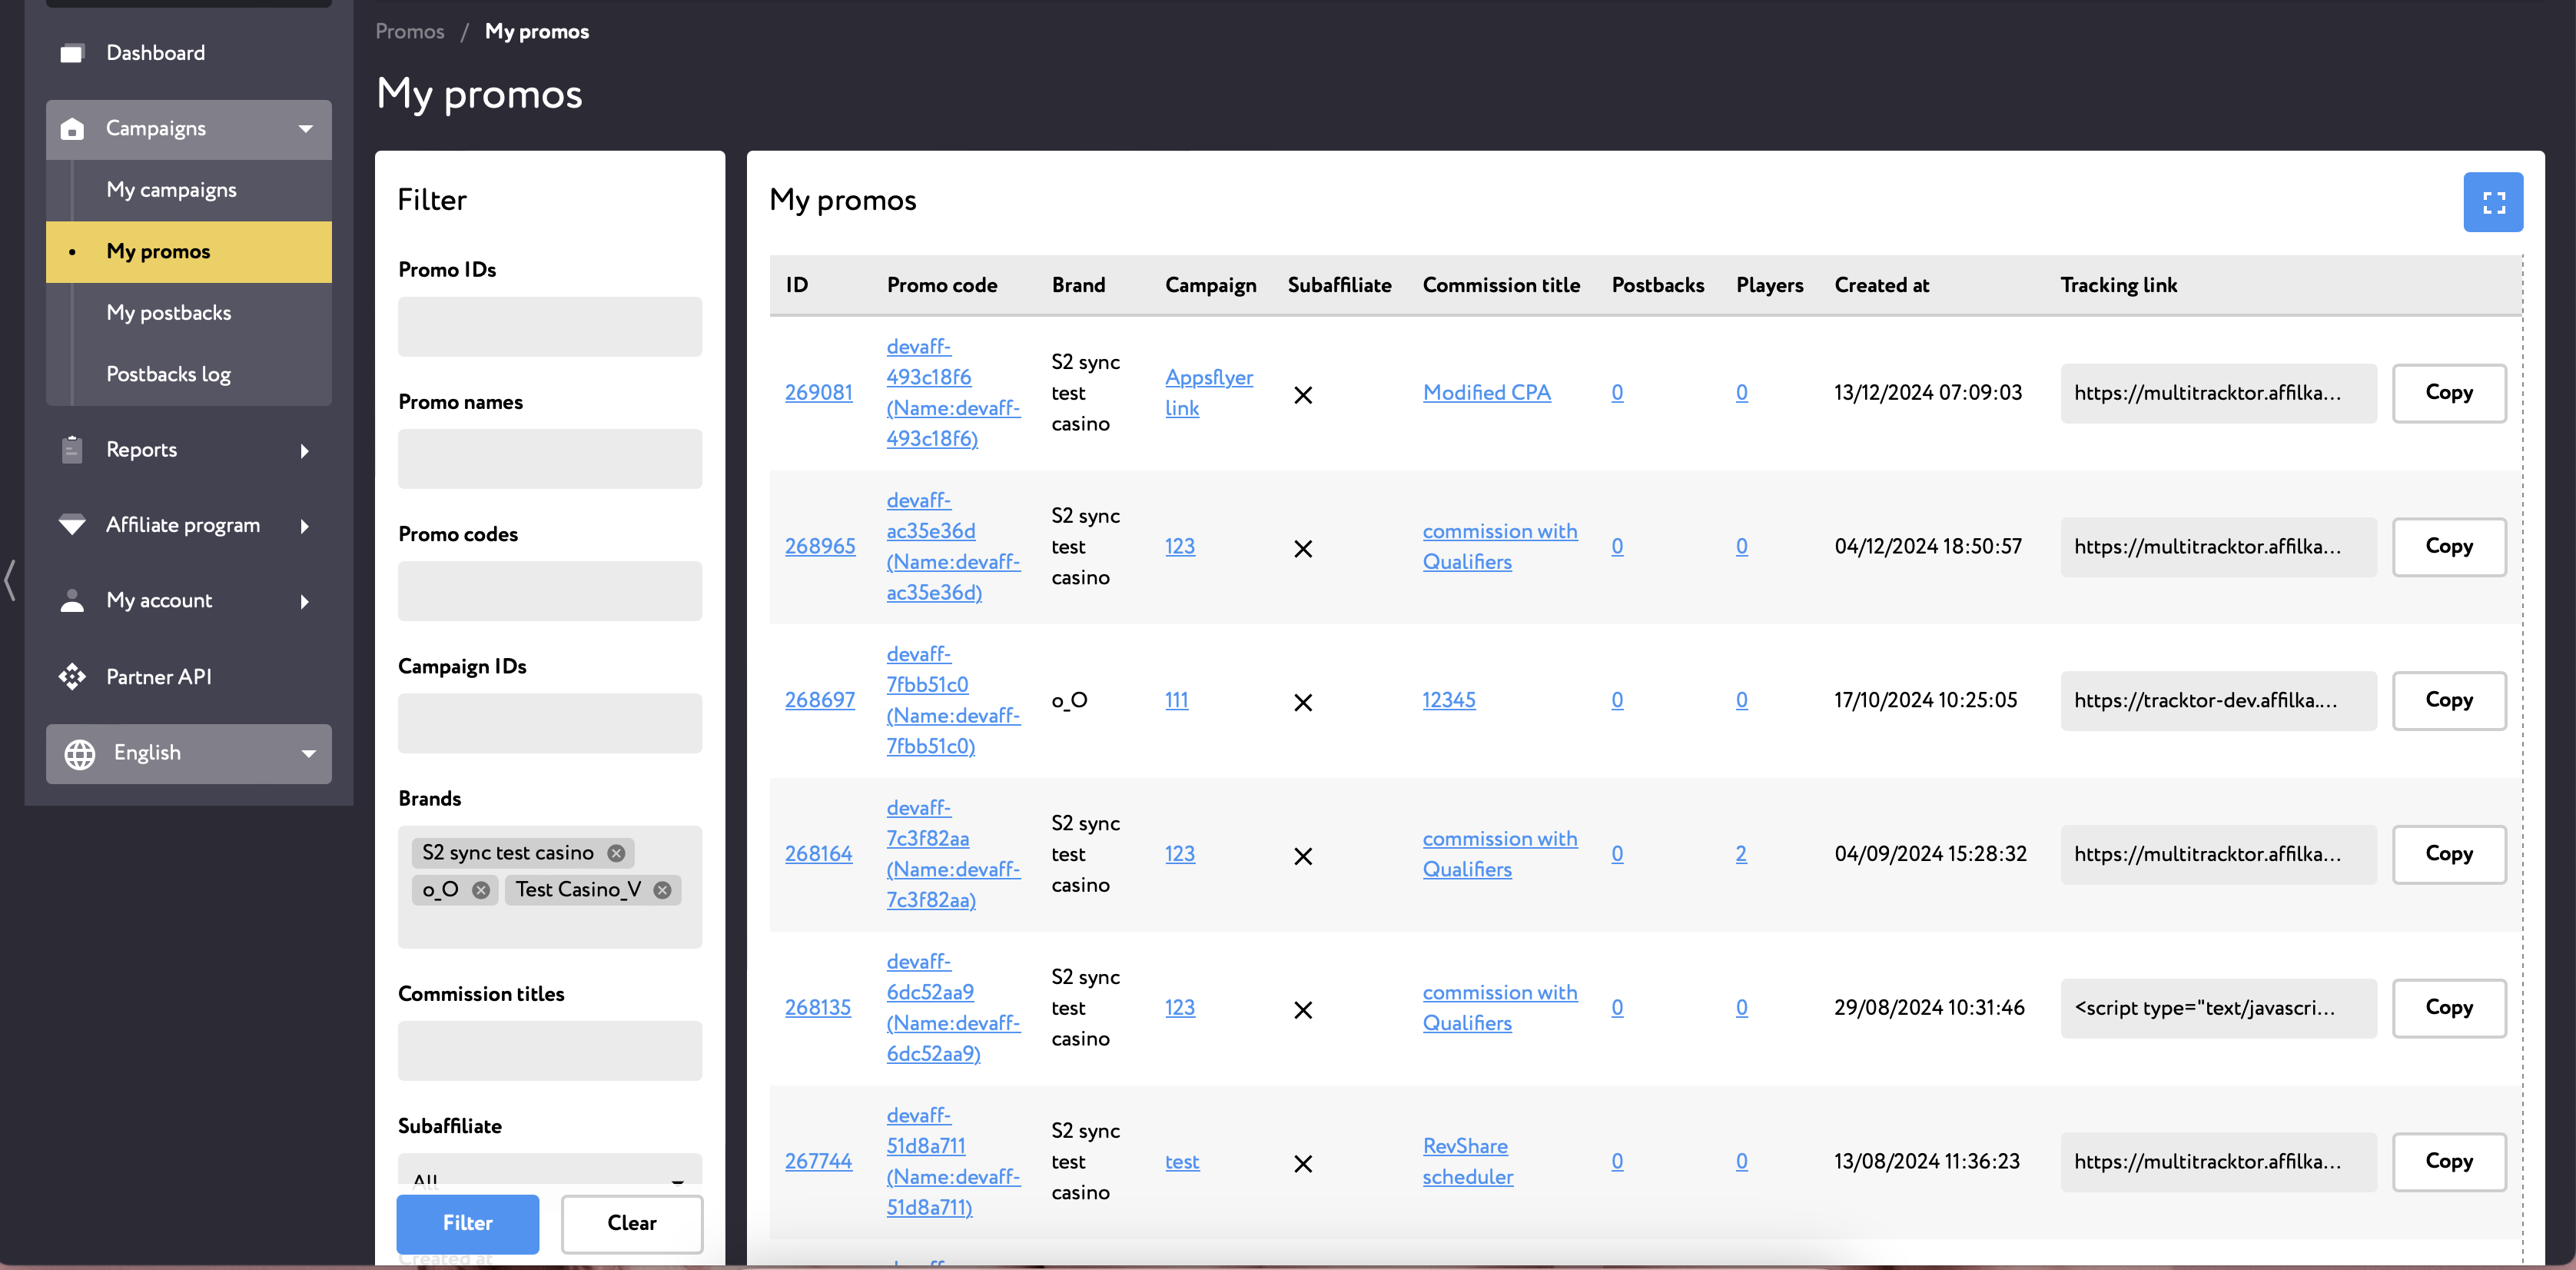
You can view the full list of all your tracking links on the “My Promos” page (/partner/promos) in the “Campaigns” tab. You can filter and find tracking links by their IDs, names and codes, by the Campaign IDs to which the tracking links belong, by the Commission titles linked to these tracking links, by the Brand they are promoting, by the creation date, as well as by their type – Subaffiliate or not.
From this page you can copy your tracking links, you can add postbacks specifically for the tracking links in question as well as edit them (change their destination landing and media, if used).
¶ My Postbacks
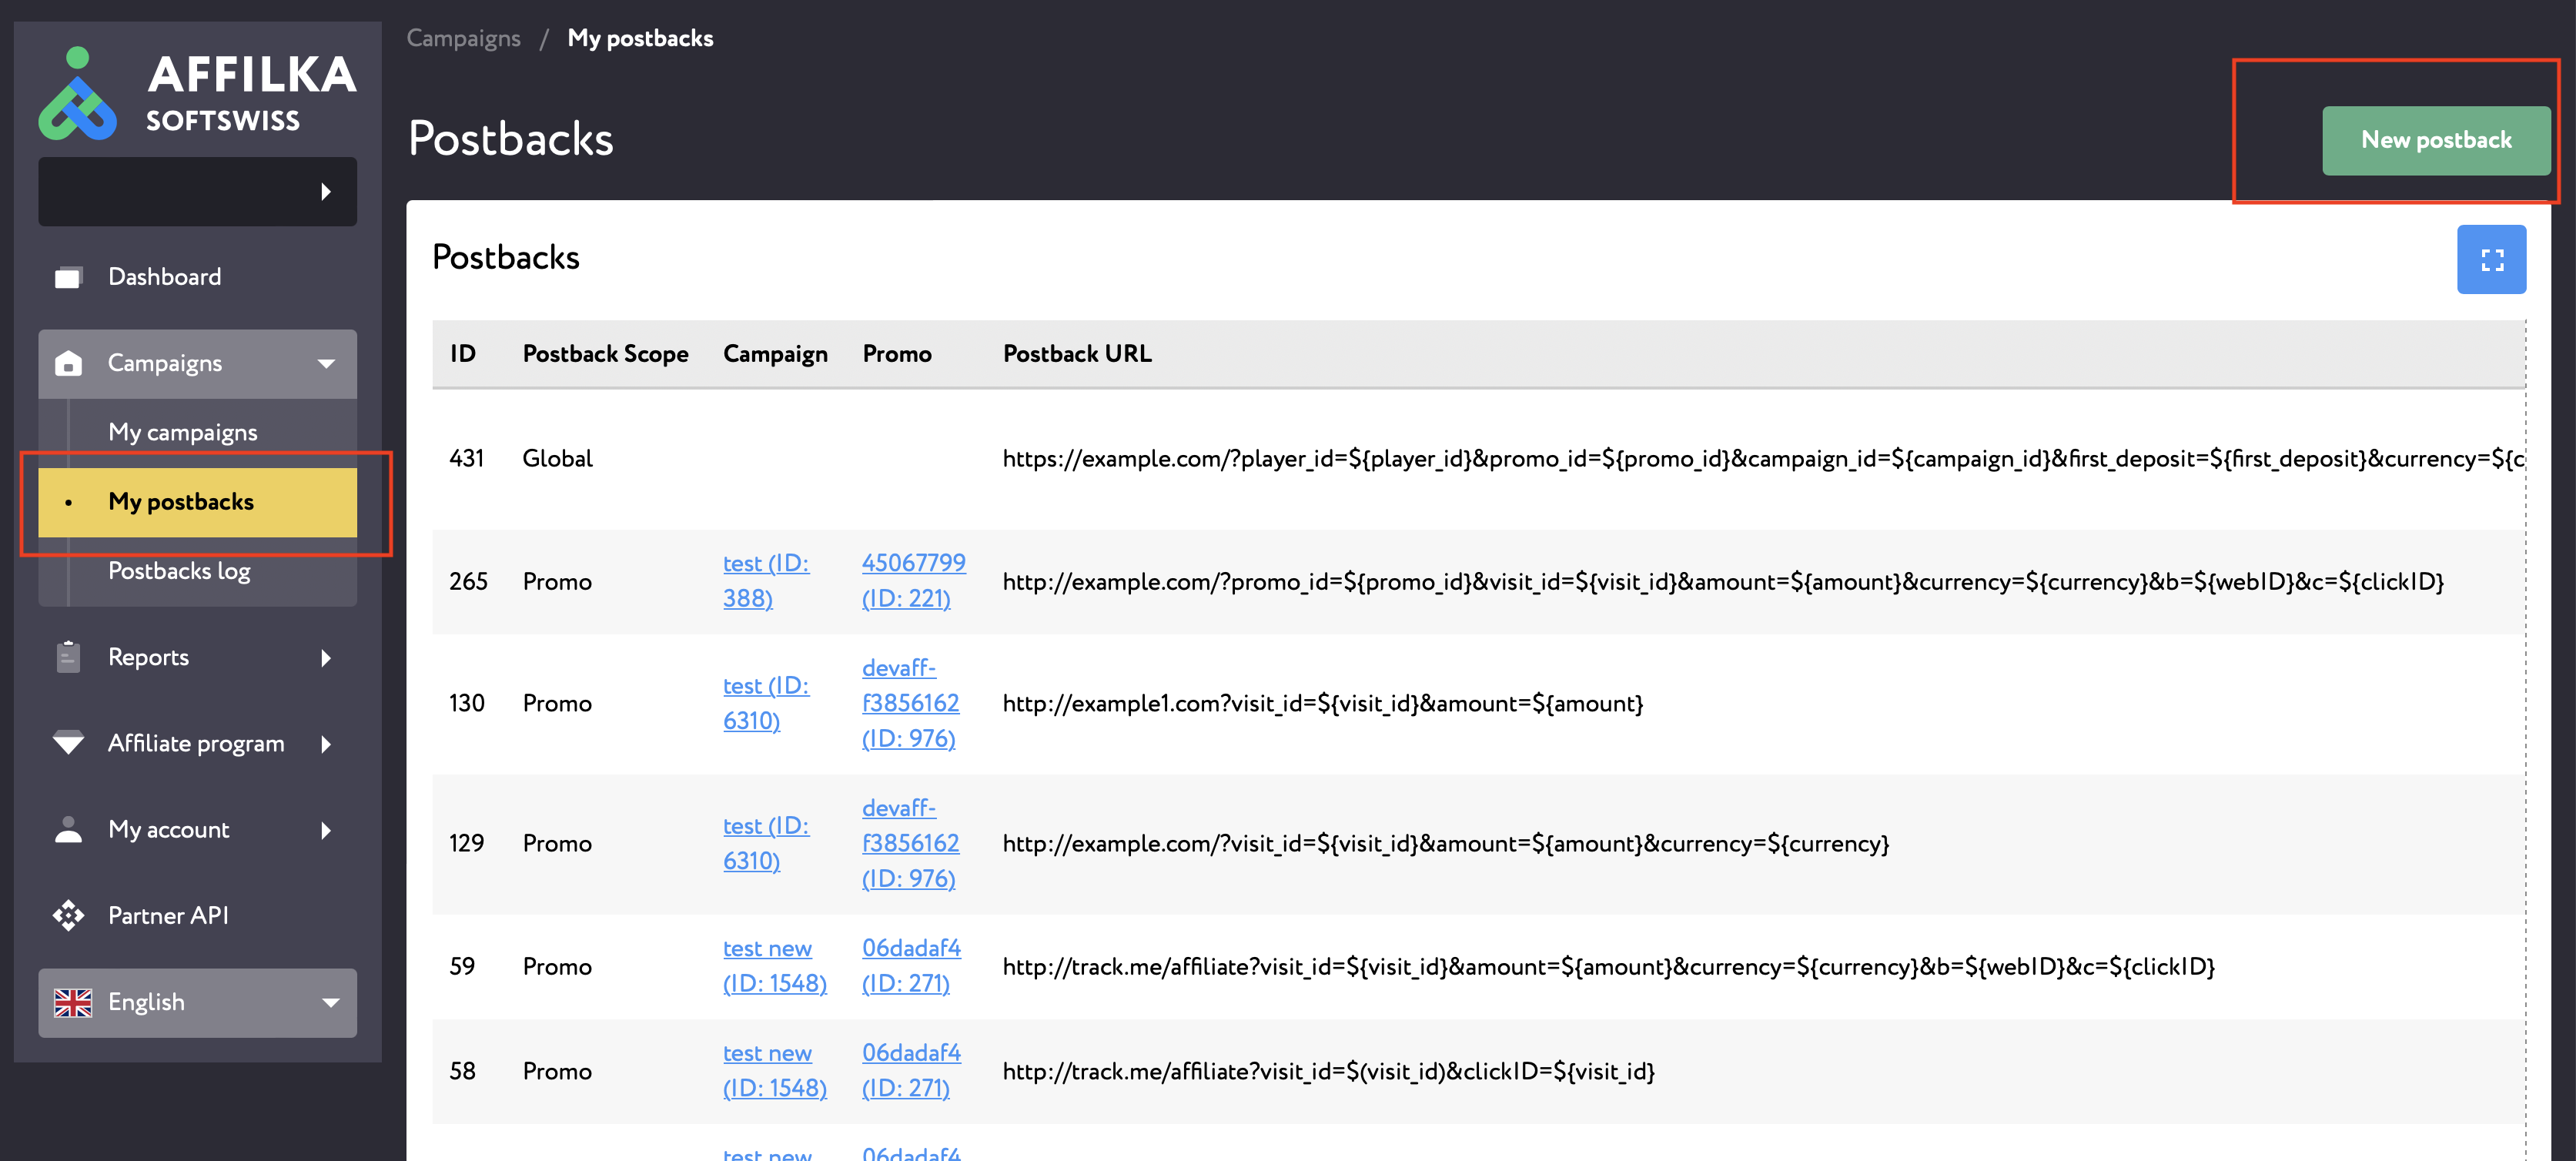
You can view the list of all postbacks you have created on the My Postbacks page (/partner/postbacks) in the "Campaigns" tab. You can also create new postbacks, edit and/or delete them on this page.
In Affilka postbacks can be set up on account, campaign and promo level.
- a global postback will be triggered on an account level;
- a campaign postback will be triggered for specific campaigns;
- a promo postback will be triggered for specific promos.
¶ Postbacks Configuration
You can create all postbacks types on the /partner/postbacks page. Campaign and Promo postbacks can also be created from the corresponding detailed Campaign and Promo pages.
¶ Create Postbacks on the “My Postbacks” page.
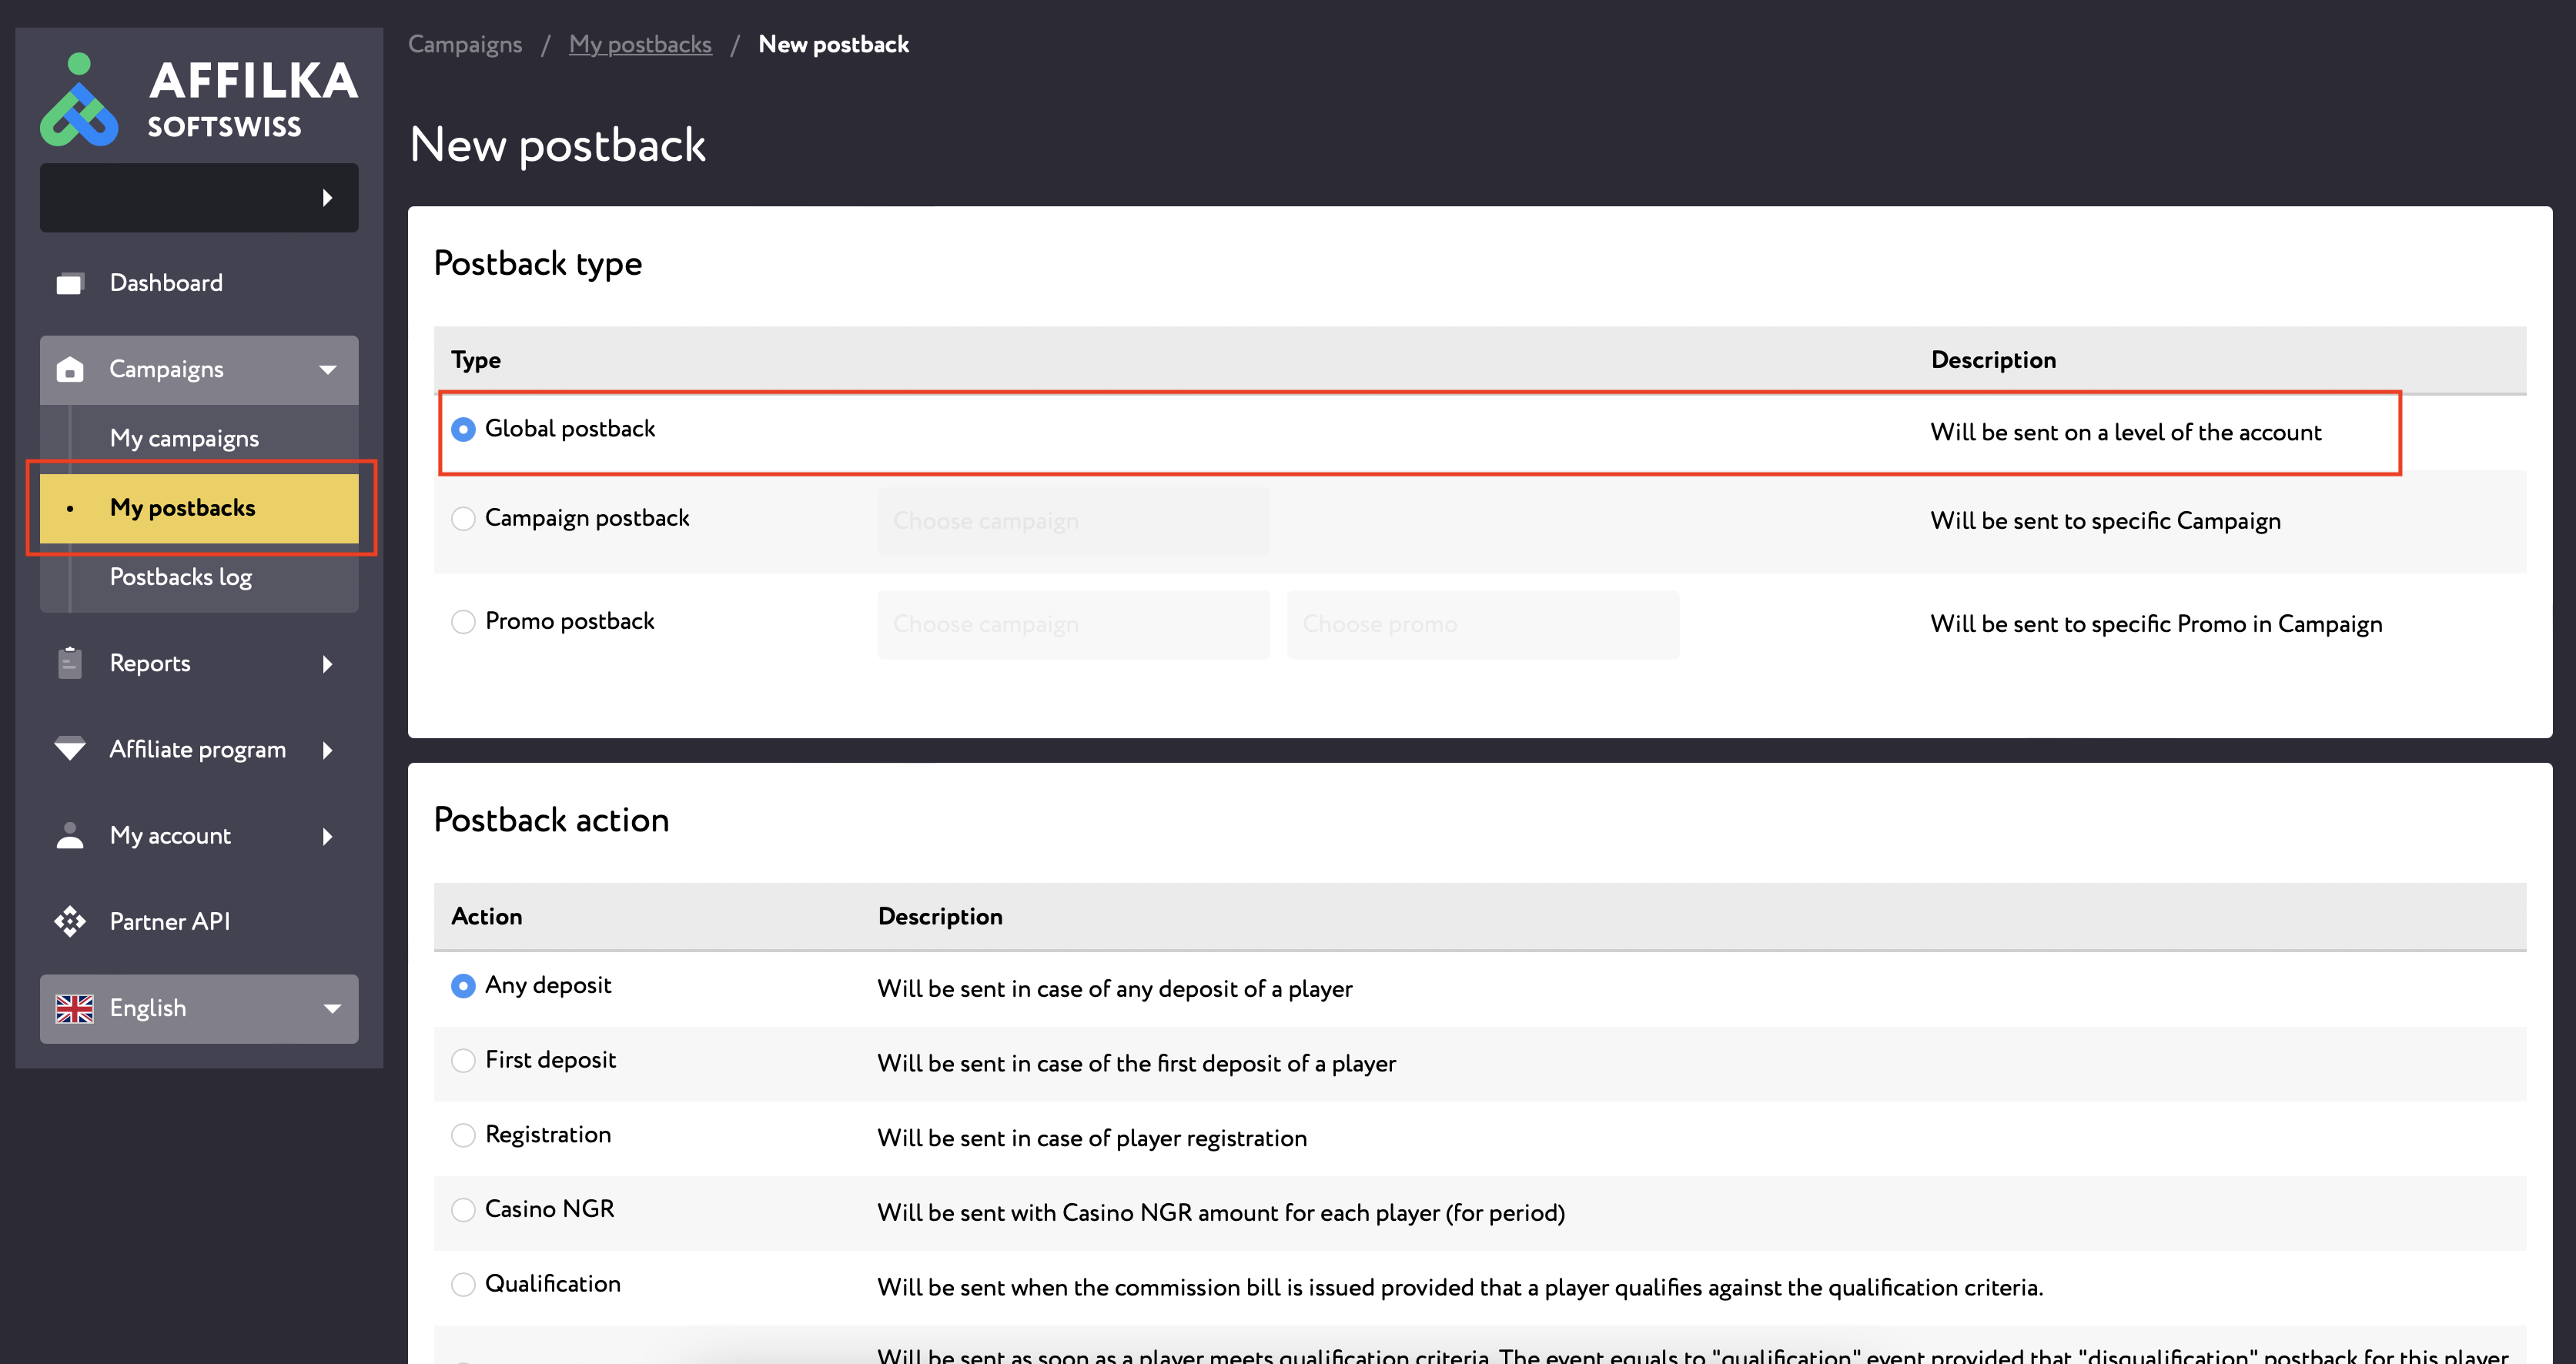
1) To create a postback on the /partner/postbacks page, press on the "New Postback" button in the top right corner of the page and choose the scope to which the postback will be applied:
- global postback will be triggered on an account level;
- a campaign postback will be triggered for specific campaigns; You will need to indicate a specific Campaign ID here. The input field will automatically suggest the campaigns for selection.
- a promo postback will be triggered for specific promos. You will need to indicate a specific Promo ID here. The input field will automatically suggest the promos for selection. If you do not type a Campaign ID but add a Promo ID, the Campaign ID to which the Promo belongs will be automatically filled in for you.
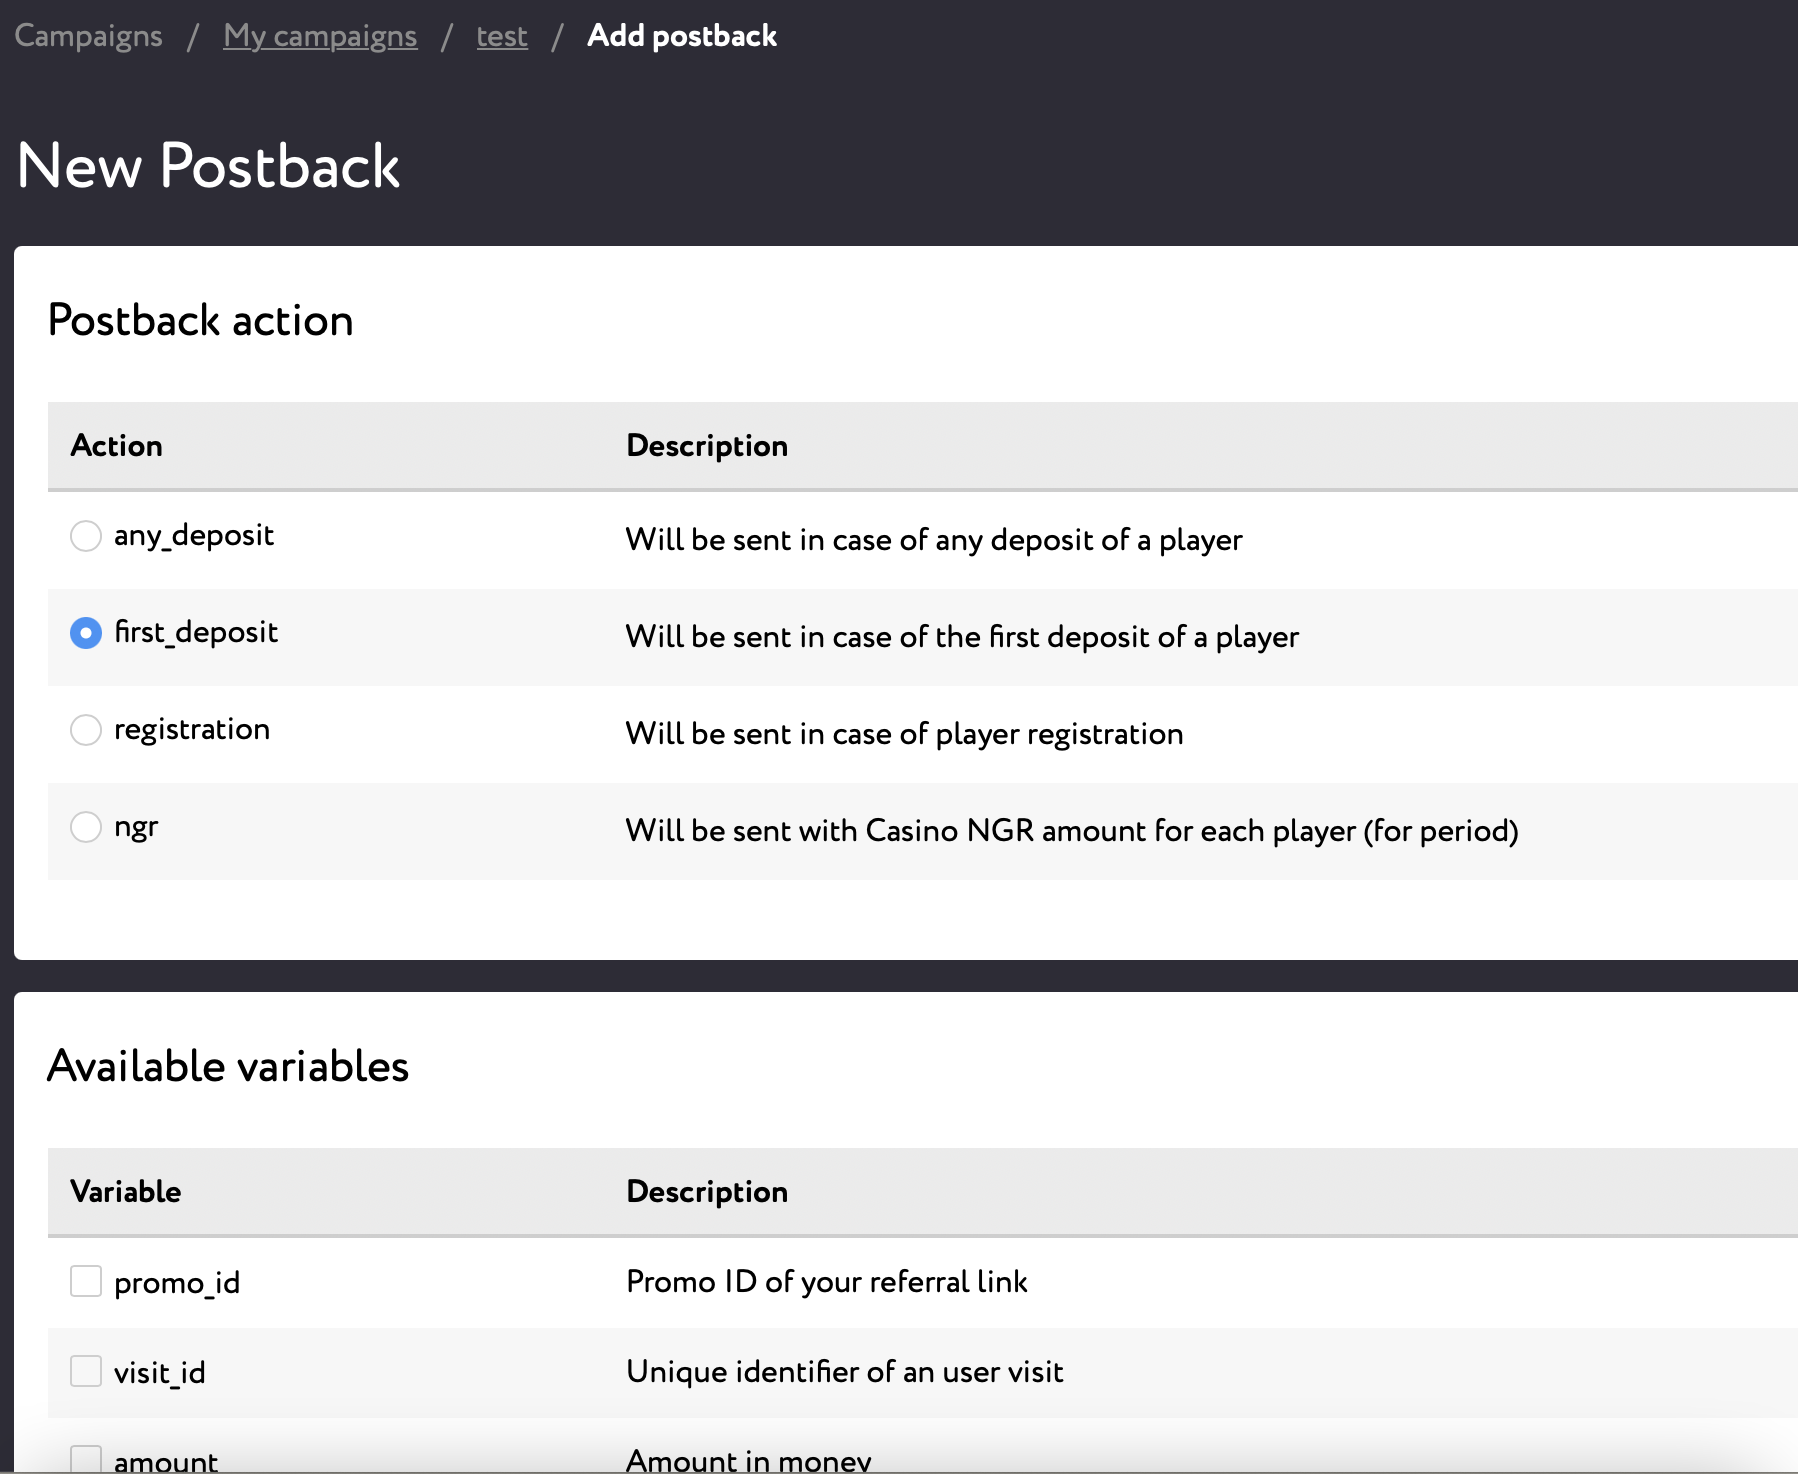
2) Select the postback action which you want to track. For example, first_deposit
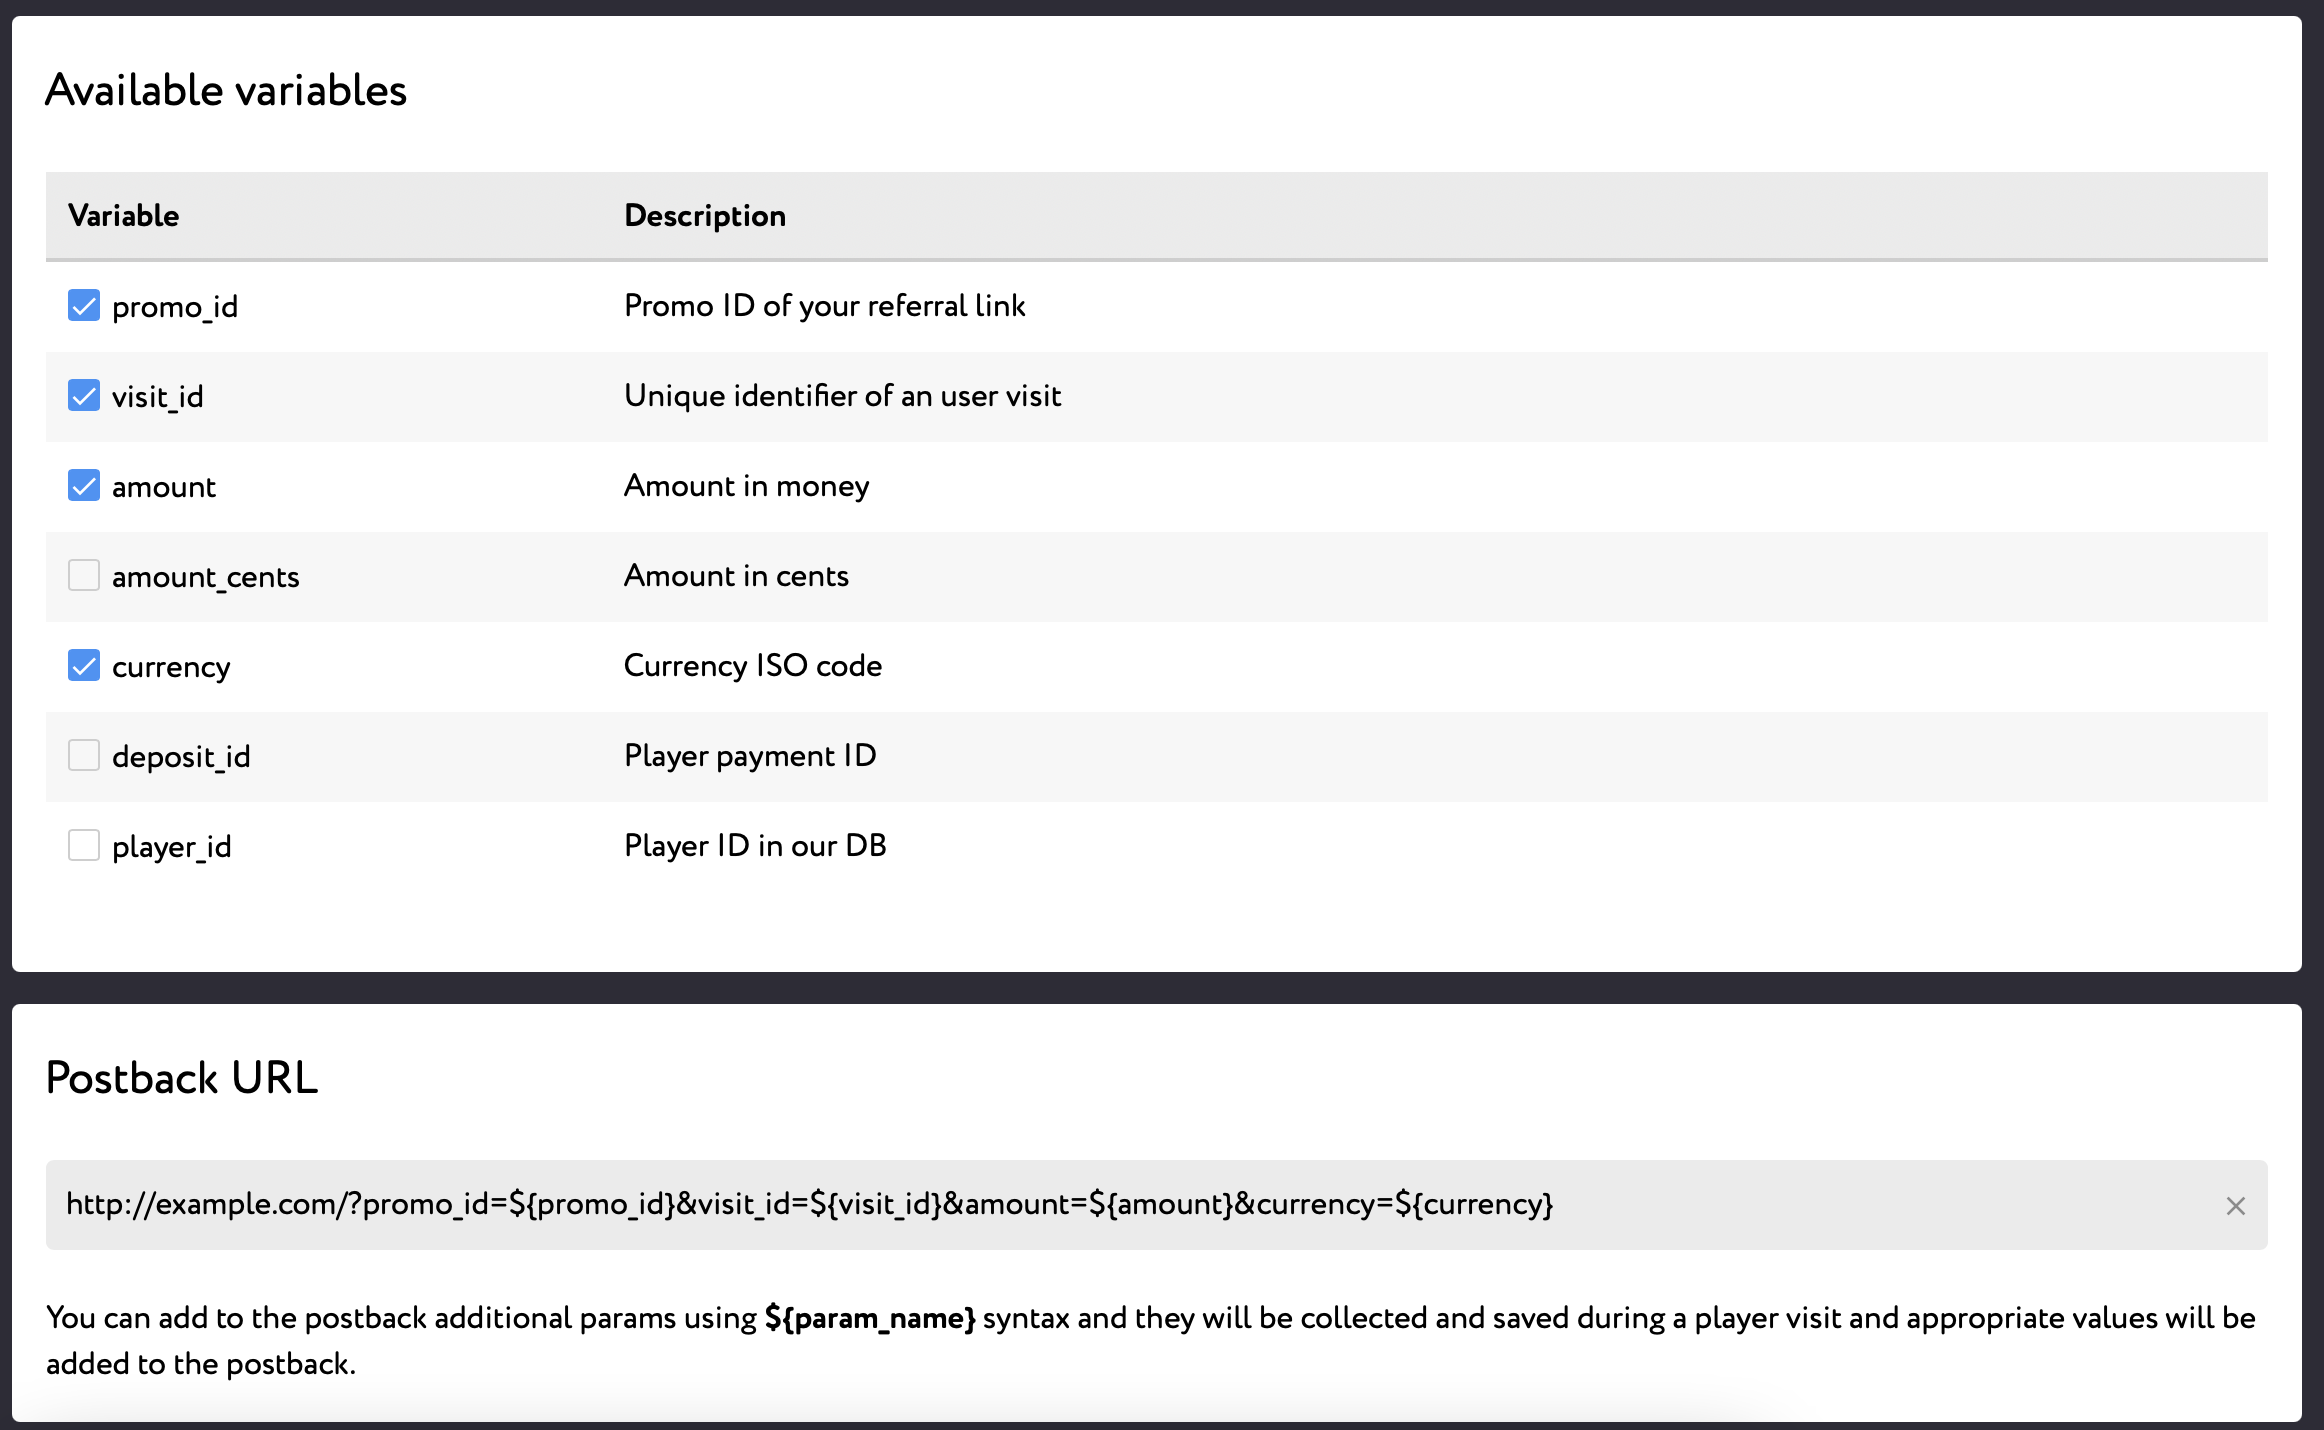
3) In the Postback URL field indicate the URL of your tracking system. It will receive the info from the affiliate program server whenever the selected event occurs. Let us imagine, that your affiliate tracker is located at http://example.com
4) To add the variables that you want to receive with this postback, simply click on them and they'll be added to your postback url. Example: http://example.com?promo_id=${promo_id}&visit_id=${visit_id}&amount=${amount}¤cy=${currency}. If you're configuring a Global postback, you may want to include such variable as "promo_id" and "campaign_id" in your Postback URL to be able to differentiate between different promos and campaigns.
This is a format for encoding keys and their corresponding values. All key-value pairs are separated by an '&' character, and each key is separated from its value by an '=' character.
¶ How to add custom parameters to a postback?
Let us imagine a situation where an affiliate wants to send additional parameters to the affiliate program from their tracker (for example, Campaign ID and Source name) and then receive postbacks with these parameters. Such parameters are not offered by default by our affiliate system so they need to be filled in by an affiliate manually during the postback url configuration.
To add a custom parameter you need to add a key-value pair to the url according to the following syntax: param_name=${param_name} where param_name is your parameter key and ${param_name} is its value. Let's consider the above url example and additional custom parameters webID and clickID. The postback URL with such parameters may look as follows:
http://example.com?promo_id=${promo_id}&visit_id=${visit_id}&amount=${amount}¤cy=${currency}&b=${webID}&c=${clickID}

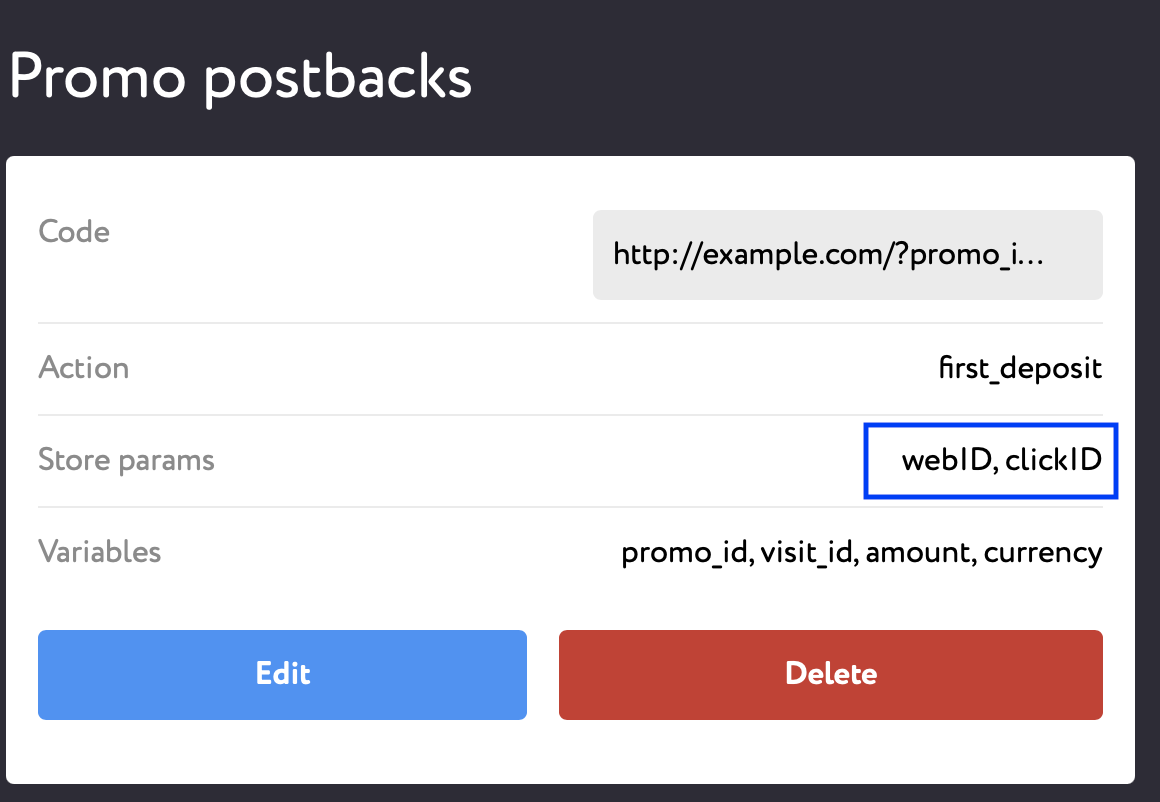
We will store these parameters in our system for the configured postback and will return them to your tracker with a postback once the event is triggered. Of course these parameters have to be familiar to and readable by your tracker.
¶ How to add custom dynamic parameters to a unique affiliate tracking link?
If an affiliate wants to send additional parameters to the affiliate program from their tracker and then receive postbacks with these parameters, these parameters need to be added to the tracking link as well.
After creating a promo for a specific campaign, an affiliate receives a tracking link. Custom parameters need to be added to this link.
Let's imagine that the unique affiliate tracking link looks like https://casinoreferdomain.com/e4567do
And the custom parameters to be passed, stored and then returned with a post back are {webID} and {clickID}.
The tracking link should look like:
https://casinoreferdomain.com/e4567do?webID=12345&clickID=67890 , where 12345 is the value of the webID parameter and 67890 is the value of the clickID parameter.
¶ You haven't received a post back. Why?
There can be several reasons for that.
1) Players haven't been synced with the affiliate program yet.
Depending on the integration implementation, players can be synced with the affiliate program every 15 minutes, once an hour, once in every couple of hours, or once a day.
So if you tested a registration or a deposit (or any other action for which the postback was configured), you will not receive a postback immediately, you will need to wait till synchronization start. You can get more details from your affiliate manager.
As for the qualification postback, this postback is only sent when a player is qualified. Player qualification happens according to commission schedule plans (in other words, when the system starts calculating your commission rewards). If you're paid daily, then qualification postbacks will be sent daily. If weekly, then one a week. If monthly, then once a month on the day your commission reward is calculated.
2) Postback isn't configured correctly. There's a syntax error.
If you used wrong syntax to configure a postback, it will not be sent. Compare the following examples:
| Wrong Syntax | Correct Syntax |
|---|---|
| http://track.me/affiliate?a={track_id} | http://track.me/affiliate?a=${track_id} |
| http://track.me/affiliate?b=$[visit_id] | http://track.me/affiliate?b=${visit_id} |
| http://track.me/affiliate/c=${clickID} | http://track.me/affiliate?c=${clickID} |
3) You might be sending corrupted values within the tracking link.
Imagine that you send your custom parameters within the referral link, e.g. transactionid. You add this parameter to the referral link but the actual value which is received, stored and sent by our system may be corrupted.
Compare:
Corrupted Tracking Link
https://casinopartners.com/e4567do?transactionid=%/n/h3D1021df233
Correct Tracking Link
https://casinopartners.com/e4567do?transactionid=3D1021df233
4) You might have made errors both in the tracking link and postback configuration.
Imagine that you send your custom parameters within the referral link to our system, e.g. publisherID. The correct ways to set up a tracking link and a post back using this dynamic parameter are:
Postback:
http://track.me/affiliate?b=${publisherID}
or
http://track.me/affiliate?publisherID=${publisherID}
or
http://track.me/affiliate?id=${publisherID}
in all these examples we store a parameter publisherID. It does not matter how you name the KEY (b, publisherID, id or whatever), we will only store the value which is indicated in the curly brackets.
Tracking link:
https://casinopartners.com/e4567do?publisherID=SOMETHING
or
https://casinopartners.com/e4567do?publisherID=[SOMETHING]
or
https://casinopartners.com/e4567do?publisherID={SOMETHING}
Here it matters how the KEY in the tracking link is named. If it does not correspond with the parameter stored in the postback in the curly brackets, we won't have a chance of knowing what parameter this is.
Compare:
1) you refer a player via https://casinopartners.com/e4567do?publisherID=12345 link. The player registers. The postback for player registration looks like http://track.me/affiliate?id=${publisherID}. We send the postback http://track.me/affiliate?id=12345 to you. You can then break down your traffic per different publisherID.
2) you refer a player via https://casinopartners.com/e4567do?btag=12345 link. The player registers. The postback for player registration looks like http://track.me/affiliate?btag=${publisherID}. We do not know what btag=12345 stands for. We do not store btag value. We store and send ${publisherID} value. So we send the postback http://track.me/affiliate?btag=${publisherID} to you. You can not break down your traffic per different btag , because we do not store this value and do not send it with postback.
¶ How it all communicates with affiliate's tracker
When you configure a postback URL for a specific promo, the referral link for this promo will not automatically include the dynamic variables you've indicated. You should place this referral link in the Offer section of the Tracker and at the Offer Page enrich the referral link with the required dynamic variables, still remembering to feature them all in the postback as well. The ultimate referral link, to test the conversion before you advertise the link, is normally placed in the Campaigns section of the Tracker and has a different view in comparison with the referral link from the Affilka platform.
Examples of successfully configured referral links and postbacks, which fired the dynamic variables and conversion to affiliate's tracker:
1) Postback URL from web-master profile: http://trackerdomain.com/p.ashx?o=1607&e=525&f=pb&r=${visit_id}
Referral link with dynamic values https://refdomain.com/1aa816c1?visit_id=#reqid# - you insert this final view in the tracker
(reqid is the dynamic variable from the tracker)
Postback fired from Affilka: http://trackerdomain.com/p.ashx?o=1607&e=525&f=pb&r=#reqid# (where reqid will be a different value every time the conversion takes place)
2) Postback url from web-master profile: http://trackerdomain.space/click.php?cnv_id=${ctag}&payout=0&cnv_status=reg
Referral link with dynamic values https://refdomain.com/a6428de42?ctag={clickid} - you insert this final view in the tracker
(clickid is the dynamic variable from the tracker)
Postback fired from Affilka: http://trackerdomain.com/click.php?cnv_id={clickid}&payout=0&cnv_status=reg (where clickid will be a different value every time the conversion takes place)
If the dynamic variable is not included in the final referral link, we won't fire it with the postback. We fire all hardcoded params + dynamic variables featured both in the referral links and postbacks.
Whether the dynamic value should be in ## or {} brackets depends on the tracker software configuration.
¶ Create Postbacks from a Detailed Campaign and/or Promo page.
1) Go to "My Campaigns" on the /partner/campaigns page and choose the campaign for which you want to set up postbacks
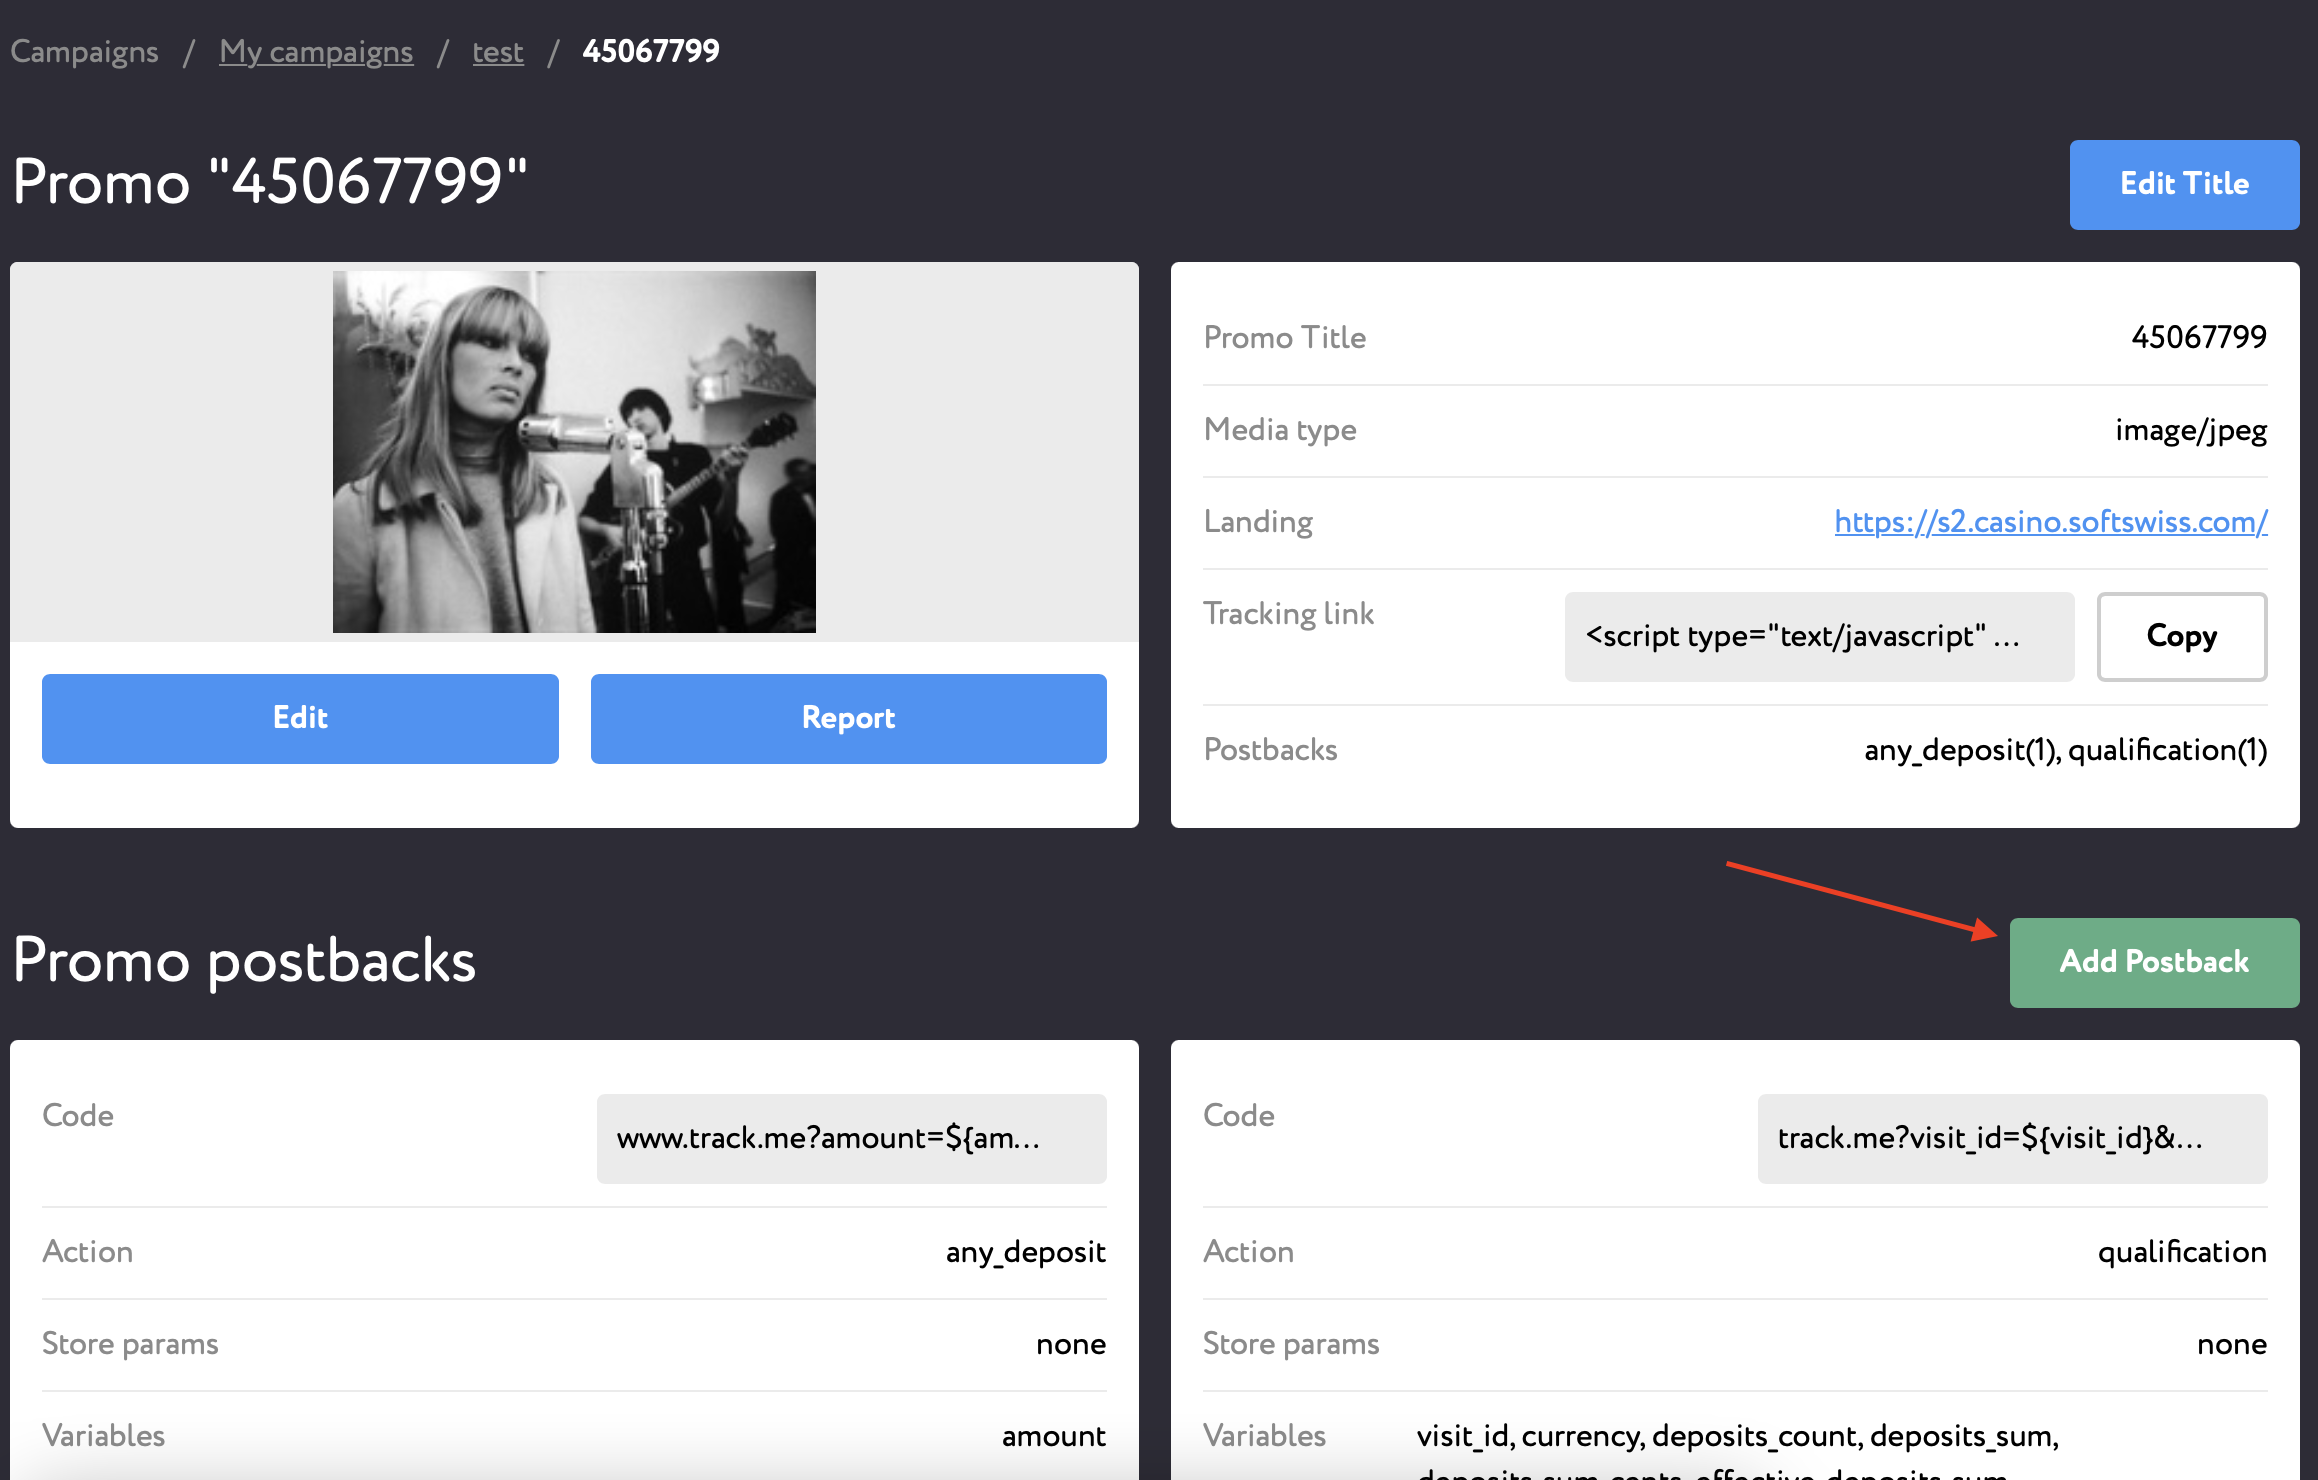
2) Scroll down to the postbacks section (campaign postbacks are located just below the cards with promos) and create the postbacks you need.
3) To be able to differentiate between different promos, include a variable promo_id in your postback url.
¶ To create a postback for a specific promo:
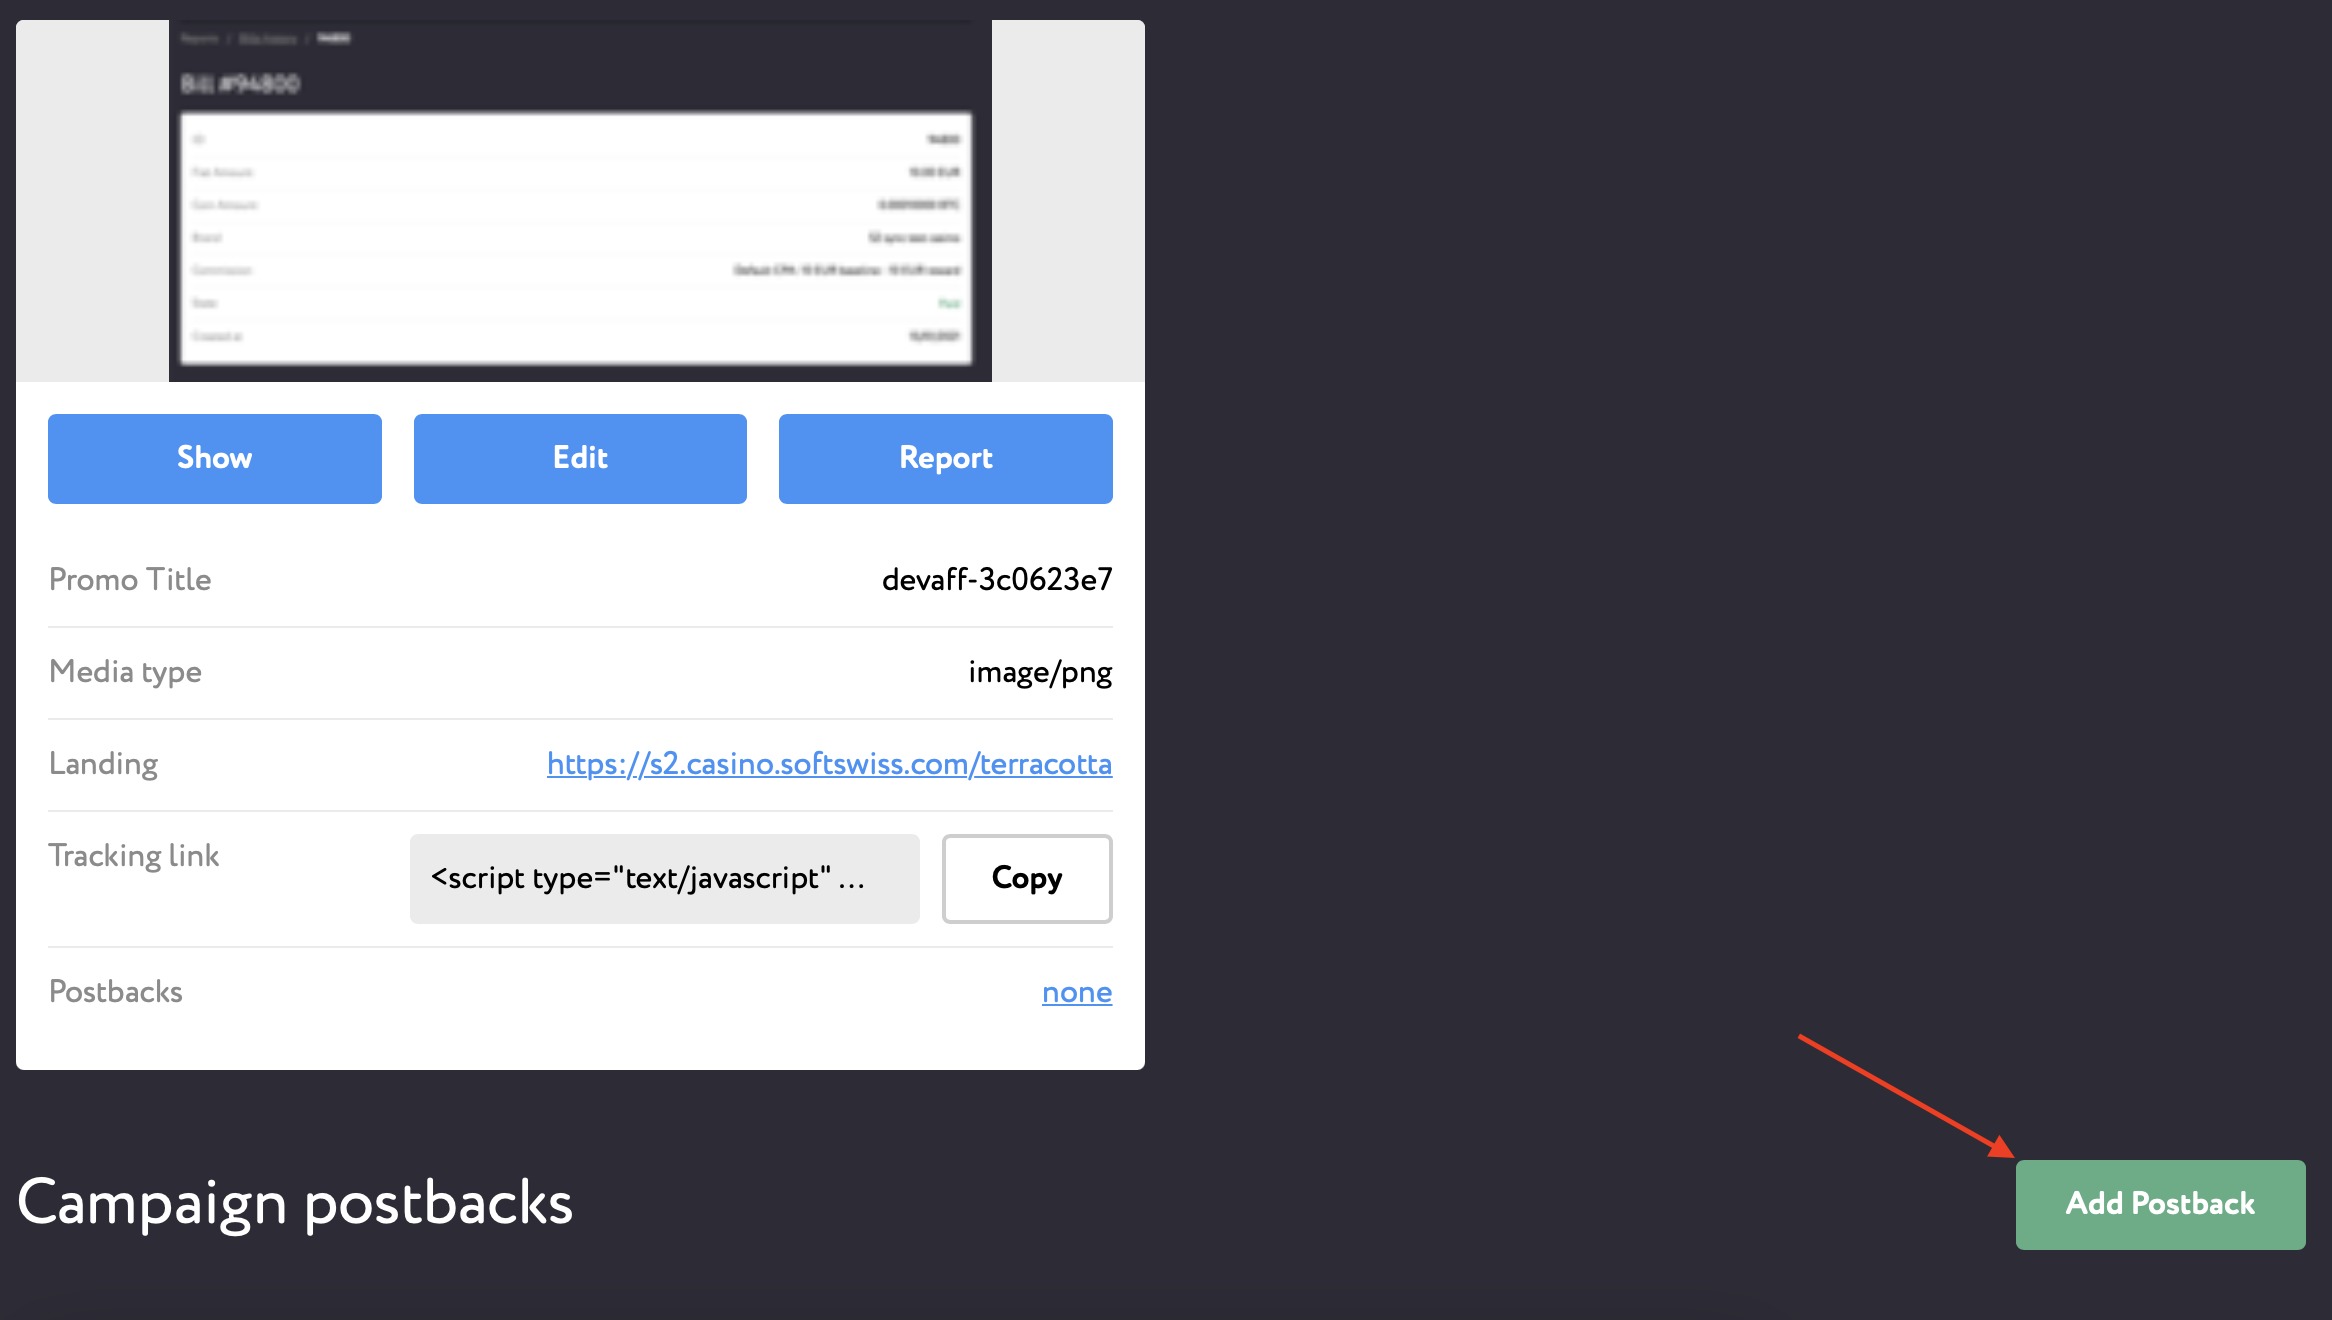
1) Find the needed Promo within a Campaign.
2) You will see string "Postbacks" on the card of a particular Promo. If no postback is yet configured, you will see word "none". Click it.
3) You will get redirected to the page with Promo postbacks and create the postbacks you need.
¶ Postbacks Log
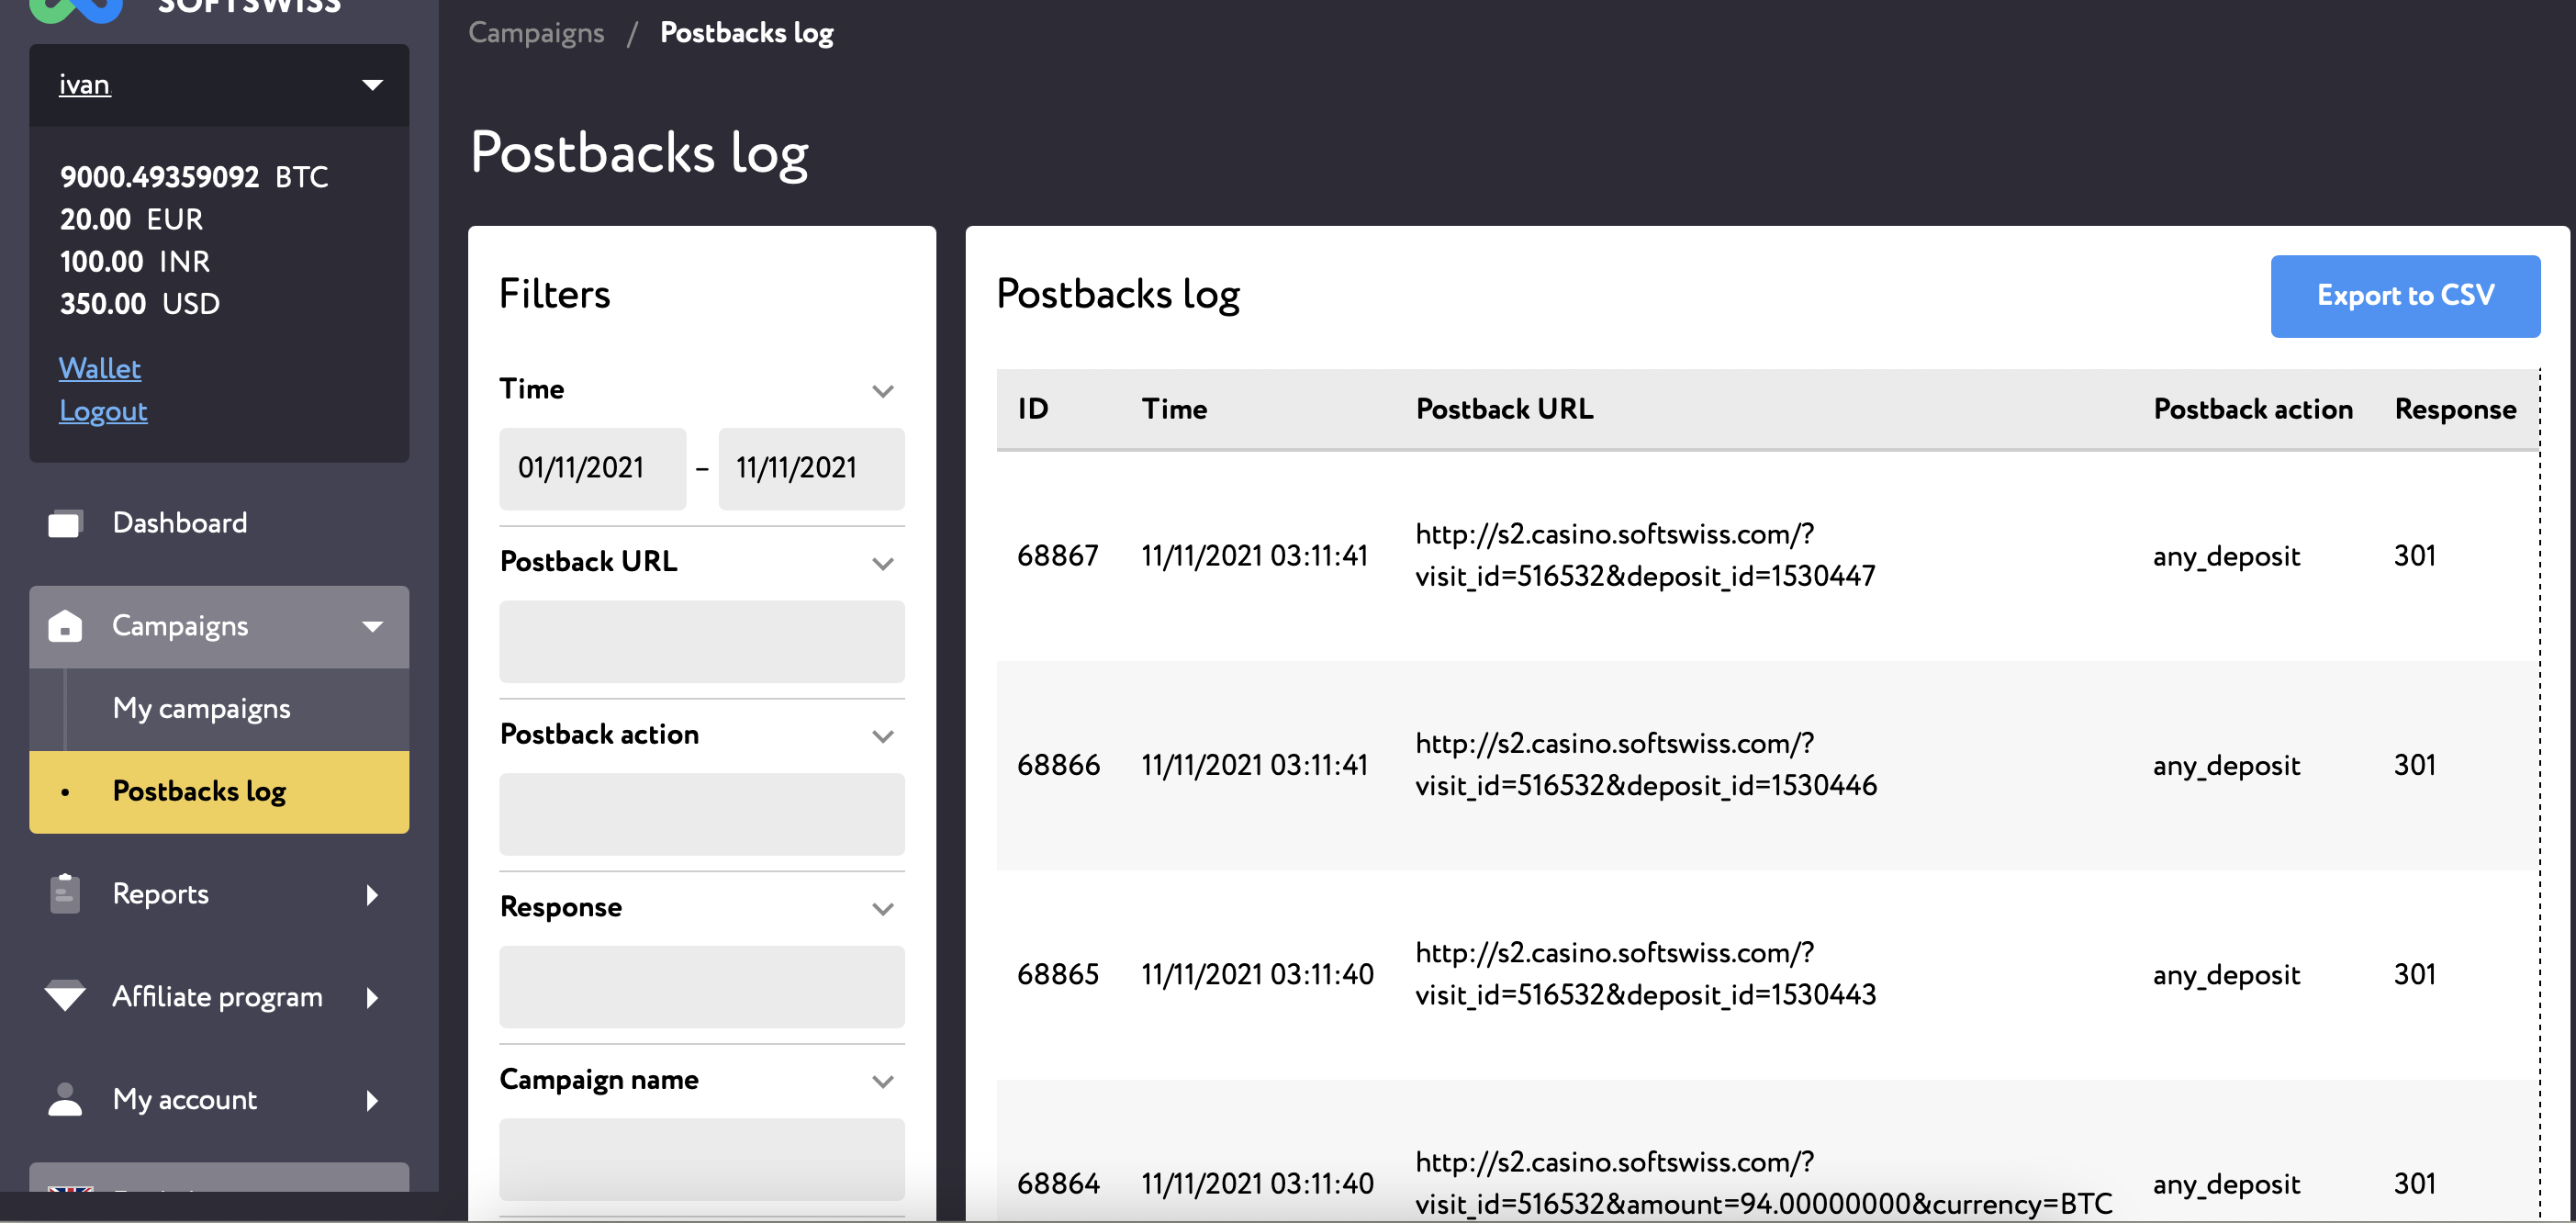
You can check the status of the configured postback in the separate tab called Postbacks Log under the Campaigns Tab.
Here you can find the required postback by:
- the time it was sent
- its URL (partial-match mode)
- action type, which triggered the postback (e.g. registration, first deposit, etc)
- response codes (http status codes). This code is sent from affiliate's tracker system to us.
- campaign name (partial match) and IDs
- promo codes and IDs
¶ Reports Tab
¶ Payments history
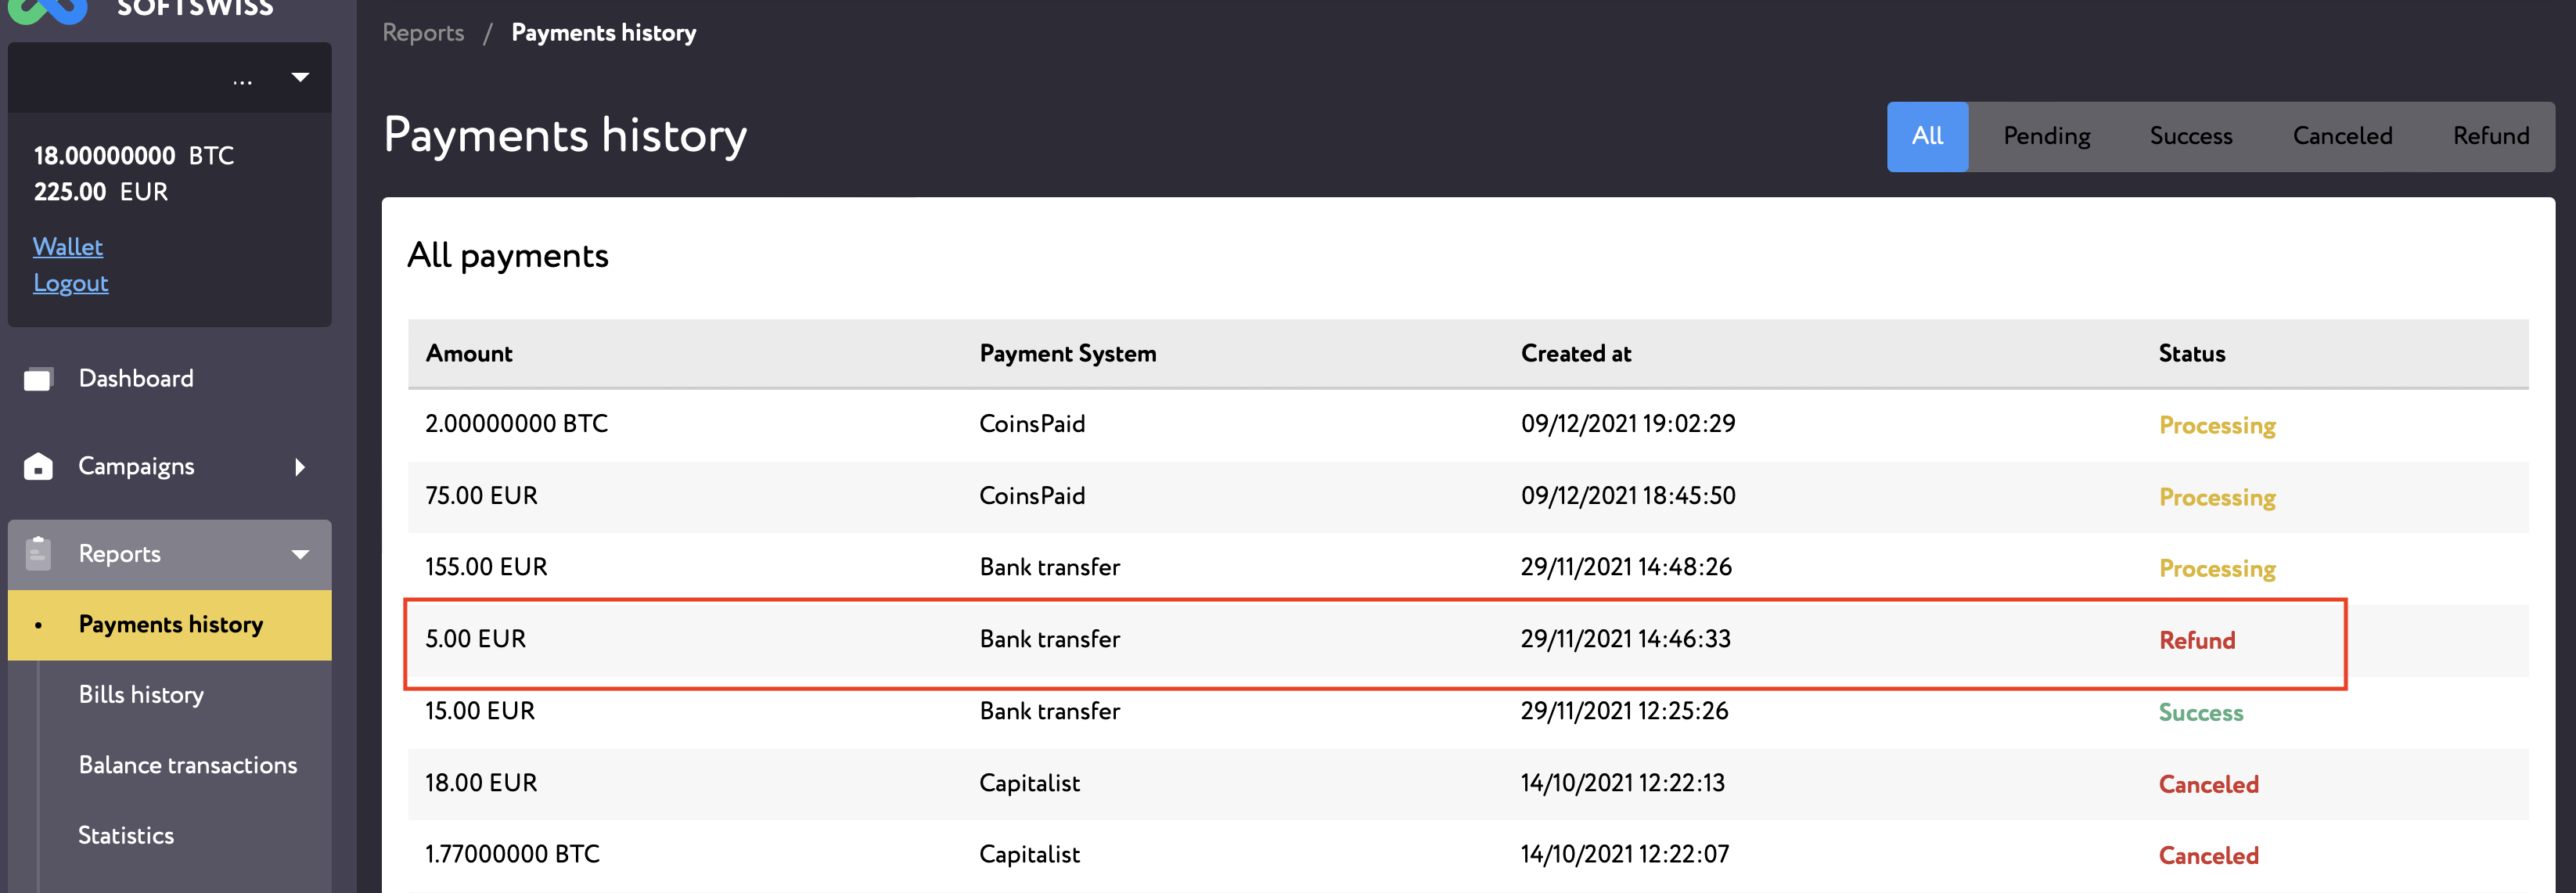
Here you can track all of your cash-out requests, their amount and their status (pending, success, cancelled, refund), time they were created and finished, and payment system to which you requested a cash-out or via which a refund was made back to your account.
¶ Bills History
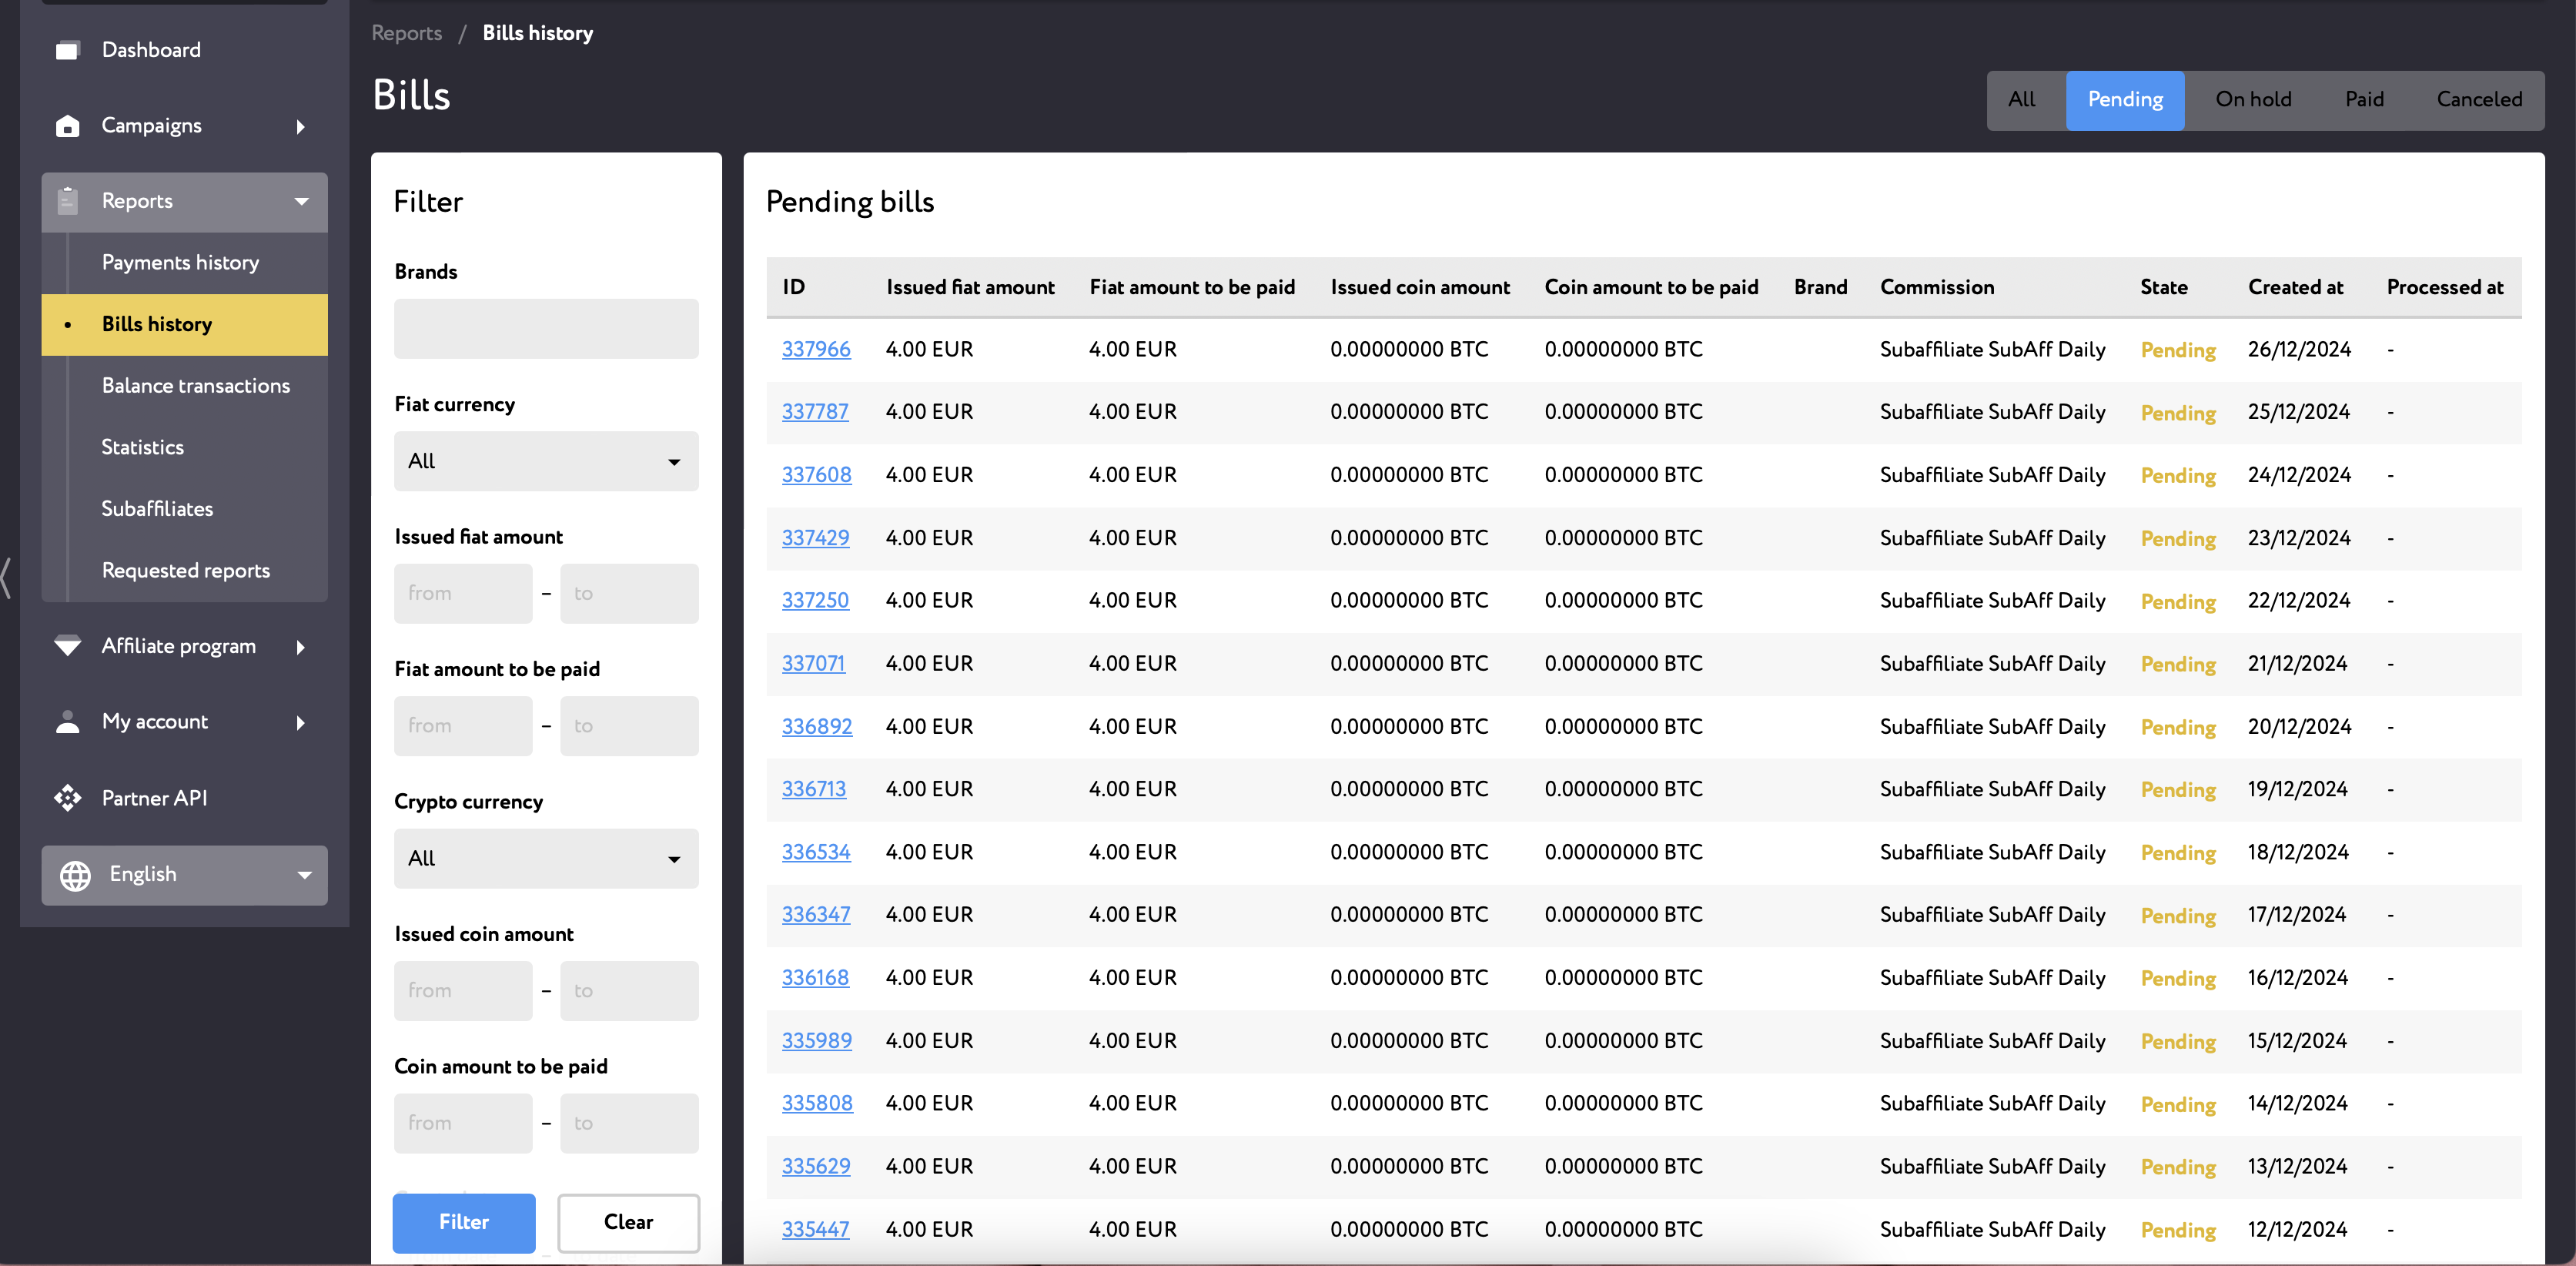
Here you can see all Bills that were issued in accordance with your commission plans for the completed Billing period. You can also use various filters to find the bills you're interested in.
Bills represent the rewards that the affiliate program pays to affiliates for referring players and/or sub-affiliates to its brands.
Every Bill is first validated by affiliate managers. All Bills waiting for affiliate managers validation are in Pending status.
If Bill calculation is correct, Bill is approved and an affiliate gets a reward to their account. This reward can later be cashed out.
If Bill calculation is incorrect (for example, there was an error in commission settings) or an affiliate has violated affiliate program terms and conditions, Bill is cancelled.
If Bill calculation requires a detailed investigation, then it may be placed on hold.
¶ Detailed Bill Page.
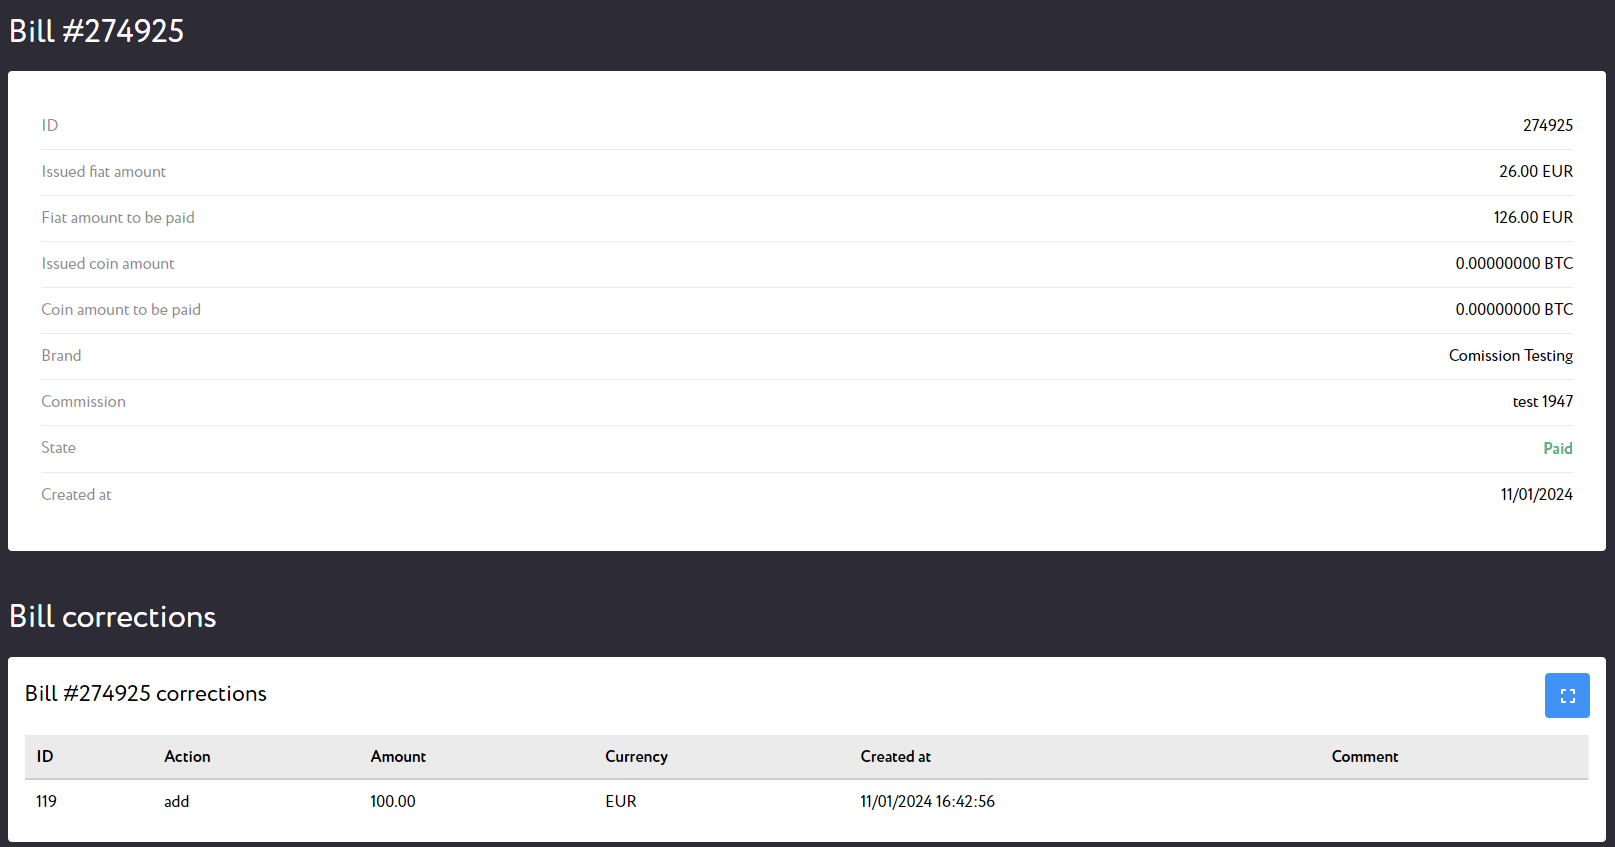
You can also view bill details by clicking on the bill id on /partner/bills page. The detailed bill page contains the following info: Bill ID (unique bill identifier), Issued fiat and coin amount (the initially issued sum of a bill), Fiat and coin amount to be paid (the total amount of the bill, if a correction was applied), Brand (brand for which the affiliate reward was issued), Commission (commission plan according to which the affiliate reward was calculated), State (pending, paid or cancelled), Created at date and Processed at date. Further details will be added later on.
The bill correction section shows the corrections applied to the bill and contains detailed information about it. Here you can find the Bill correction ID, date and time when this correction was made, the info on bill correction amount in fiat or crypto currency; what the action was (Add or Subtract types), a comment added to this bill correction.
¶ Balance Transactions
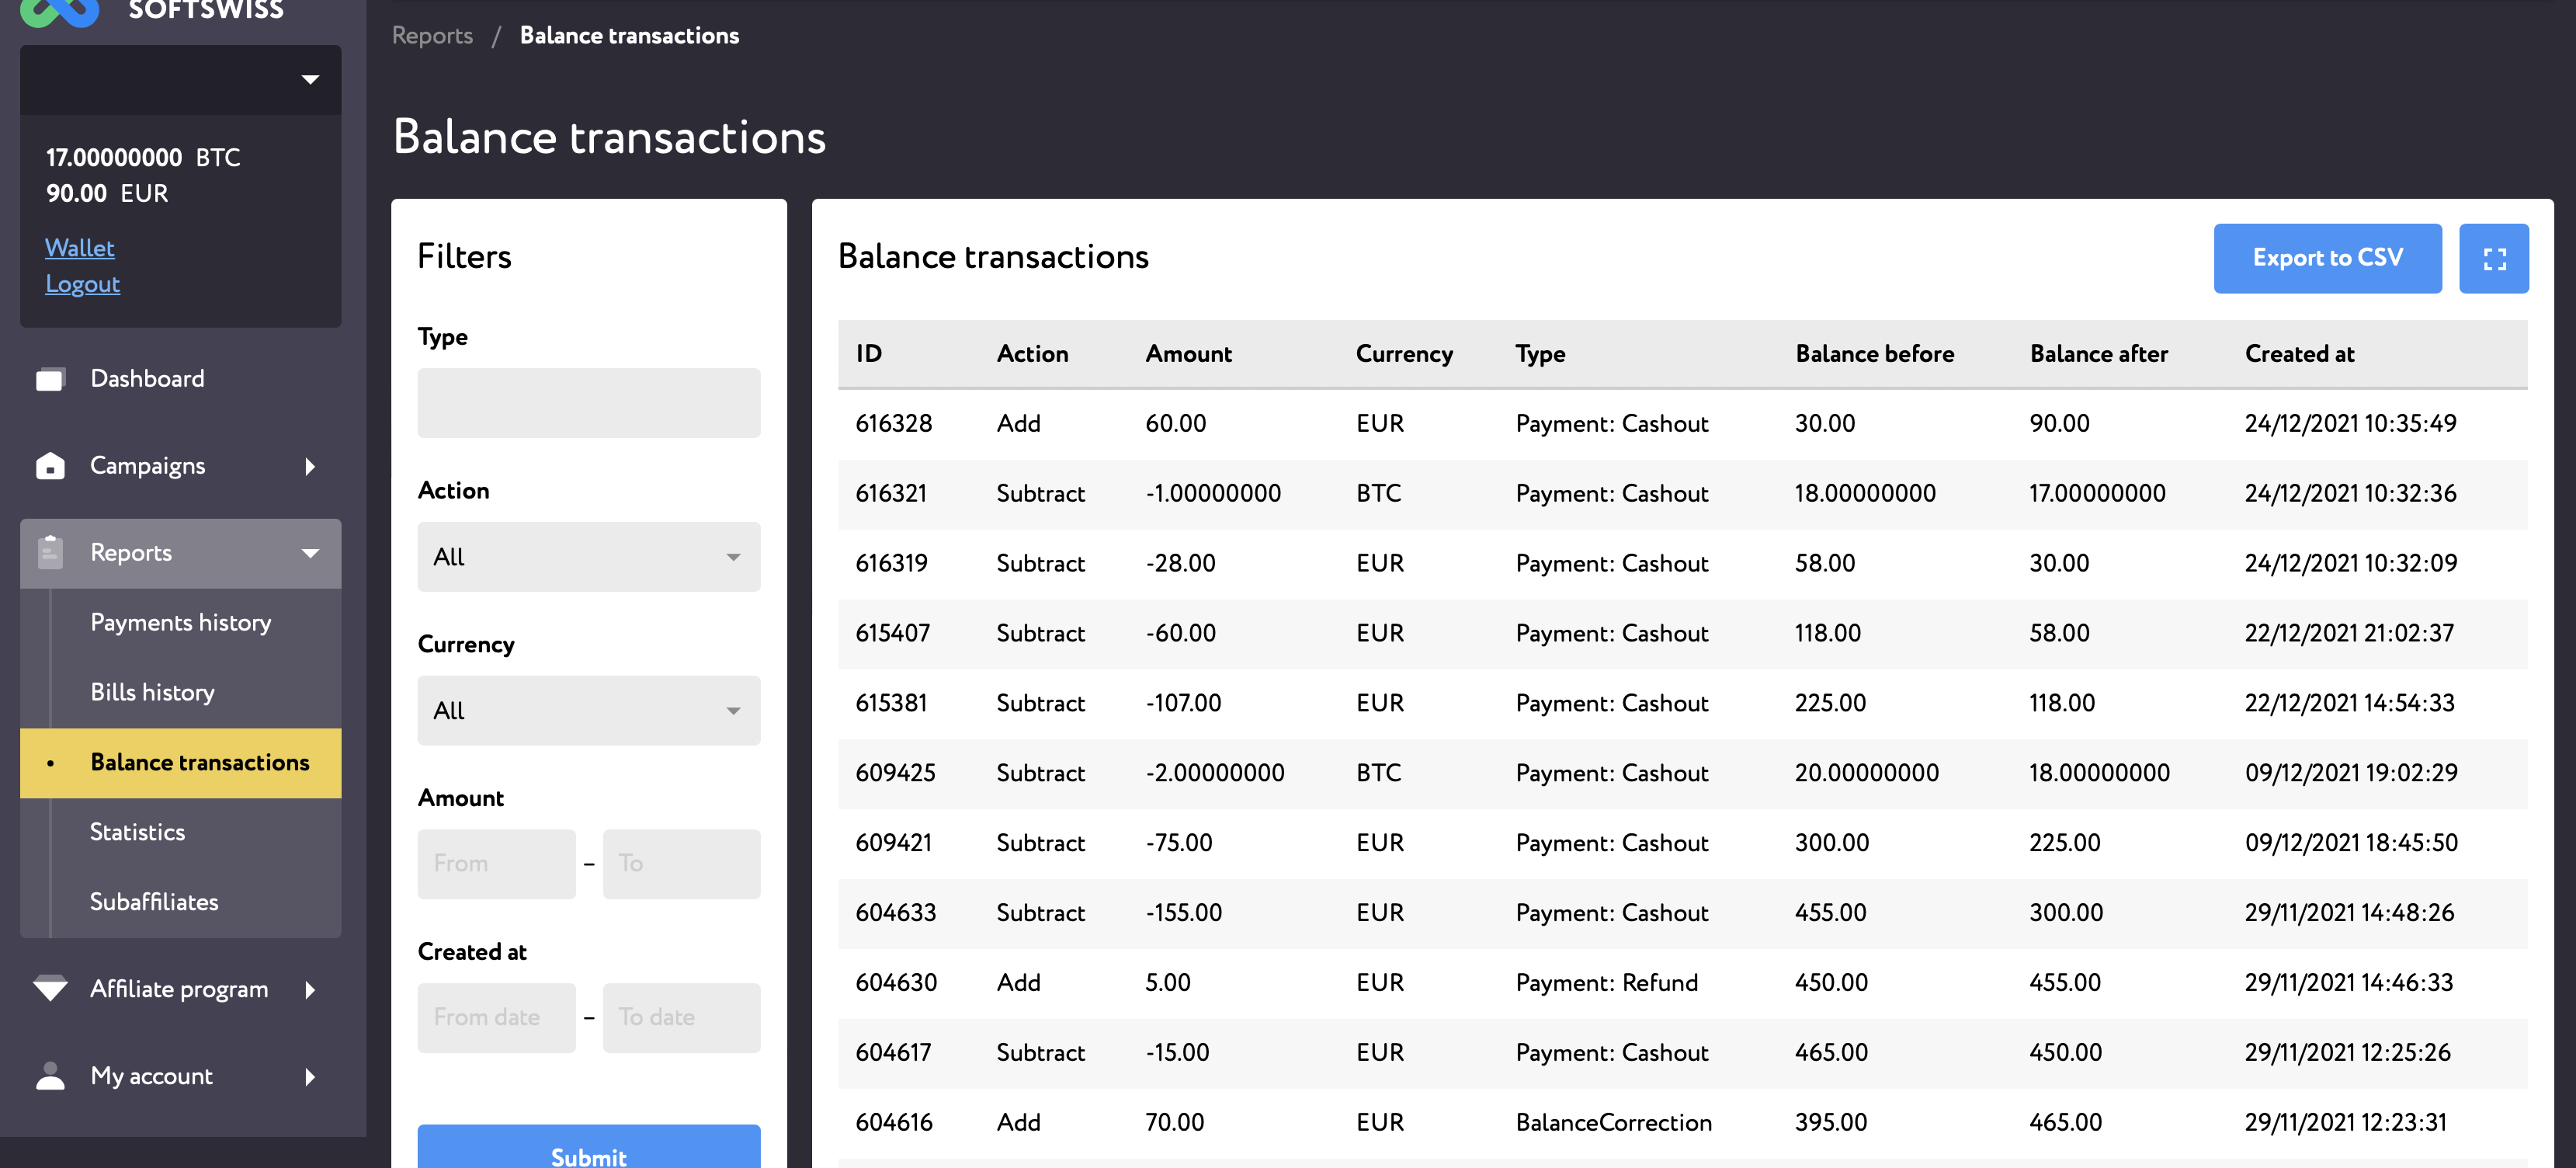
Here you can view all changes to your affiliate balance within the affiliate program. Your current balance changes whenever:
- a commission bill is approved: in this case it is added to your balance;
- a manual balance correction is made by an affiliate manager: if it's positive, funds are added to your balance, if negative - subtracted;
- you request a cashout (funds are subtracted from your account) or cancel your request or an affiliate manager cancels the request (funds are added back to your balance) or a refund of an approved cashout is made (funds are added back to your balance);
You can filter the transactions by their type (payment: all, payment: cashout, payment: refund, bill or balance correction), action (whether funds were added to or subtracted from your account), currency and amount of the transaction, date it was created.
¶ Statistics
Here you can track your performance. This report allows you to view and analyze the info on all of your brands, campaigns and promos. You can filter the report by specific date range, brand, commission strategy, campaign ID, promo ID, promo code.
You can choose what columns you'd like to see in the report and reorganize them in the order that suits you by dragging and dropping the column names.
You can also view performance report in one single currency, e.g. EUR. To do that, tick off the checkbox "Convert all currencies to EUR" in the filters block. By default, today's exchange rates are applied. If you want some other date, indicate the required Exchange rates date in the Filter above.
You can export the report in CSV, XLSX, JSON or XML and via API calls as well.
The filters, data groupings and columns available to you in the report are set by affiliate program operators and may be different from the screenshots provided.
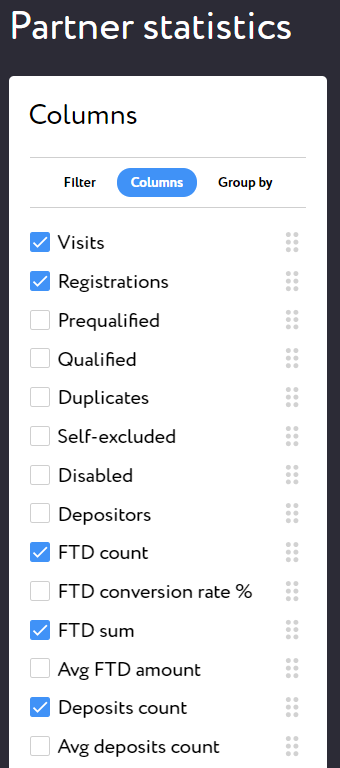
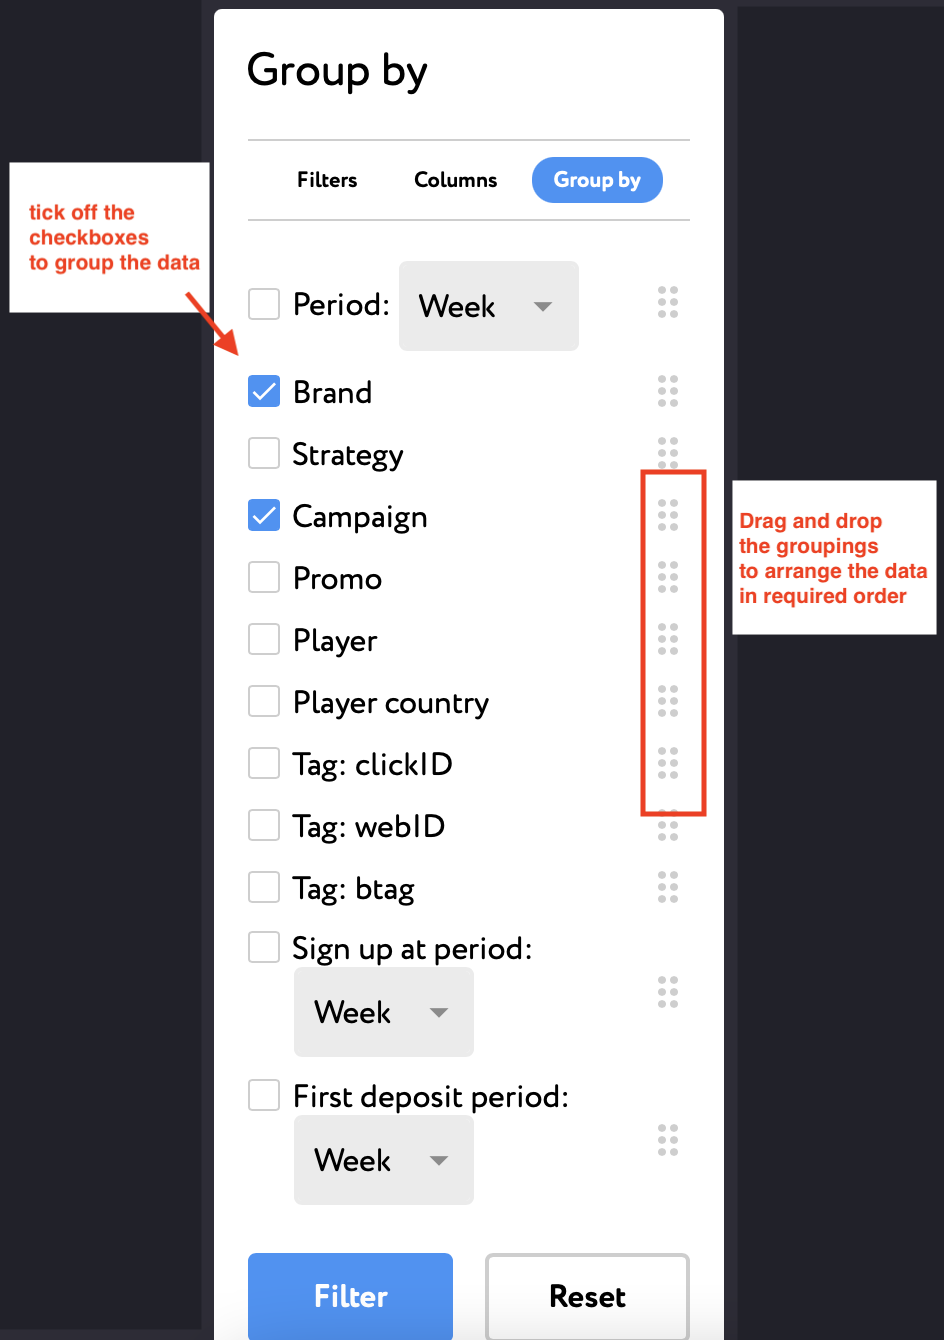
The data can be grouped by period, brand, campaign, promo. The more checkboxes you tick off, the more detailed your report becomes. Refer to the "Group by" tab in the Filters section.
If you don't need to break down the data, you can leave the checkboxes empty and you will see your total stats for the selected date range. If, however, you need to see how different campaigns/promos pair against each other during specific calendar periods, you can set the corresponding grouping.
E.g. as an affiliate you have been promoting a brand via 3 different campaigns for less than a year (say, from November 2018 till May 2019). Each campaign has one promo (tracking link). Grouping data by campaign and period: month will show you the total stats of eaсh campaign broken down per calendar month. All in all you will have 21 results (provided, of course, that there is data to show): data will be broken down into 7 calendar months presented separately for each campaign.
¶ REPORT FAVORITES
You can save your favorite report configurations (filters, columns, groupings) and access it at any time from the "Favorite Report".
To create and save report favorites you need to:
- Select required filters, columns and grouping in the report.
- Click on the Filter button to download the report.
- Save it to favorites by clicking on the Star icon at the top of the report page.
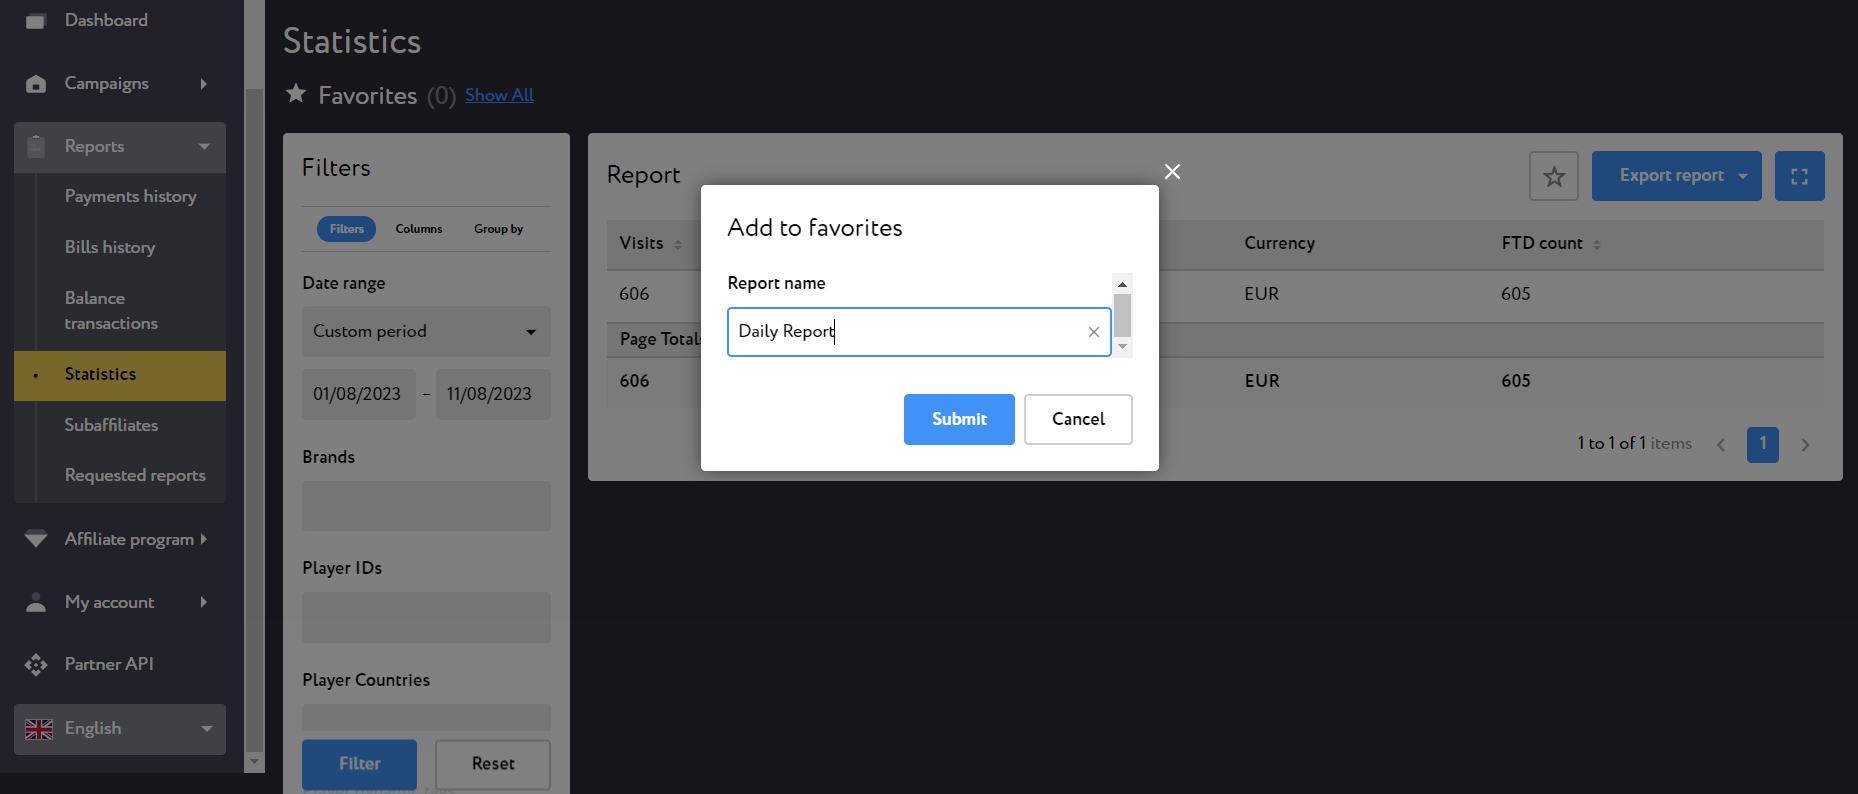
- Add the name of the favorite report and click Submit.
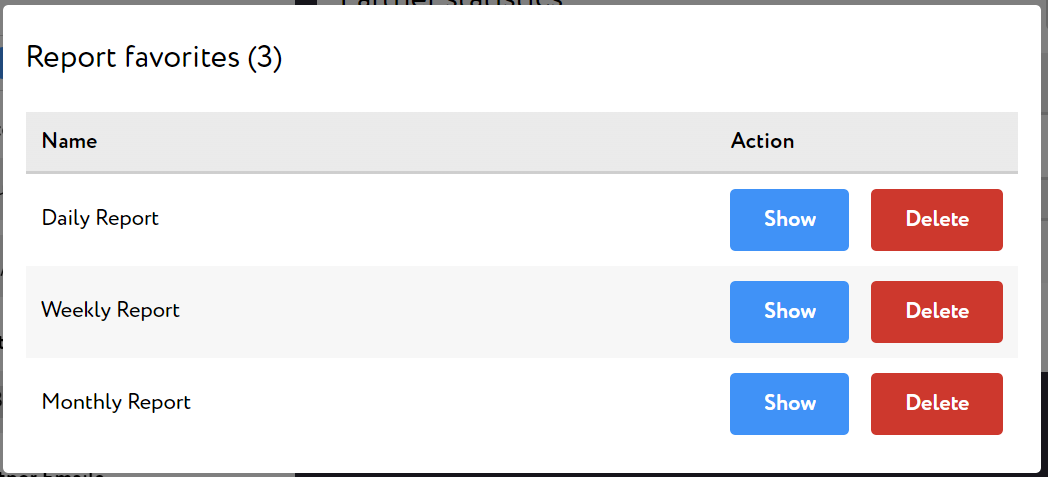
Show All button next to the “Favorites” section will allow you to see all the saved reports. Here you can also remove a favorite by clicking on Delete or download the required report.
PLEASE, NOTE!
- If you select an absolute date range when configuring the favorite report, the system will always show this date.
For example, you have set the period from March 1, 2023 - March 22, 2023, then the report will always show data for the selected period.
- If you choose a relative date range to the report when configuring the favorite report, it will always show the relative period.
For example, you select the last month, then the report will show data for the previous month, regardless of the period when you request the report.
¶ REPORT EXPORTS
You can extract the performance report in such formats as: CSV/XLSX, JSON, XML. To export the report, click on the “Export report” button and choose the desired format from the drop-down selector.

¶ CSV/XLSX formats
When you choose this option, the report will be sent to your email. You can also download the report, once it's ready, from the “Requested reports” page in the Affiliate Interface.
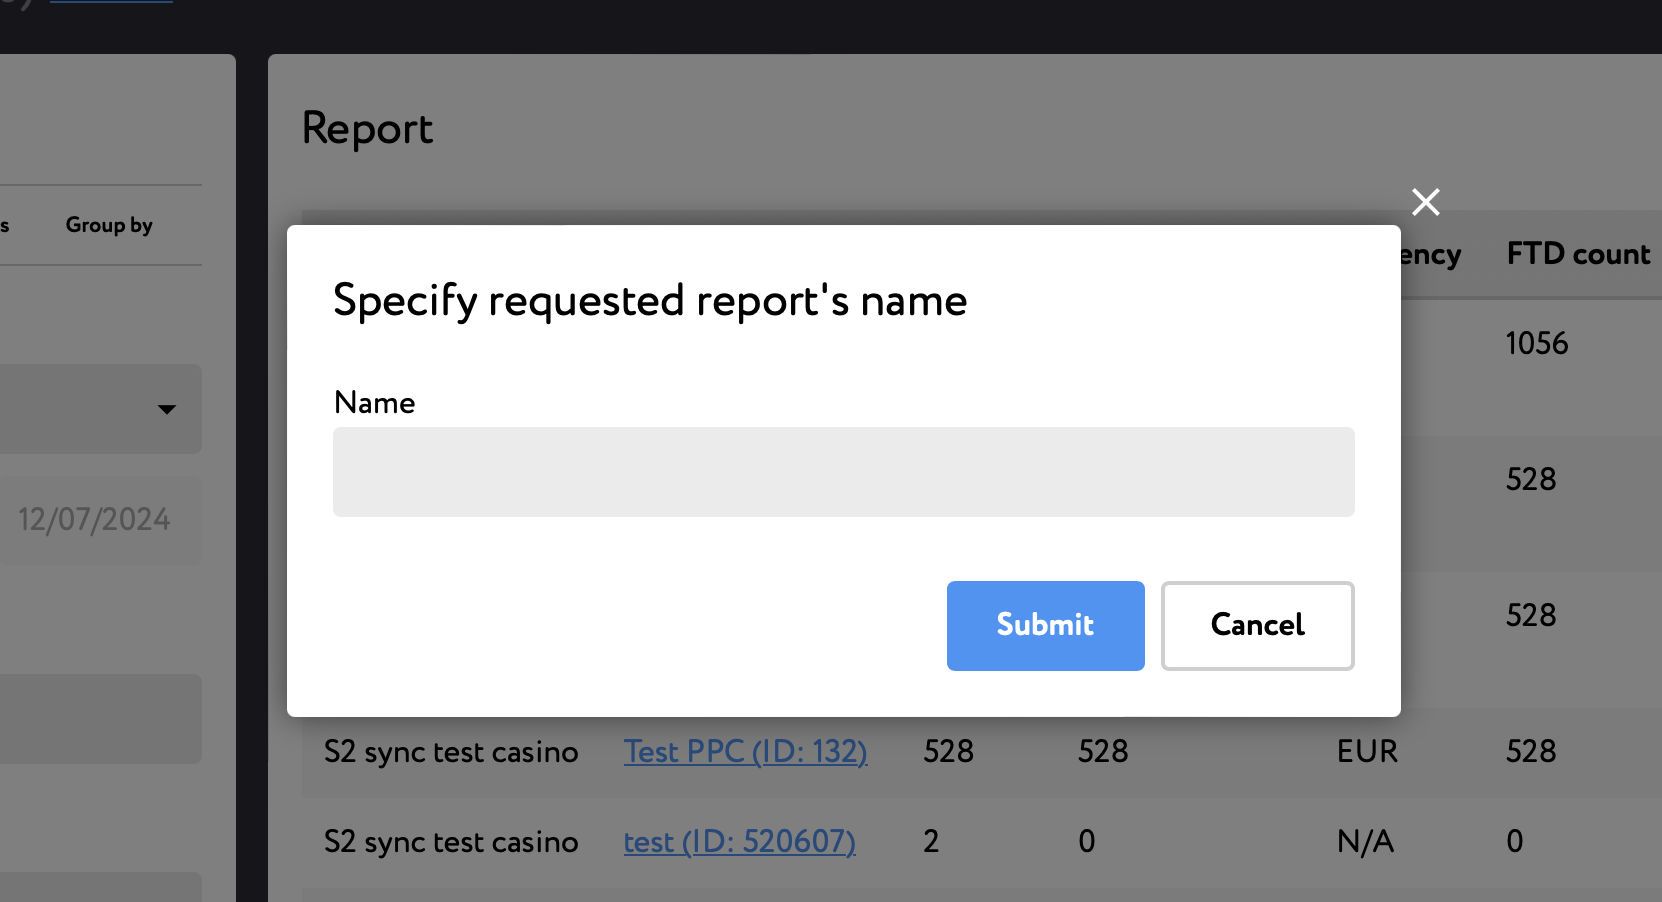
When choosing this option, you will be prompted to give a name to your requested report. Choose something that reflects the contents of the report so that you could easily navigate among your requested reports once they're ready.
¶ XML/JSON formats
You can extract performance report in JSON/XML. To retrieve the statistics feed link, choose the required format from the “Export report” "dropdown selector. Every link can be copied and opened outside an active session off site thanks to individual tokens assigned to each affiliate. The token remains static so that you could fetch data across different months without having to log in.
IMPORTANT! The data fields, data groupings, their order as well as currency representation in the JSON/XML report corresponds to the filters you have configured.
For example, if you want to retrieve monthly statistic feed broken down per campaign id, promo id and day and you'd like to see visits, registrations, FTDs and NGR and this data is needed in 1 currency EUR according to the current exchange rates date - you need to 1) configure all of these fields in the "Filters" block, 2) press "Filter" and 3) after that retrieve the feed link by choosing the corresponding export option.
¶ REPORT API.
You can also get the report via an API. Partner Reports are singled out into separate endpoint available via /api/customer/v1/partner/report. When making requests to the Partner API, you need to send your user’s unique statistic token in the authorisation header.
Your unique statistic token can be found on the Account Info page. You have an option to expire statistic token for yourself or your teammates. Please, note that the statistic token is unique for each team member.
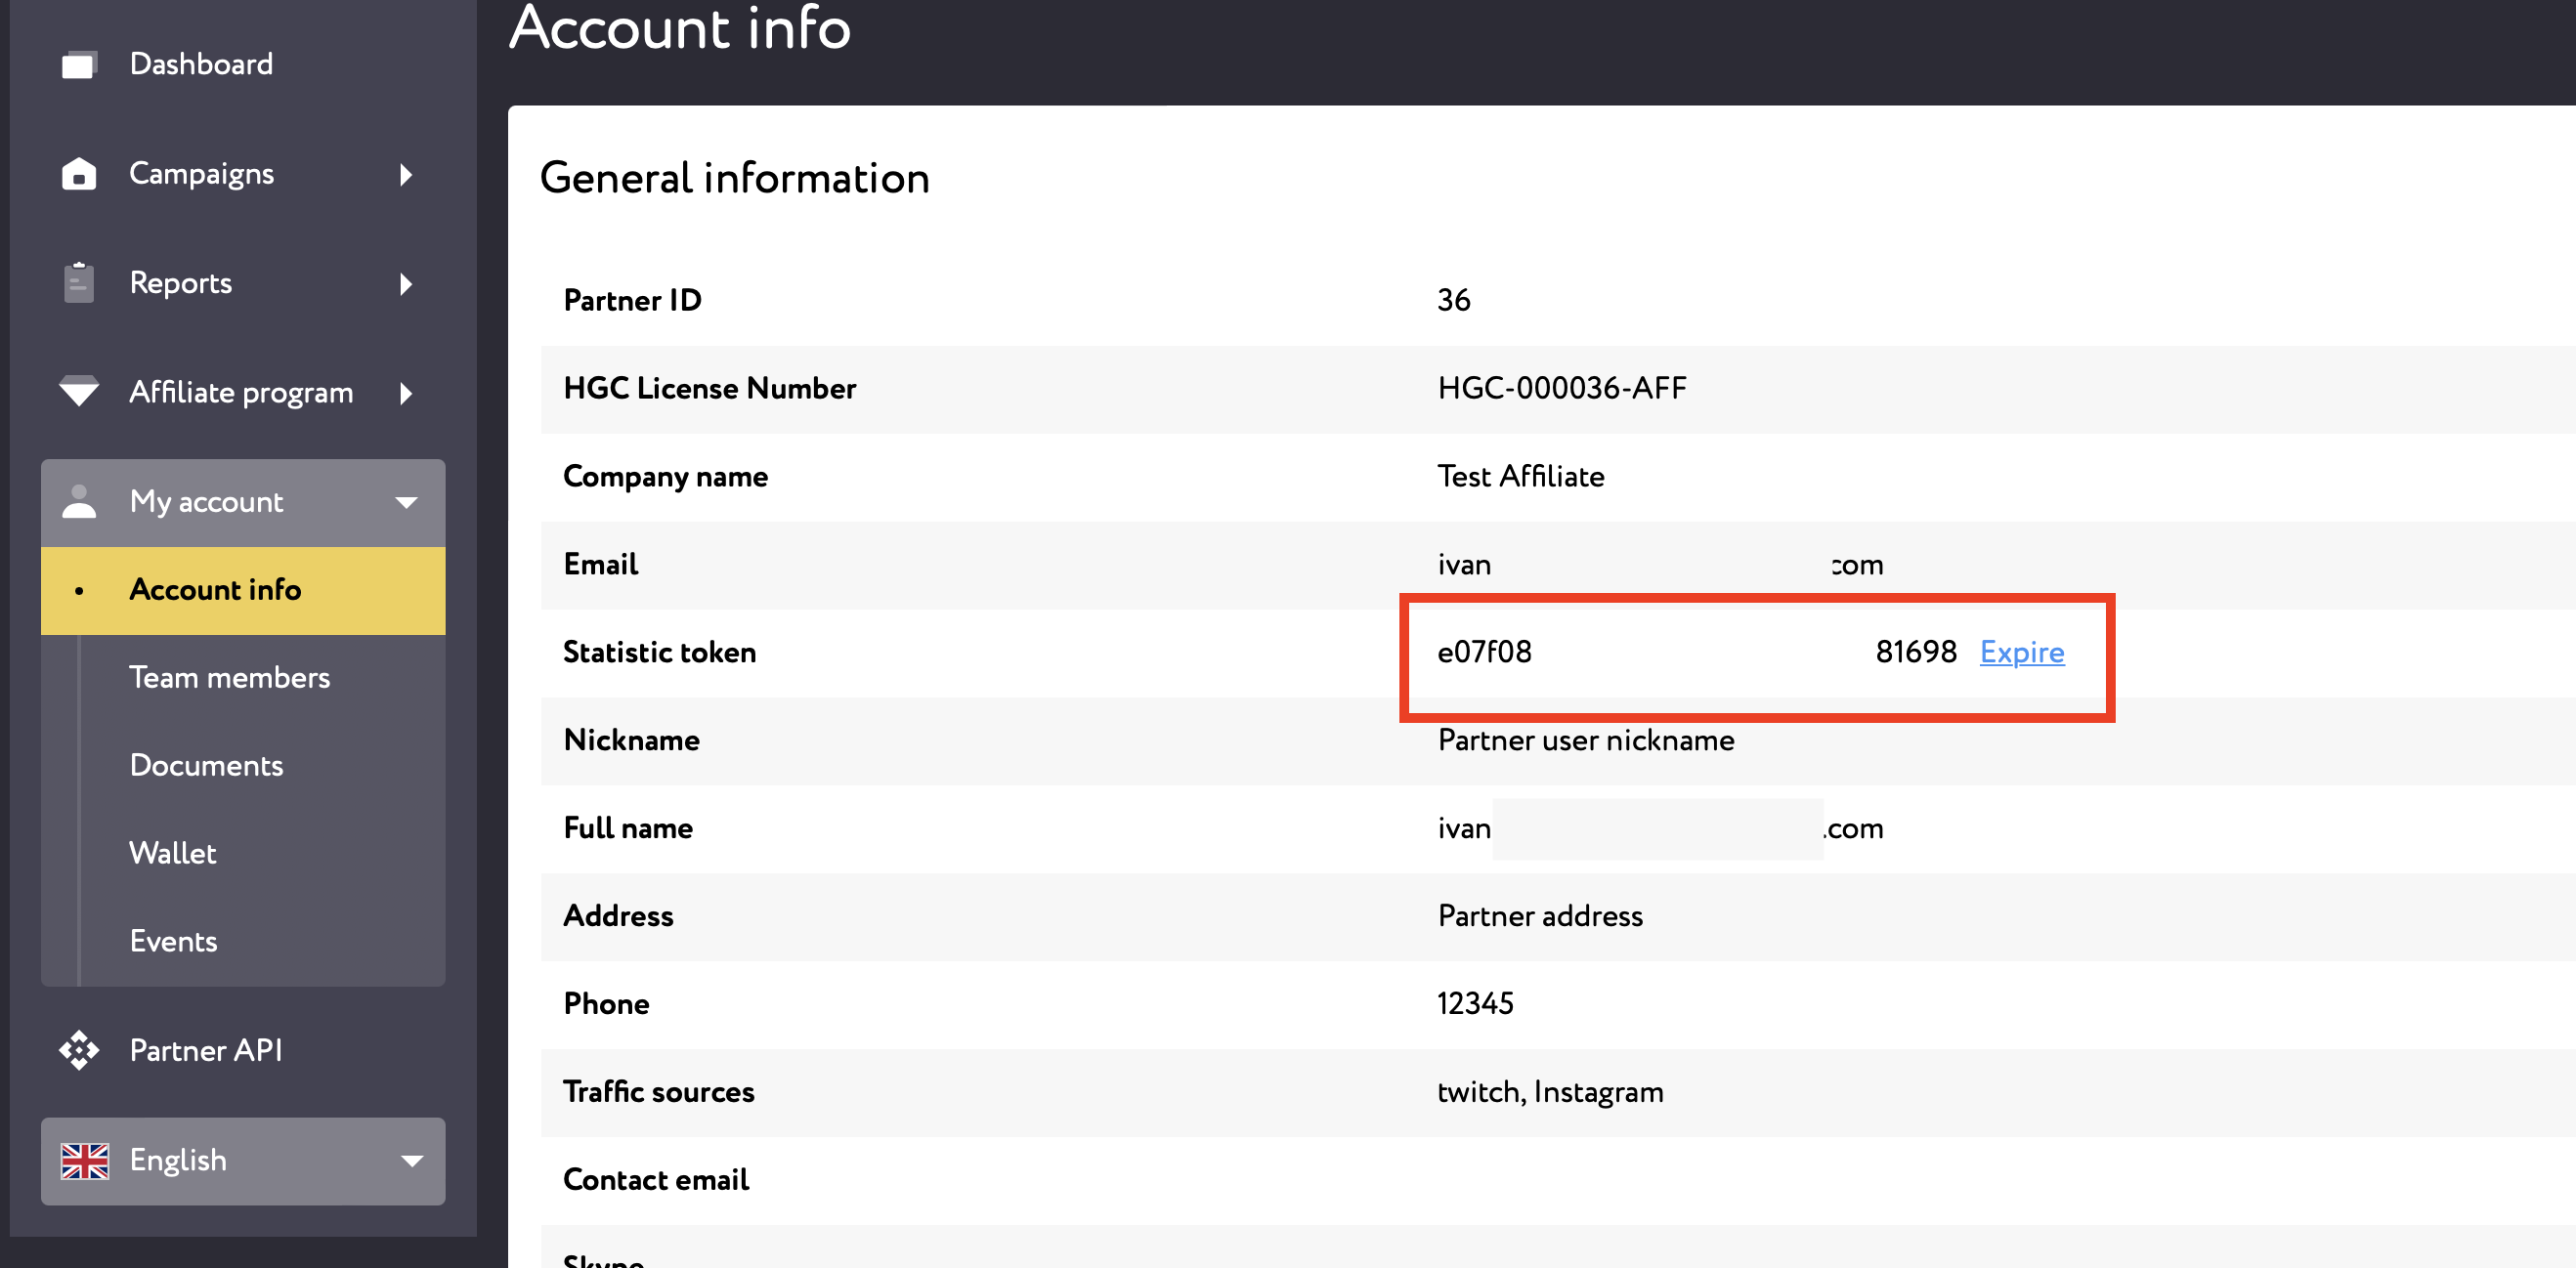
Your unique statistic token can also be found in XML/JSON feed URLs. For example:

The list of the report attributes available to you is available via /api/customer/v1/partner/report/attributes.
The Report API documentation can be found via the /partner/api_docs/customer/partner/index.md link in the Affiliate Interface (within the API tab in the navigation menu).
¶ Subaffiliates
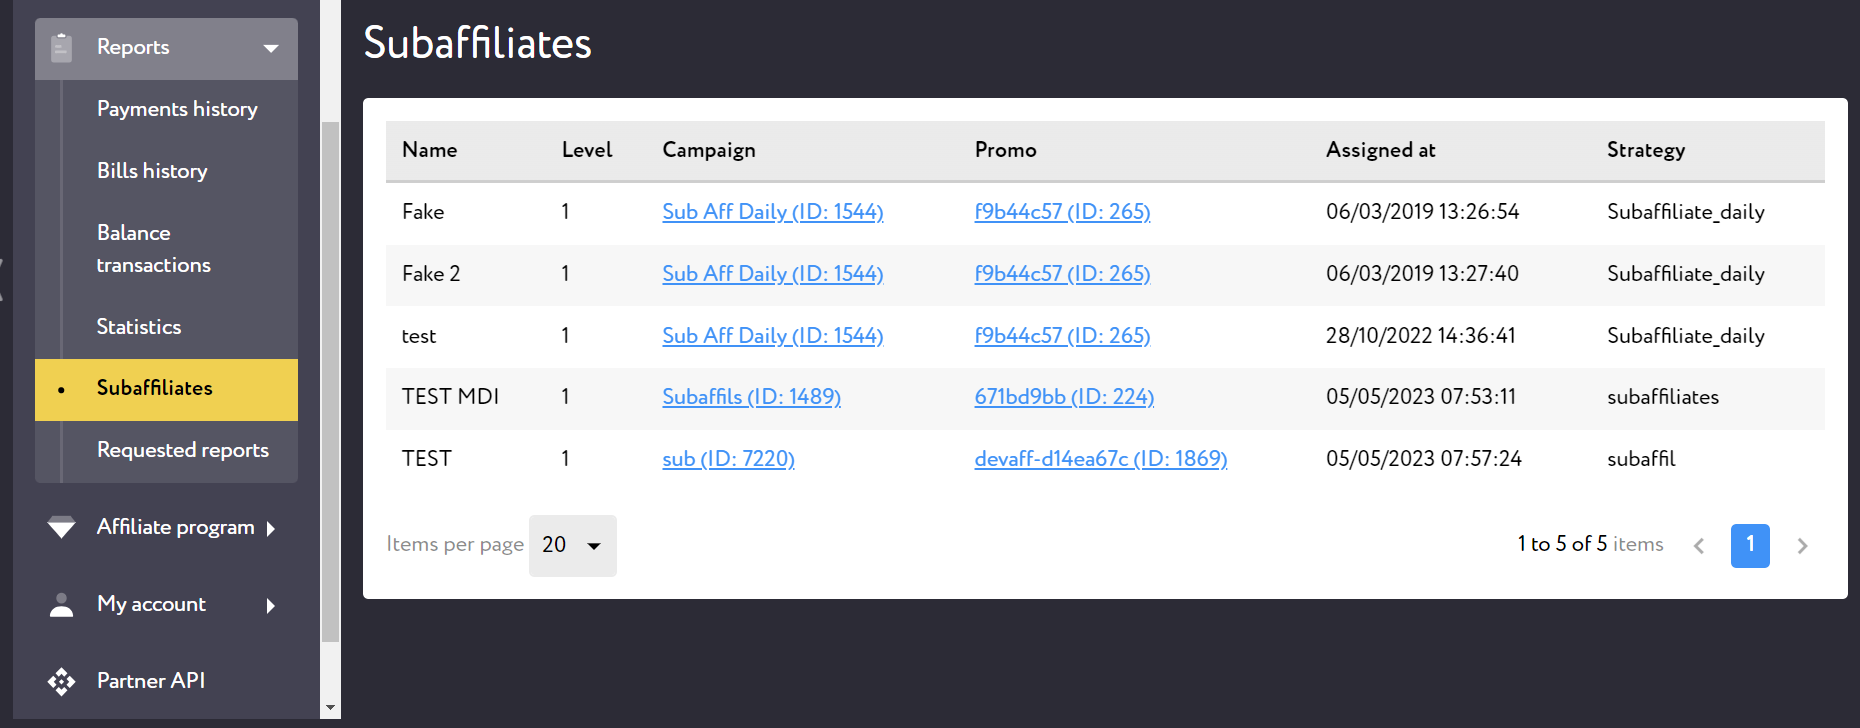
If you have a sub-affiliate deal available to you and you have invited sub-affiliates into an affiliate program, the tab "Subaffiliates" will be available within the "Reports" tab.
You can view all sub-affiliates you invited on the /partner/partner_connections page. The list contains subaffiliate names, level of subaffiliation, campaign, promo, registration date and subaffiliate commission info.
¶ Requested reports
All performance reports that a user requests in XLSX/CSV format will be stored on a "Requested Reports" page under the "Reports" tab in the navigation menu. Here you will also find the Reports that couldn't be displayed within the interface because of the time-out limit.
The page contains Request ID, Report Name, Report Parameters, Actor, Report State (processing, failed or successful), Requested At date and time and a link to download the report in XLSX or CSV formats.
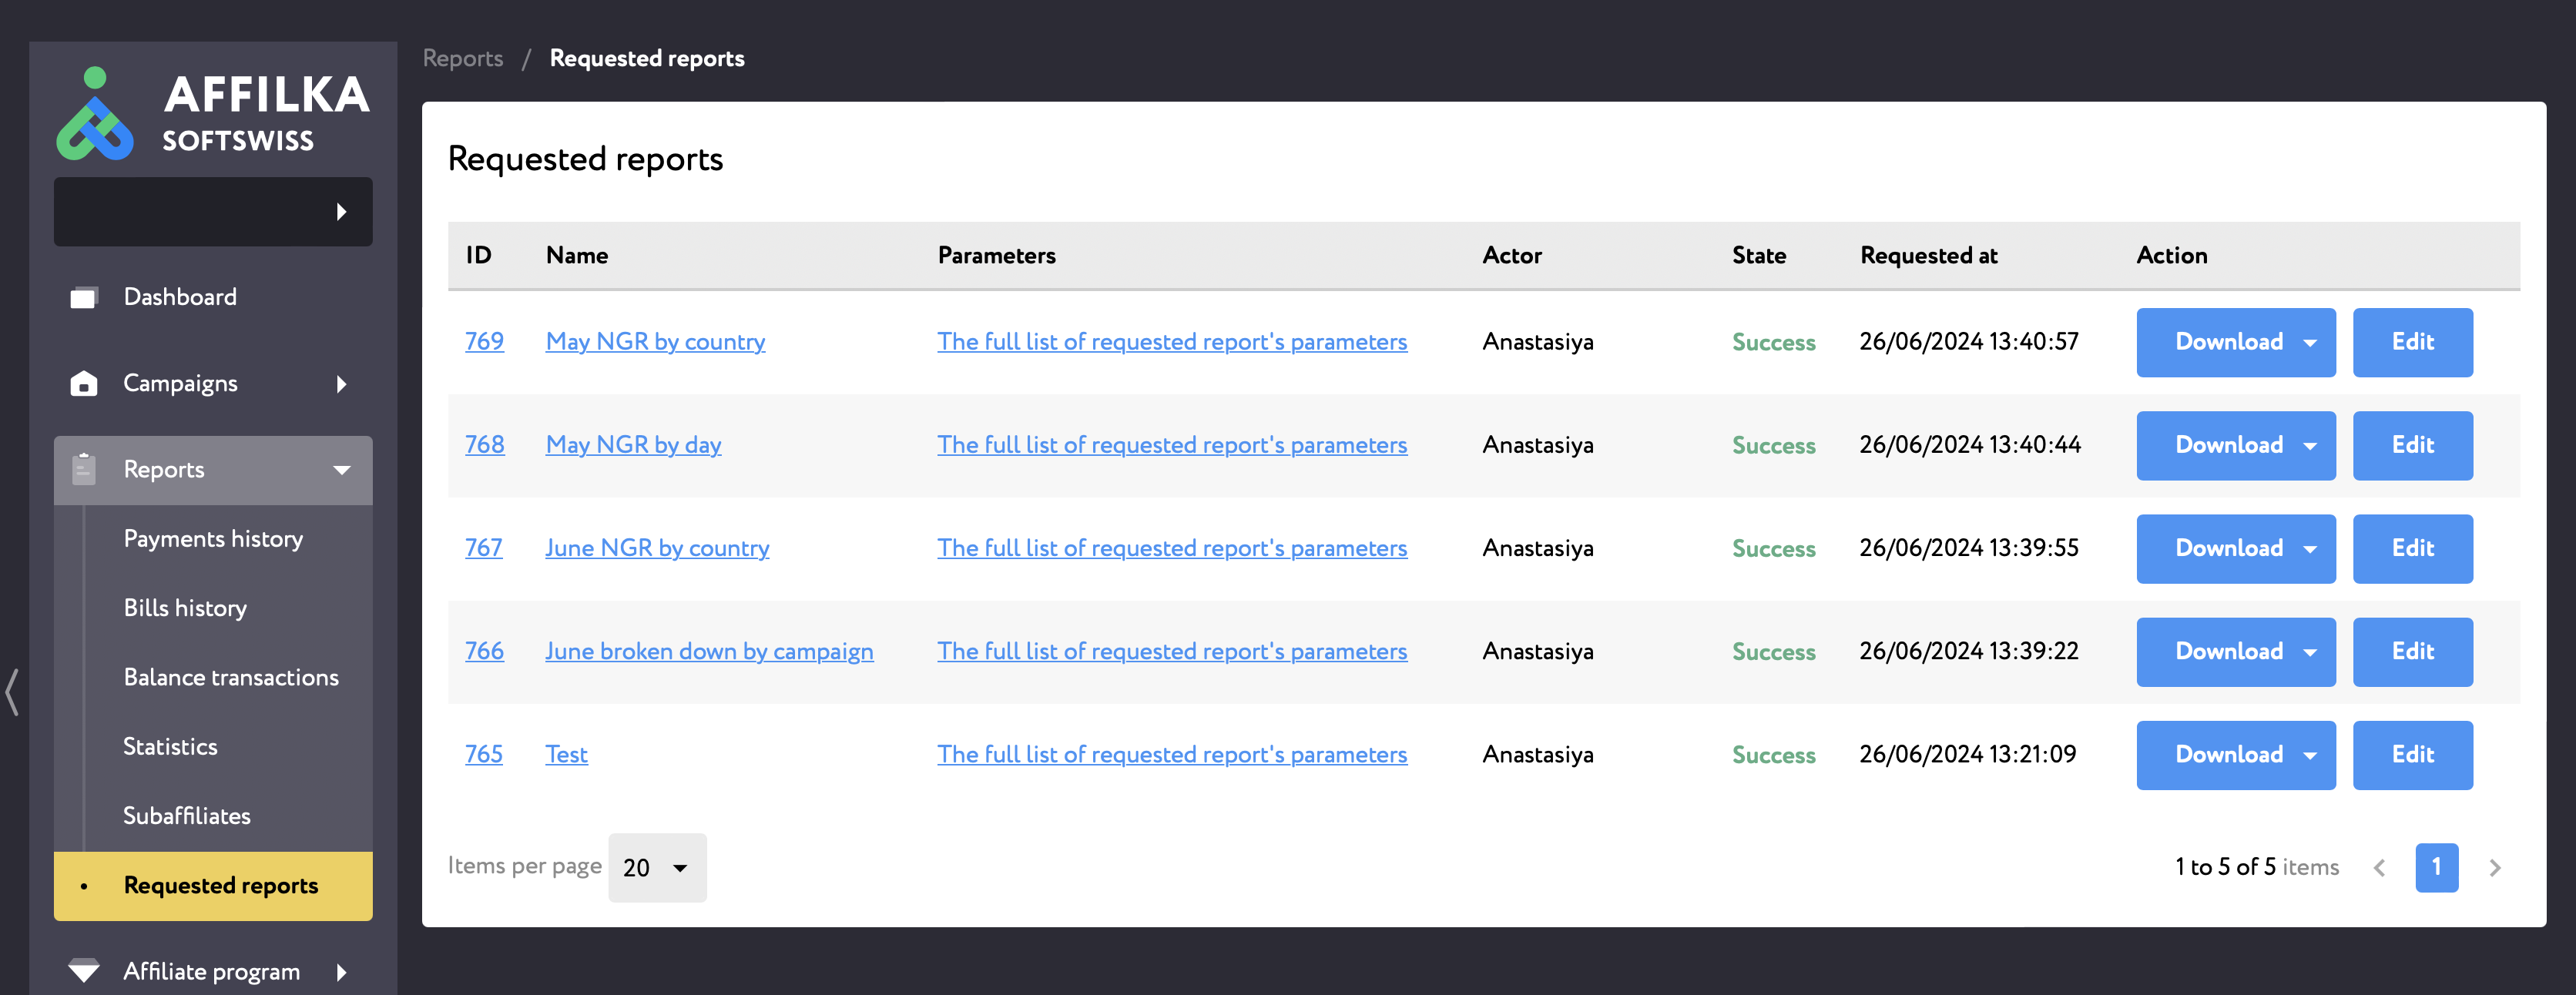
If you haven't indicated a name for your report when requesting it, you can give the name to it here by clicking the “Edit” button. If you're requesting a “Favourite Report”, the name of the preset report will be applied to it – but can be edited later on.
As soon as the report is ready, you will be notified via email.
The email will contain an attached XLSX file, in case you want to view the report straight away. The email will also contain a link to the detailed page of the requested report in the Affilka where you can download the report via browser.
The available download options include Zipped CSV (consisting of 2 files: report rows and report totals) and XLSX (one file divided into 2 tabs with report rows and report totals).
¶ Affiliate program tab
¶ Commissions
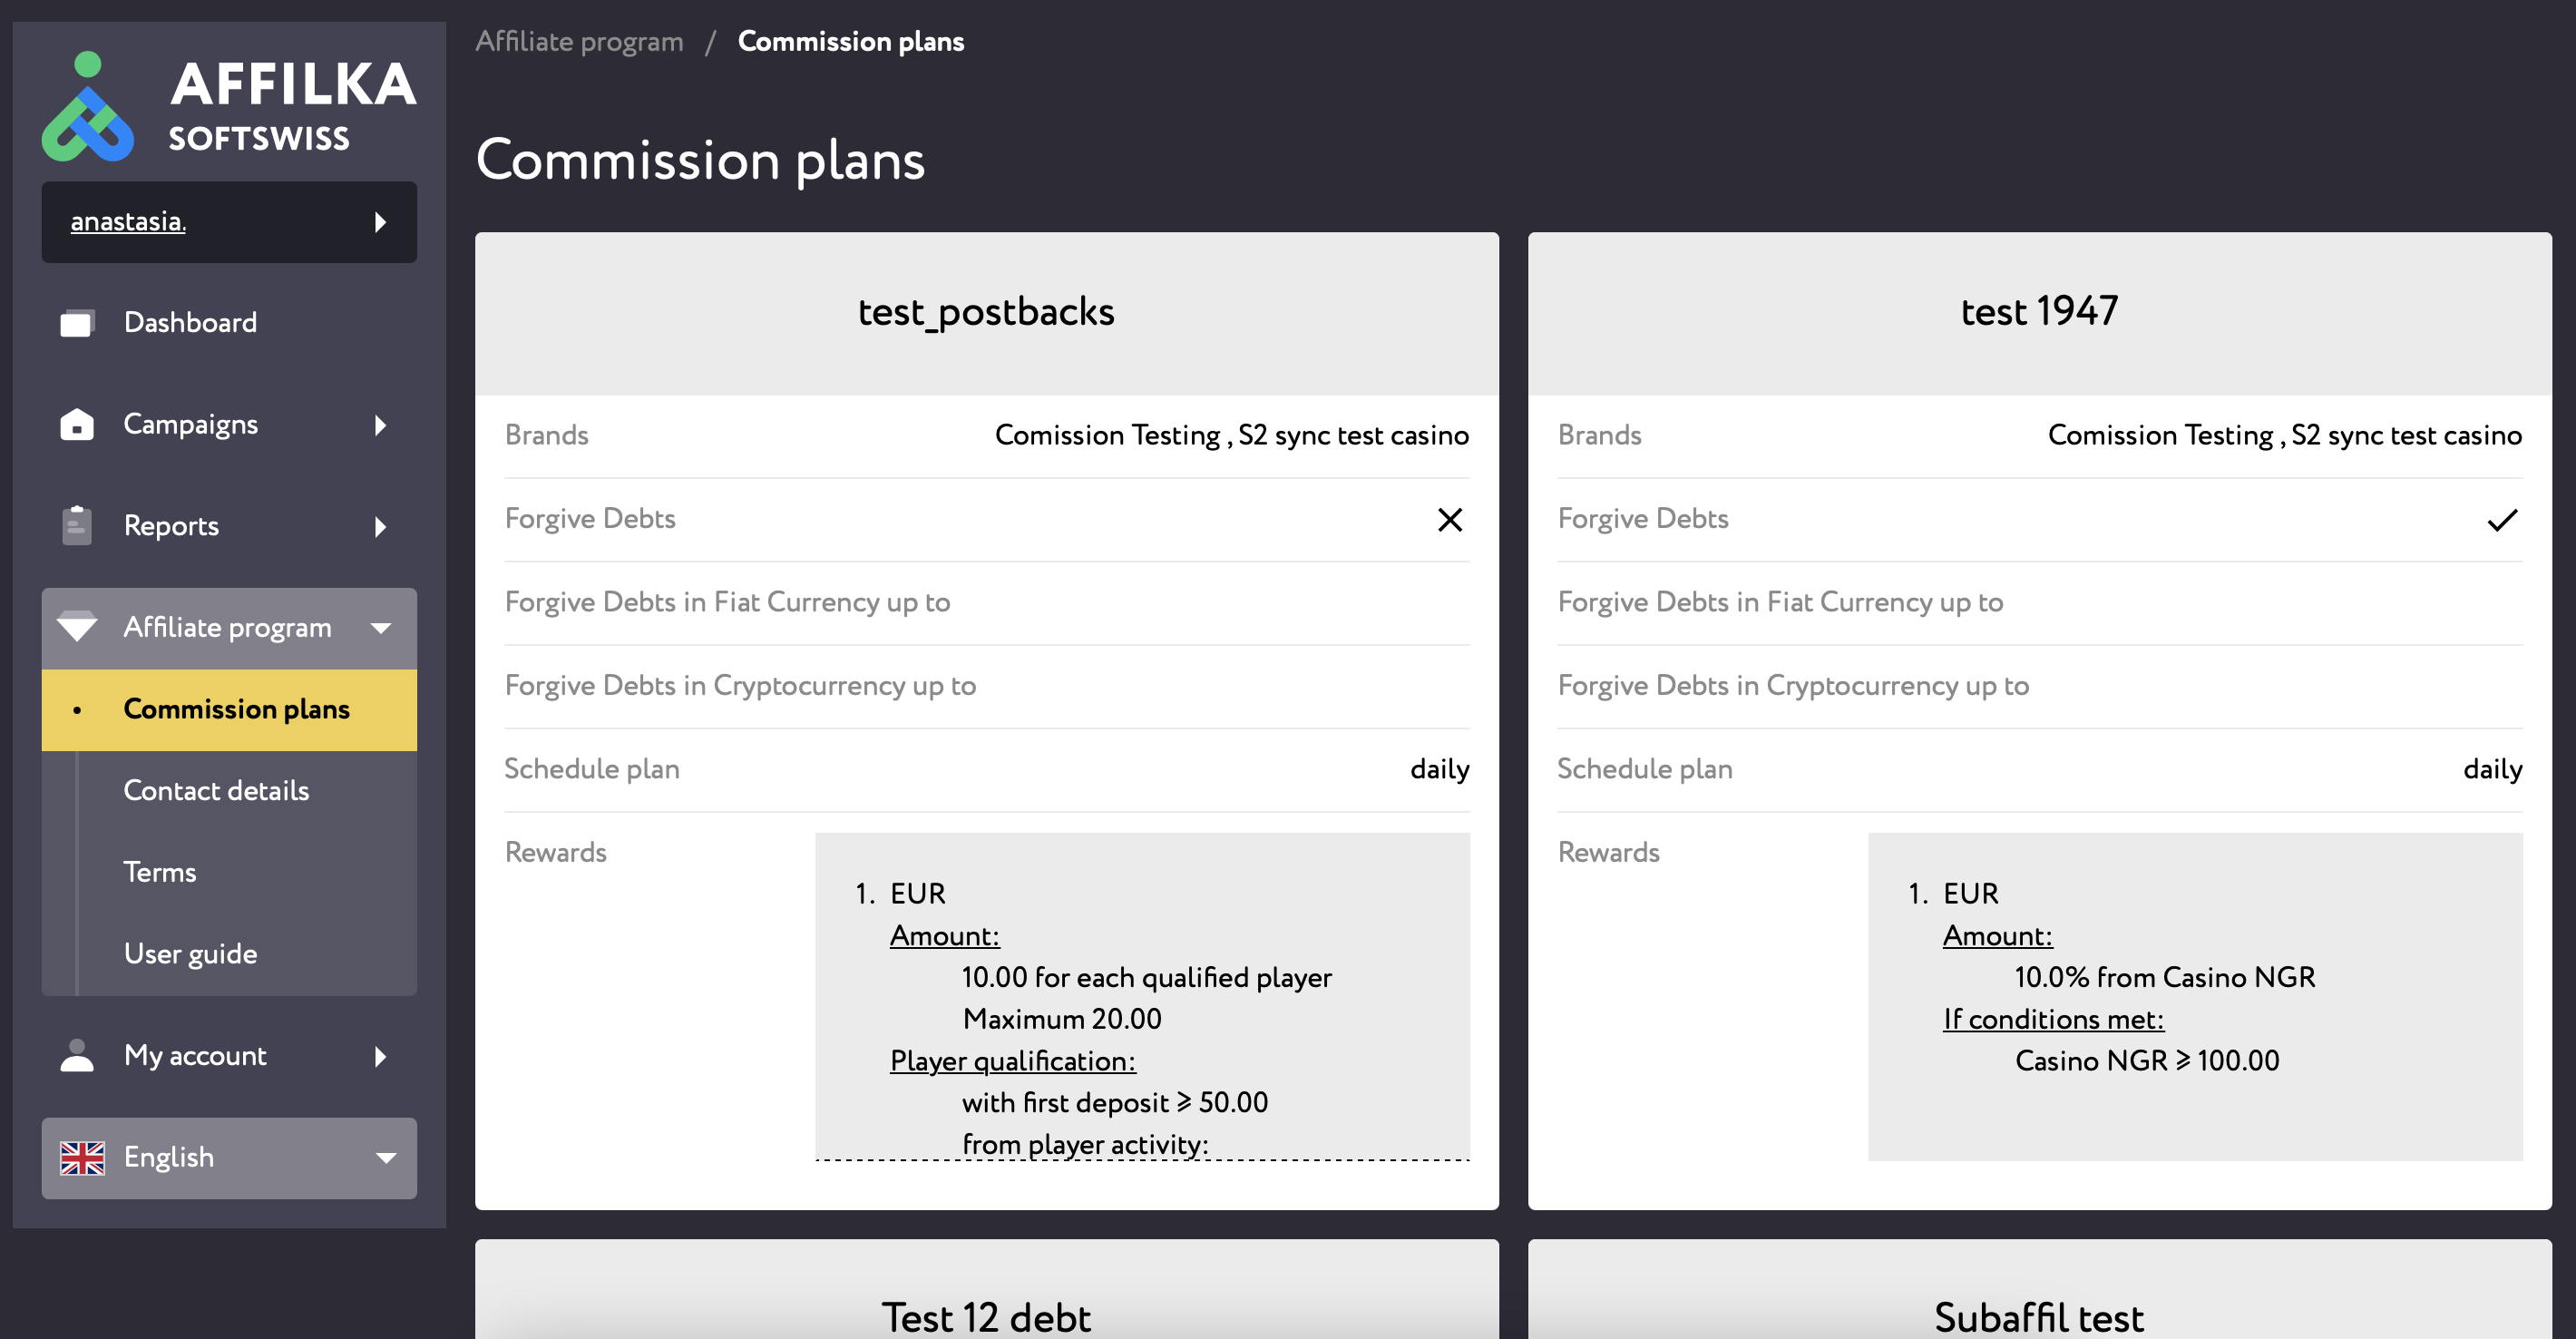
This page contains a list of all commission plans that are available to you within the affiliate program. This may include both individual commission plans and default commission plans. You will get rewards in accordance with the commission settings described in each card.
Please, note:
only 1 commission plan can be applied to a campaign at a time - this means that if you created Campaign A and selected Commission X to go with it, you will get the rewards according to the settings described in this Commission X.
¶ Contact Details
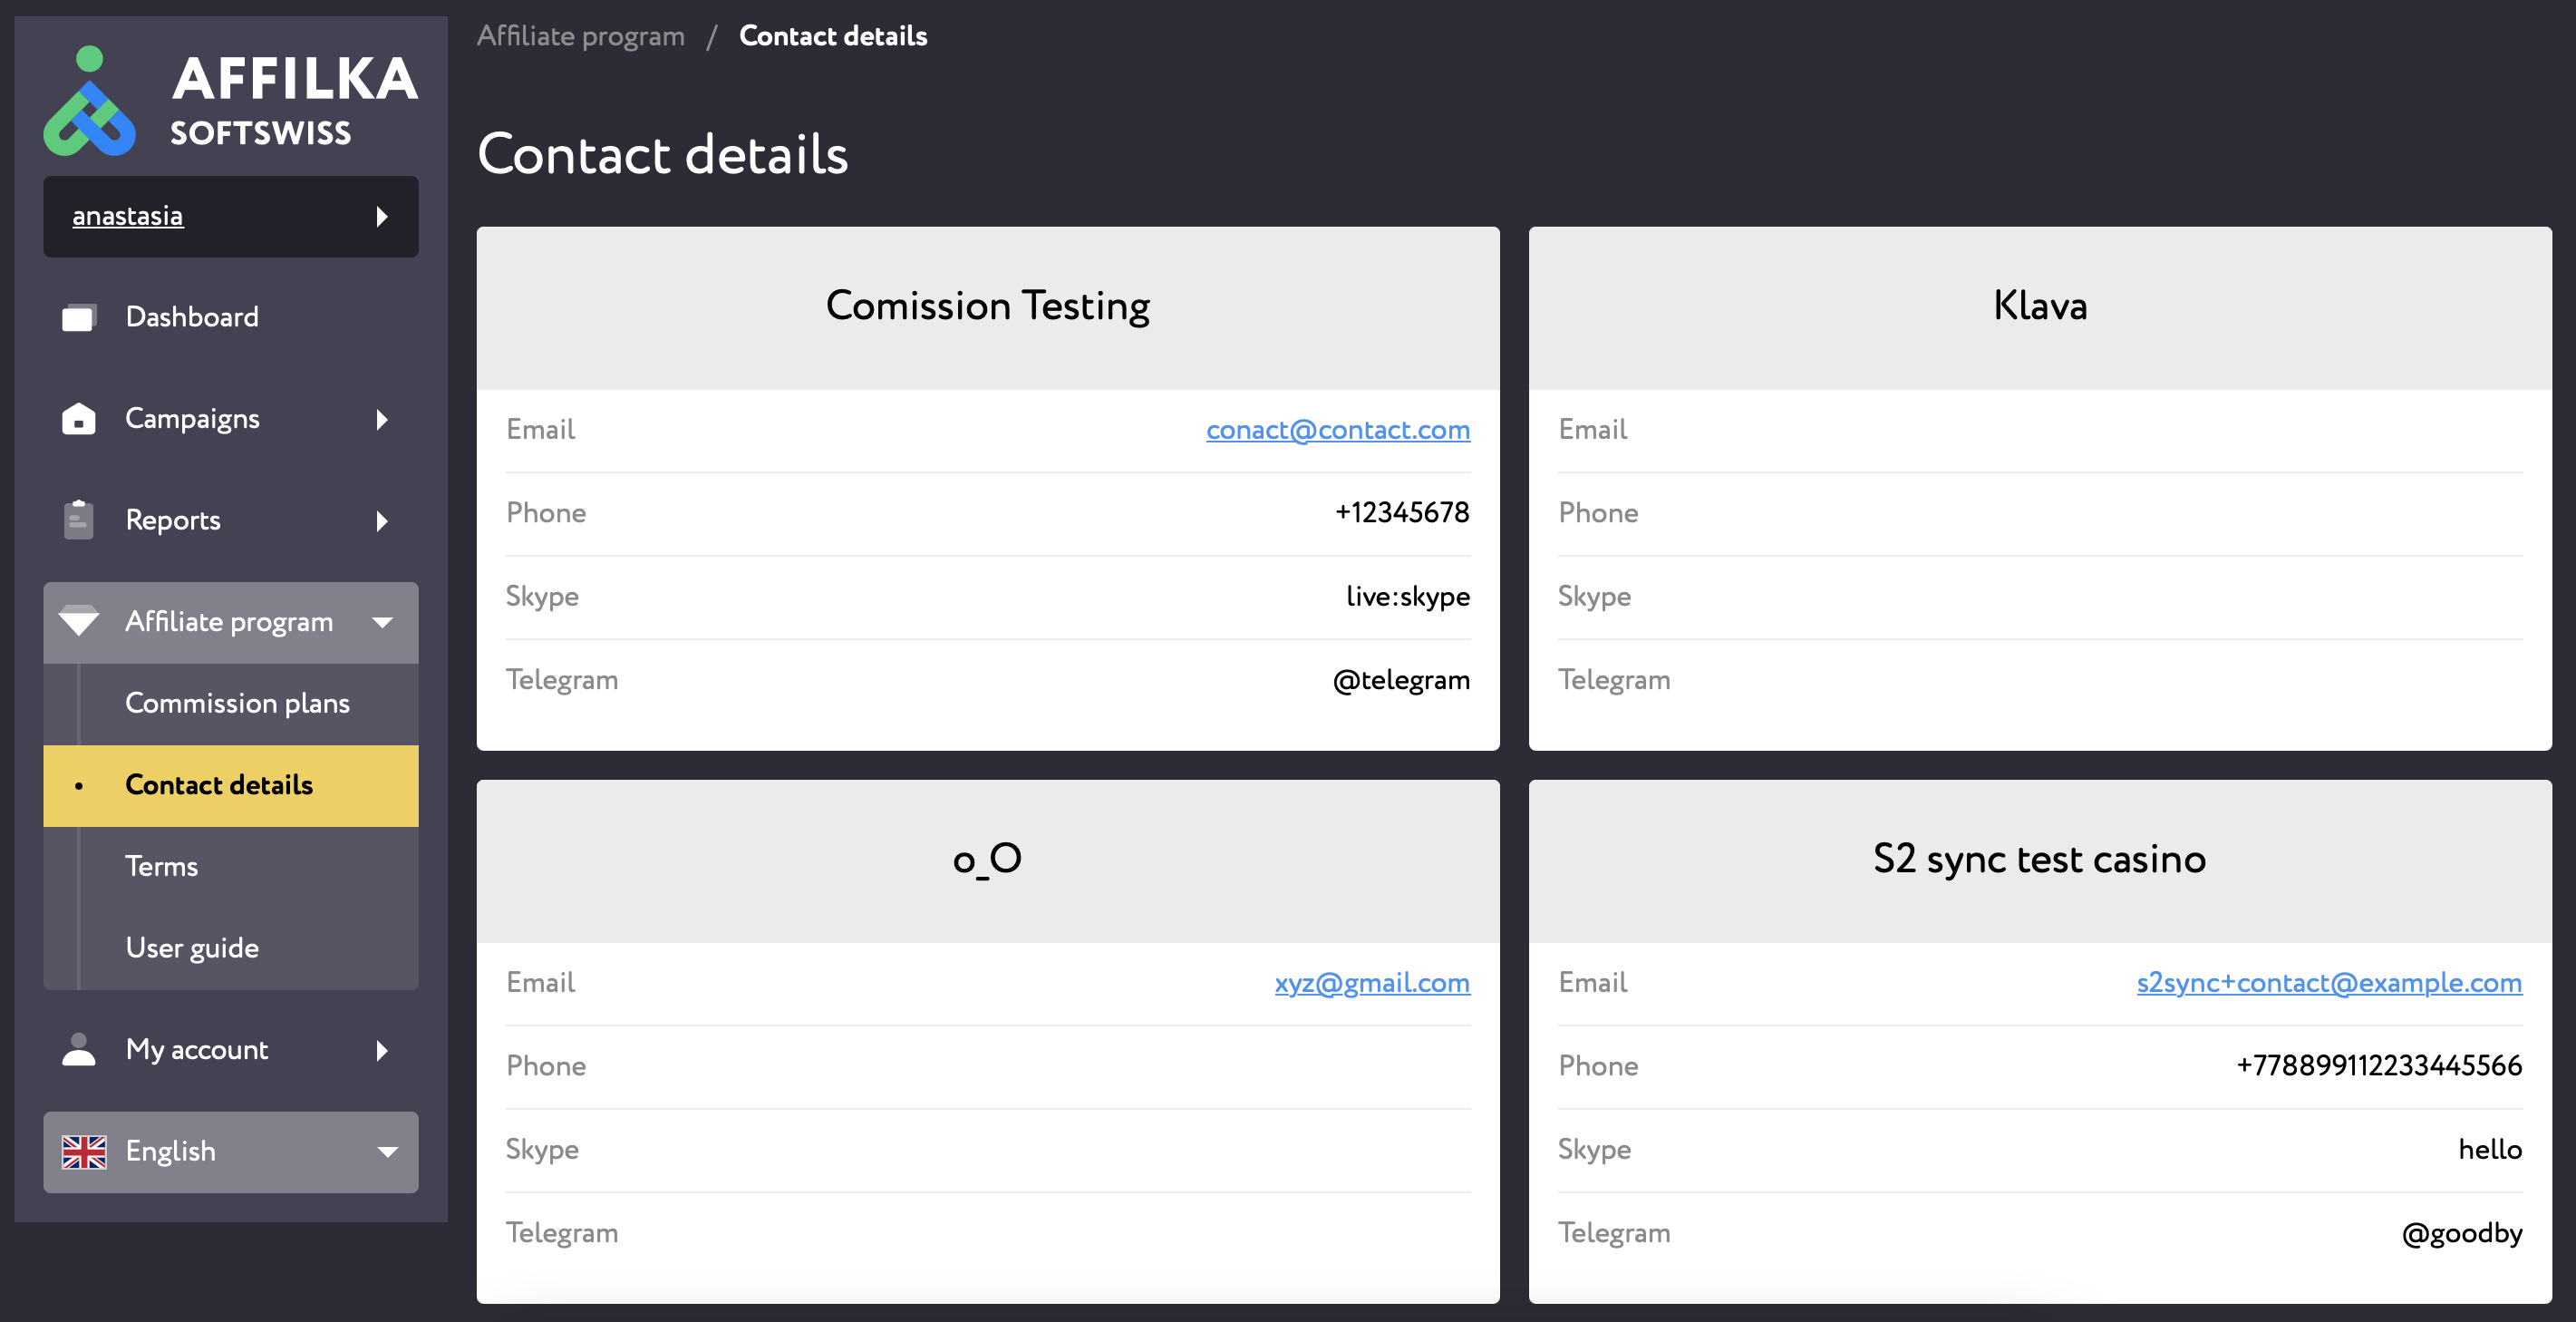
Here you will find affiliate program contact details which you can use to reach out to the affiliate program operator. Each brand has its own contact details. If you have a dedicated affiliate manager assigned to you, you will notice their contact details as well.
¶ Terms
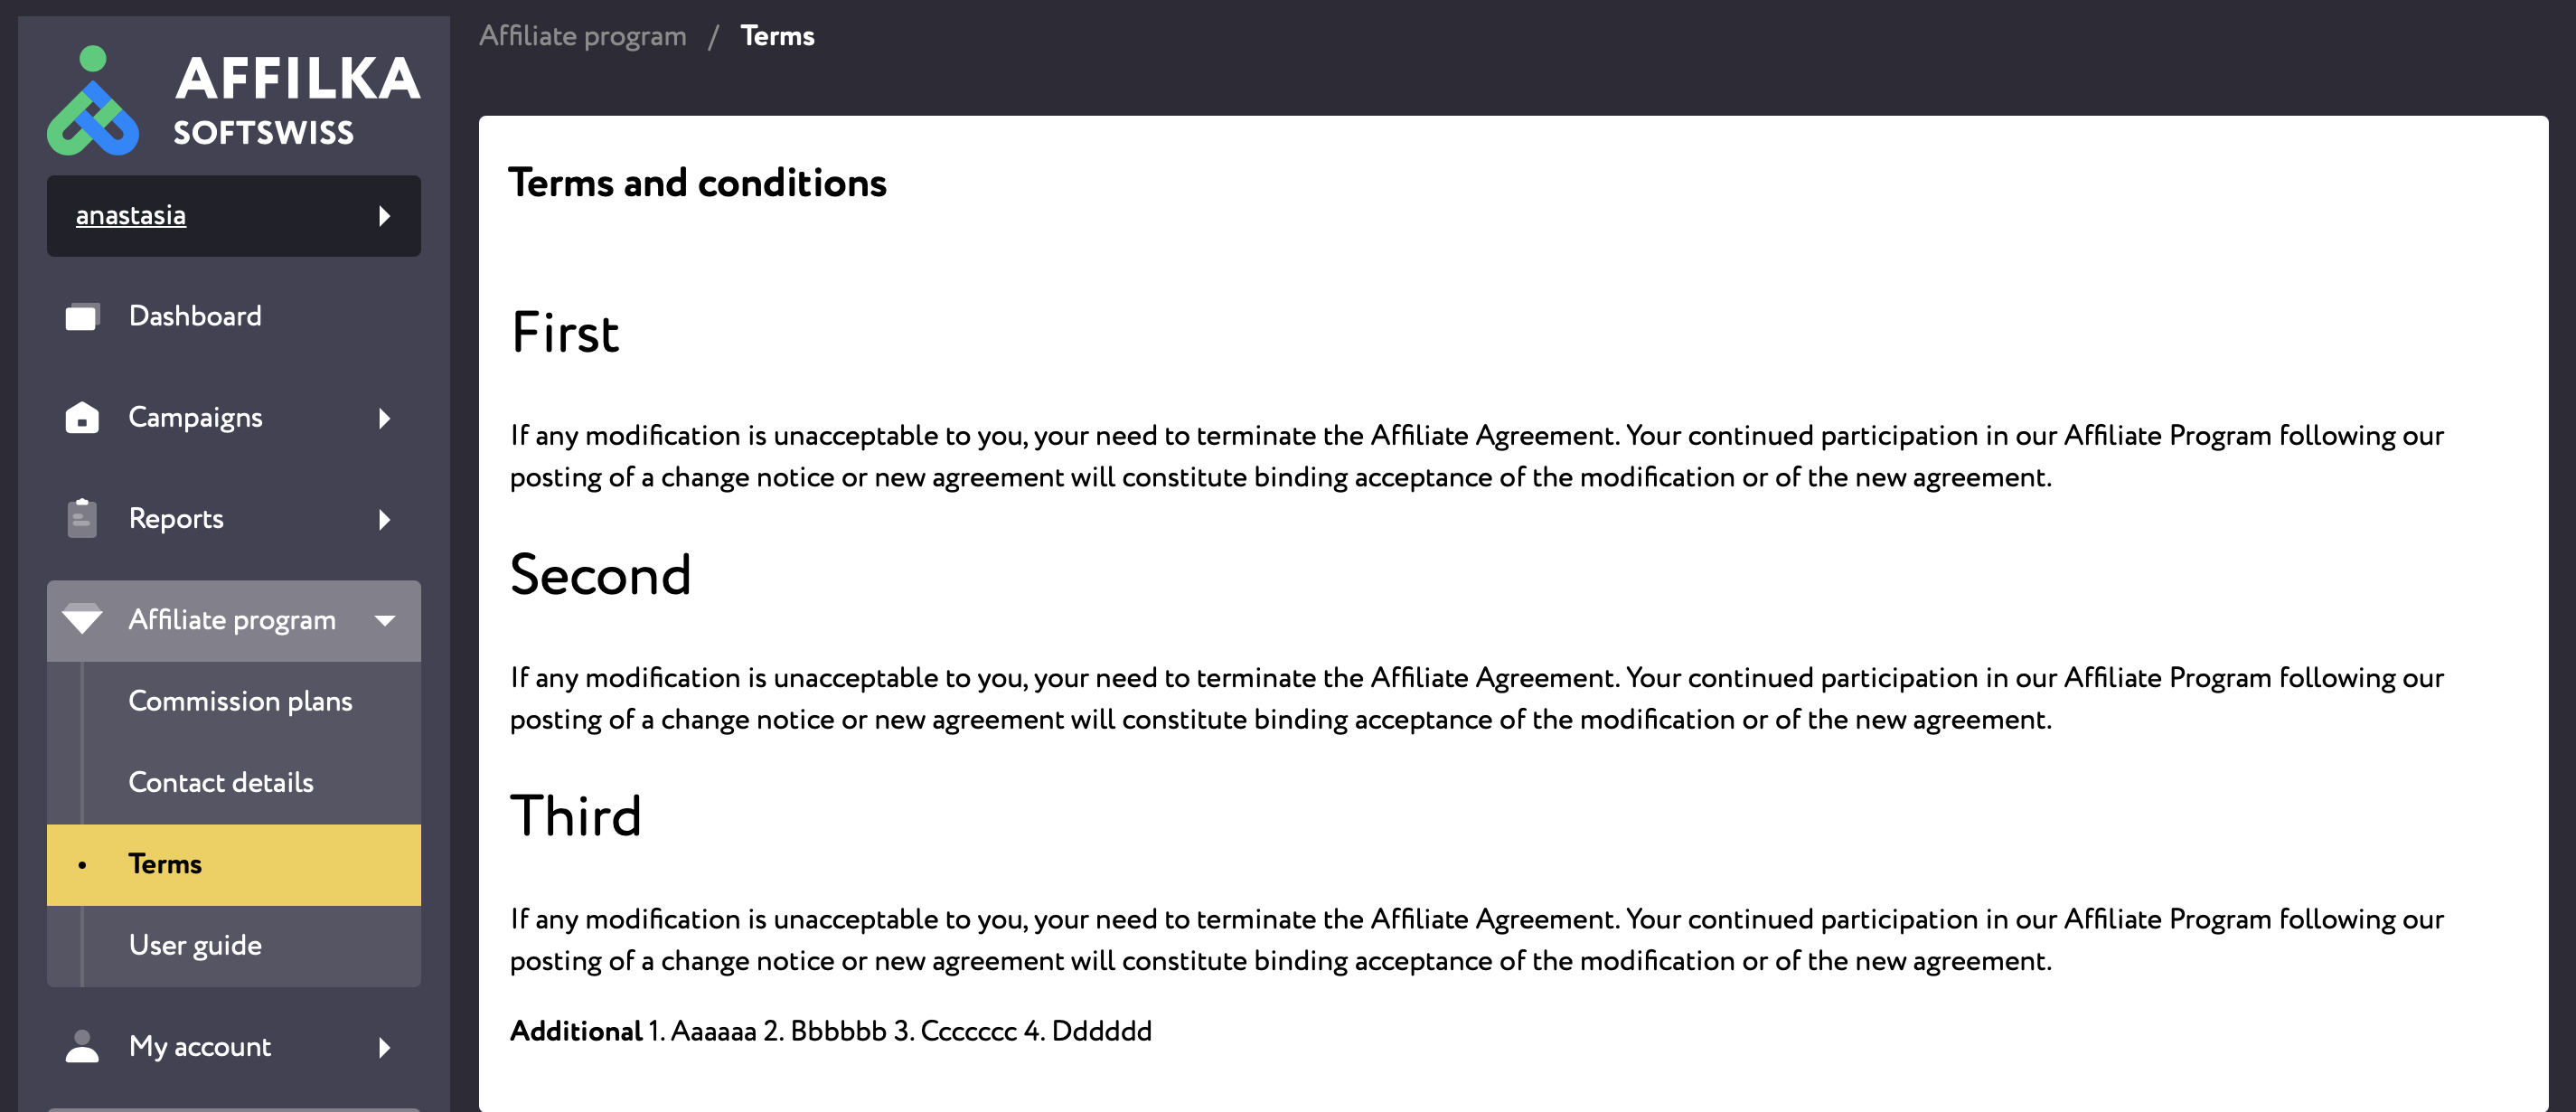
This page contains the affiliate program terms and conditions. Please, note, that the company behind the affiliate program operator may periodically make modifications to the affiliate program terms. While the operator of the affiliate program will do their best to notify you of such changes, we recommend that you revisit this page regularly.
¶ News
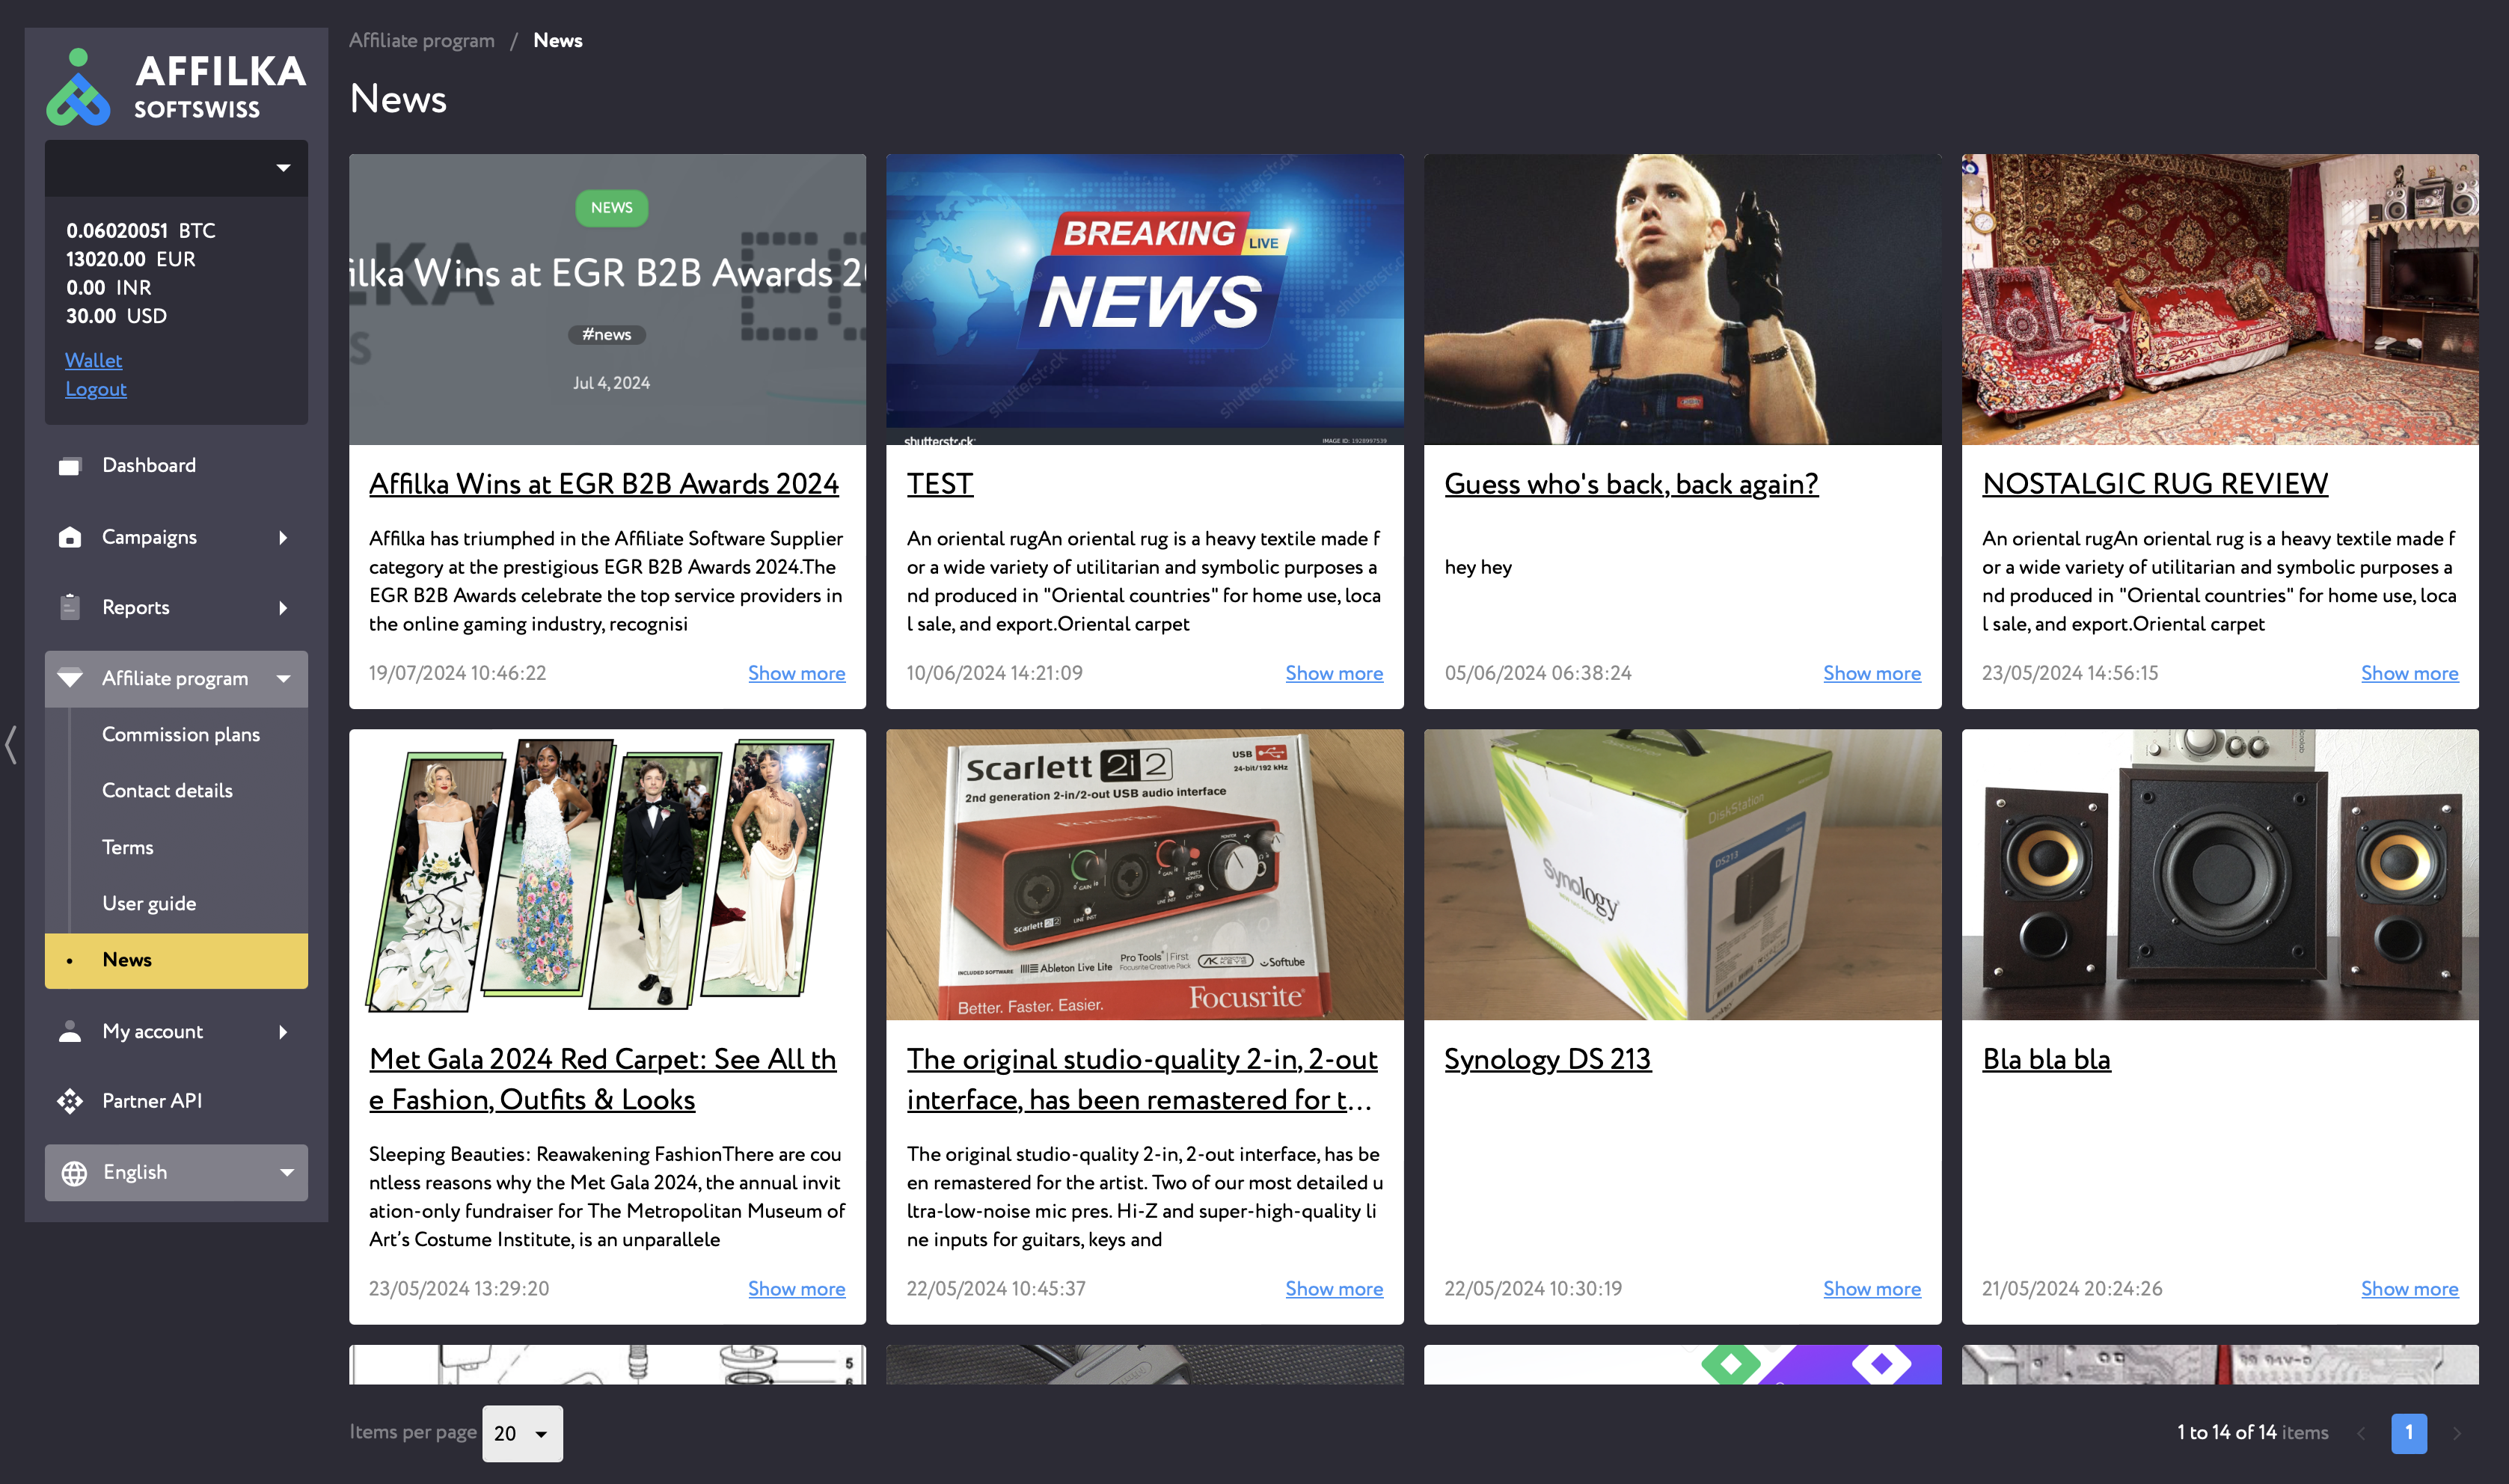
This page contains the news published by the Affiliate Program. If you want to read a specific news article in detail, press on the News Banner, the News Title or the “Show more” link in the news article that interests you.
¶ My account tab
¶ Account Info
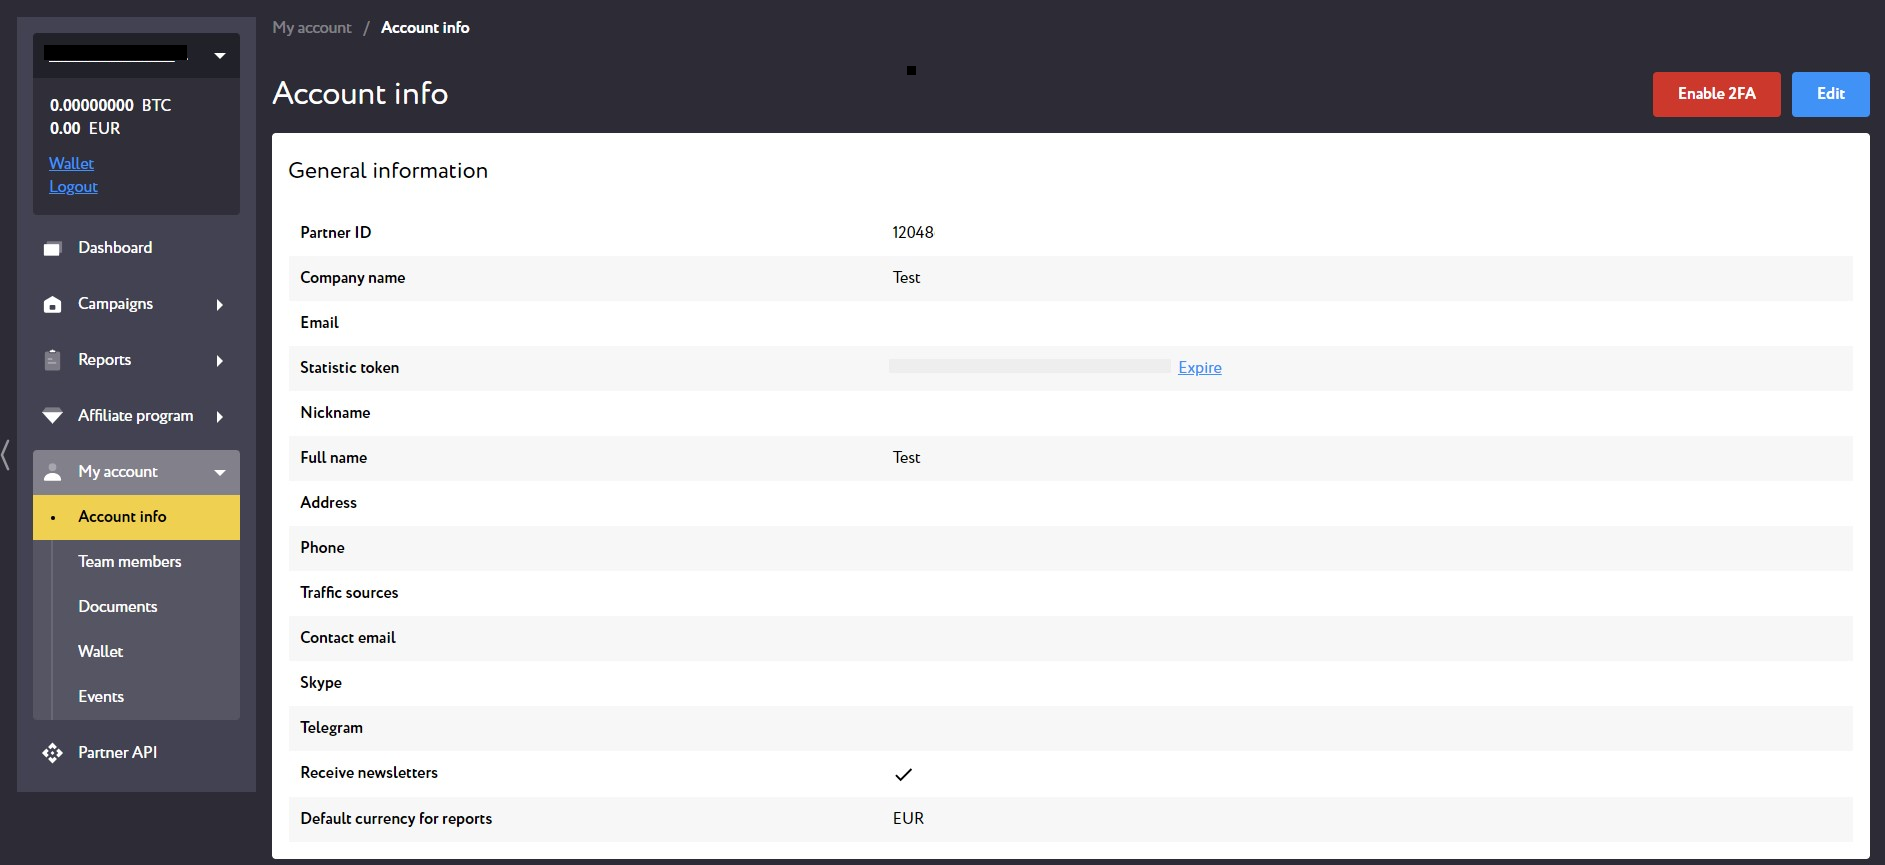
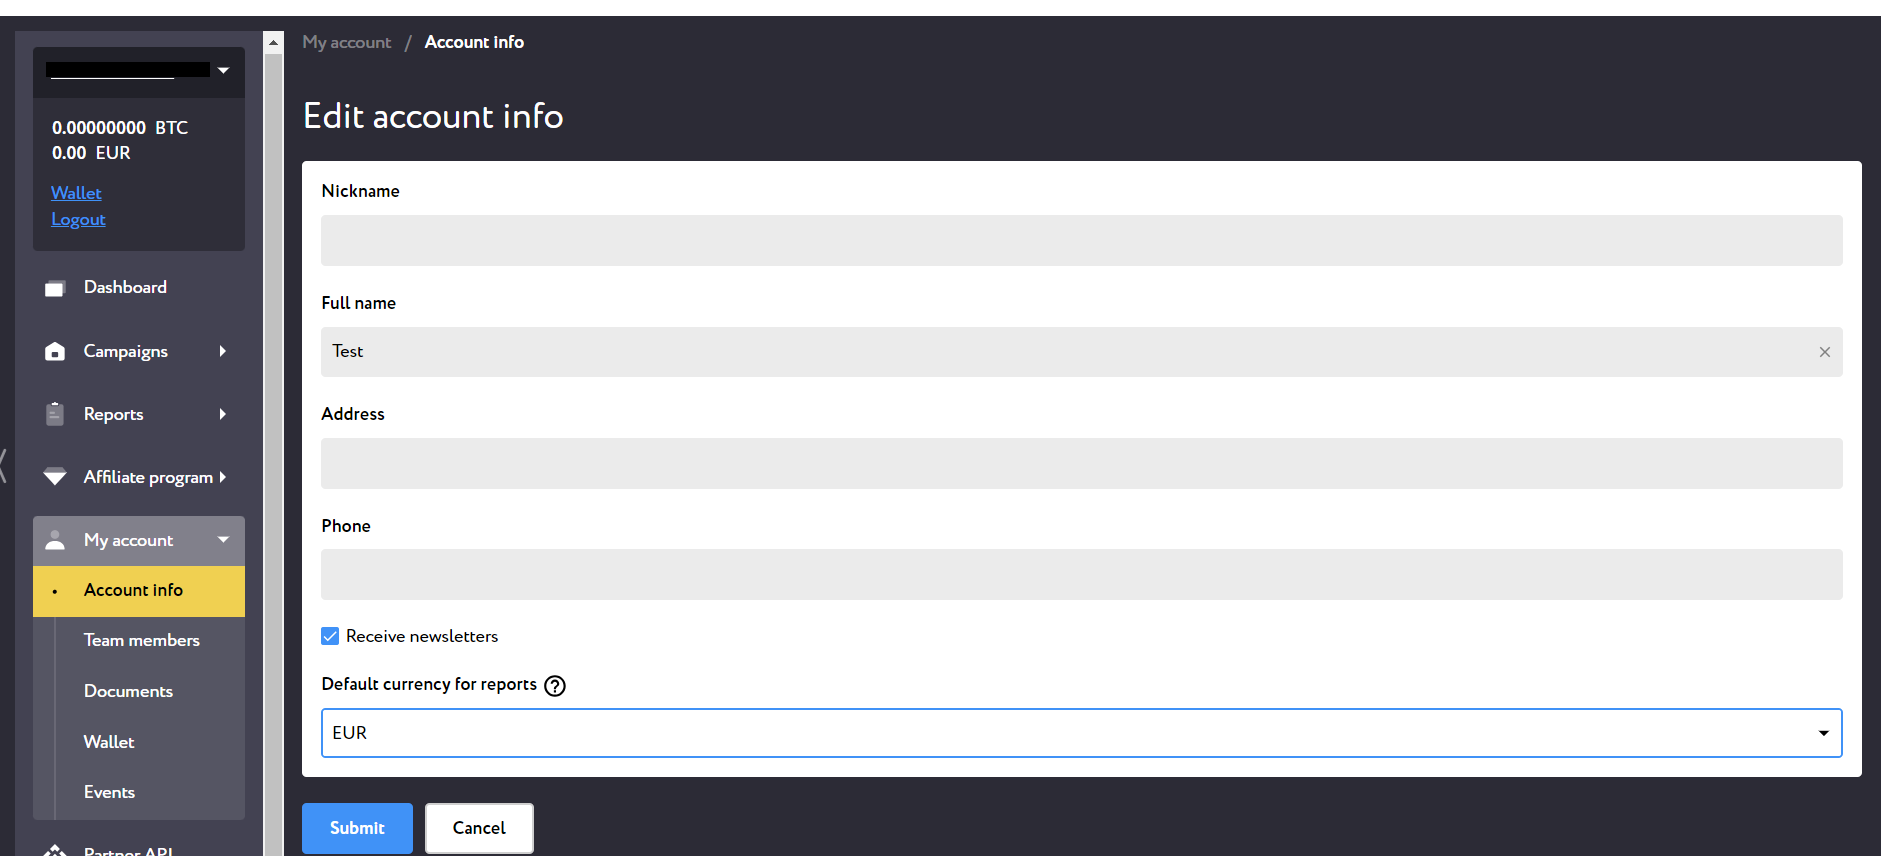
This is your personal profile. Here we keep your account info. Some of the fields are submitted at registration. You can fill in and edit other fields at any time by going to the /partner/profile page. Here you can also change you email subscription preferences and enable two-factor authentication to secure your account.
¶ Default currency for reports
In this field, you can select the default currency that will be used in Statistics and in Quick stats/Quick charts on the Dashboard. After you set it, all values in the specified sections will be shown in the selected currency by default.
The default currency setting only affects the currency in which reports and Quick stats/charts will be shown. Commissions, bills and payments are calculated in brands' base currencies.
In order for the setting to be applied:
- Click on the dropdown
- Choose currency
- Press “Submit”.
Please keep in mind that "Report Favorites" templates overrides the "Default currency for reports" setting. This means that if USD is selected as the default currency, but the "Report Favorites" template was saved in EUR, then after the changes in the selected field are applied, the "Report Favorites" templates still will be shown in EUR. In order to change the currency in the "Report Favorites", you'll need to create a new template.
¶ Active sessions
You can terminate an active session if you have identified a login from an unfamiliar device among your active sessions or among the active sessions of your team members. After you terminate the session, the user who is currently logged in using this device will log out.
To force the termination of user sessions:
- Go to the “Account Info” tab.
- Scroll down to the "Active sessions" section.
- Press "Terminate" next to the session you wish to expire.
You can also terminate active sessions of your team members. Click on the user's email in the “Team Members” section, scroll down to the "Active Sessions" field, press "Terminate" next to the session.

¶ Team Members
Use this tab to add team members to your account, to view and manage your team members.
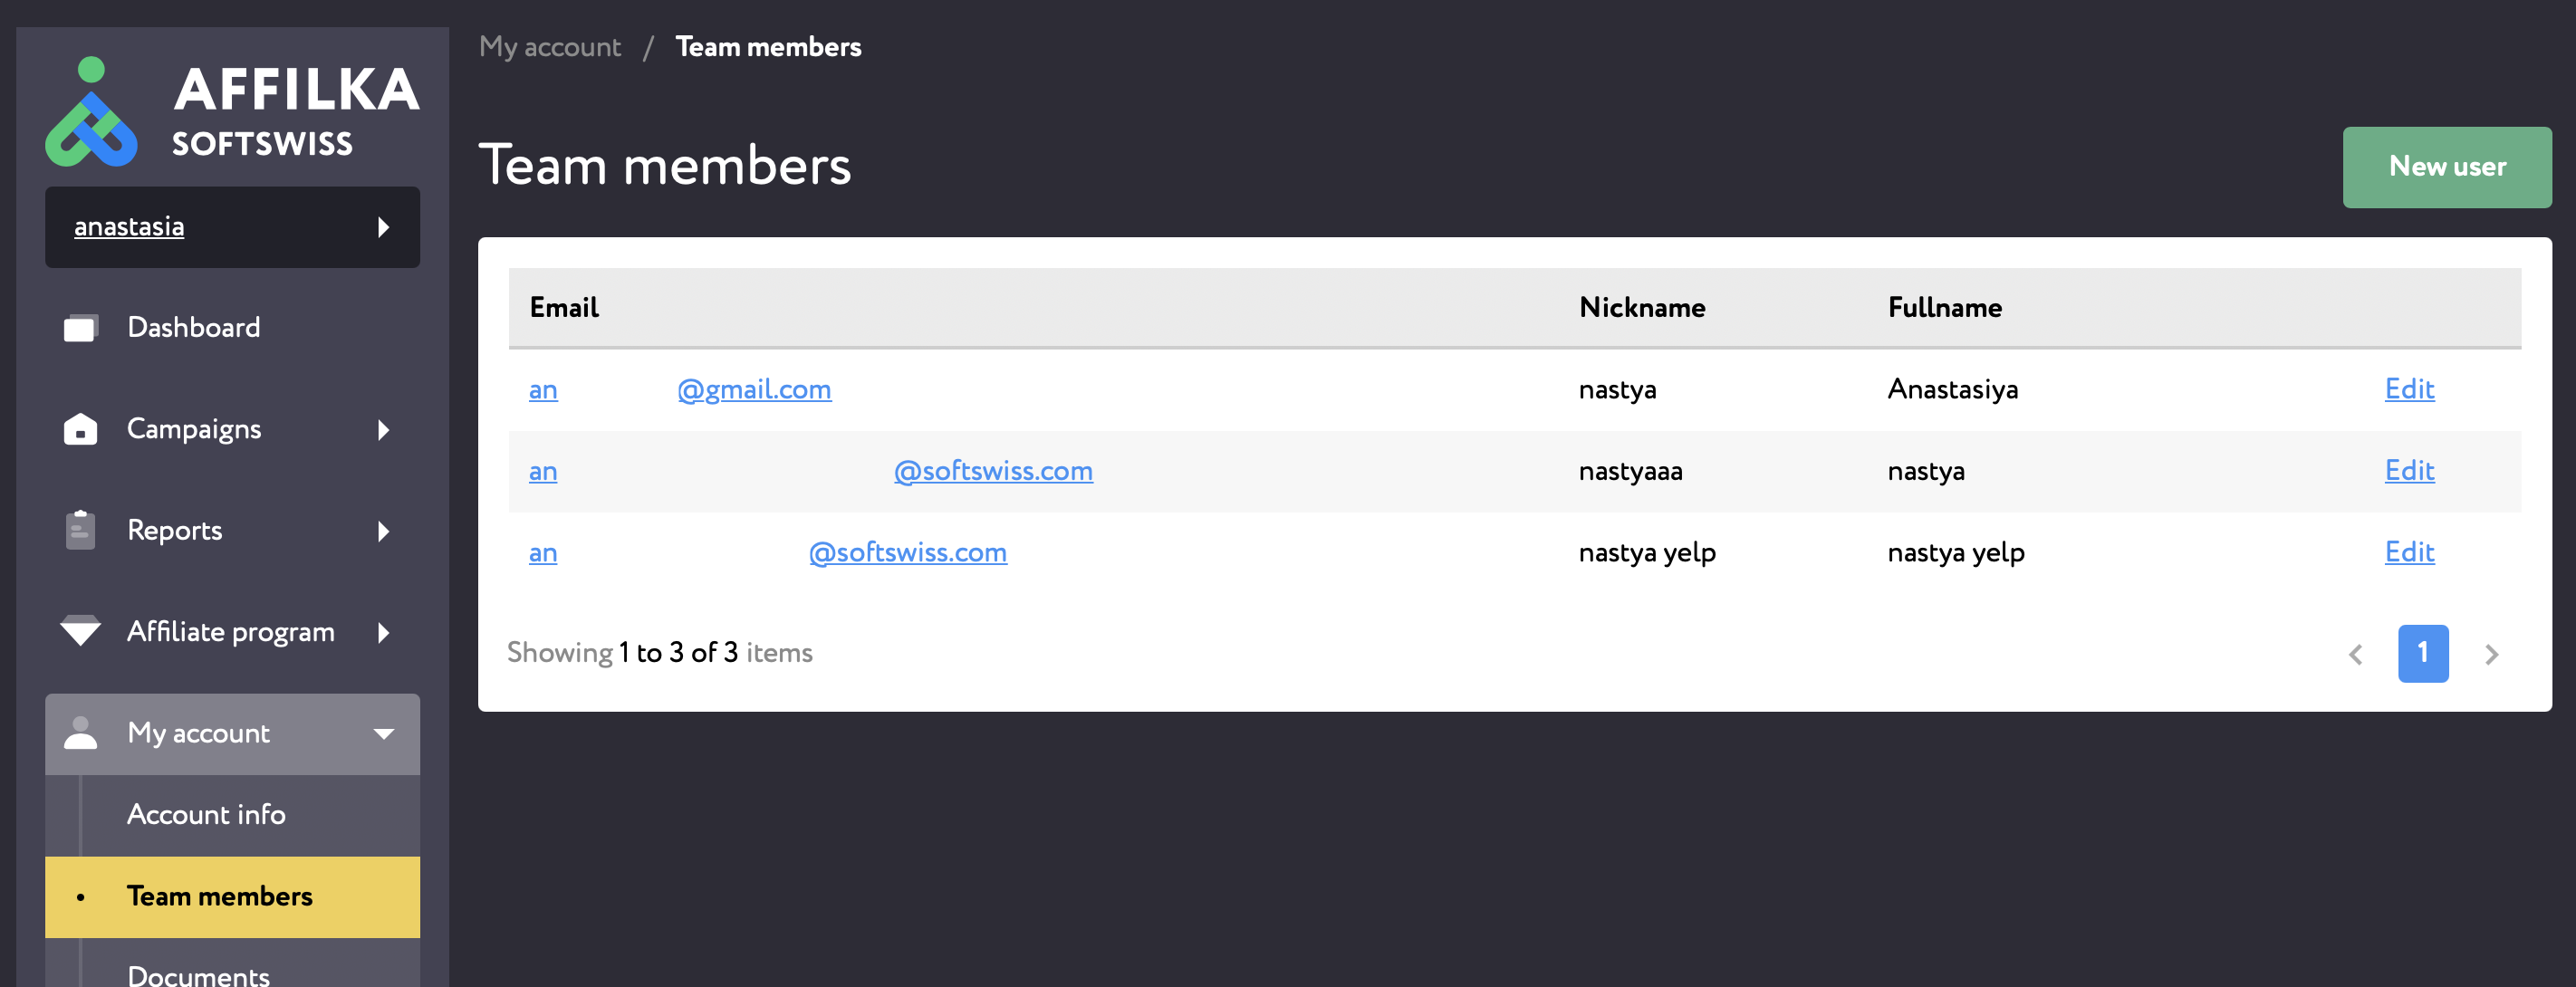
To add a team member:
1) Go to the "Users" tab via the /partner/users link.
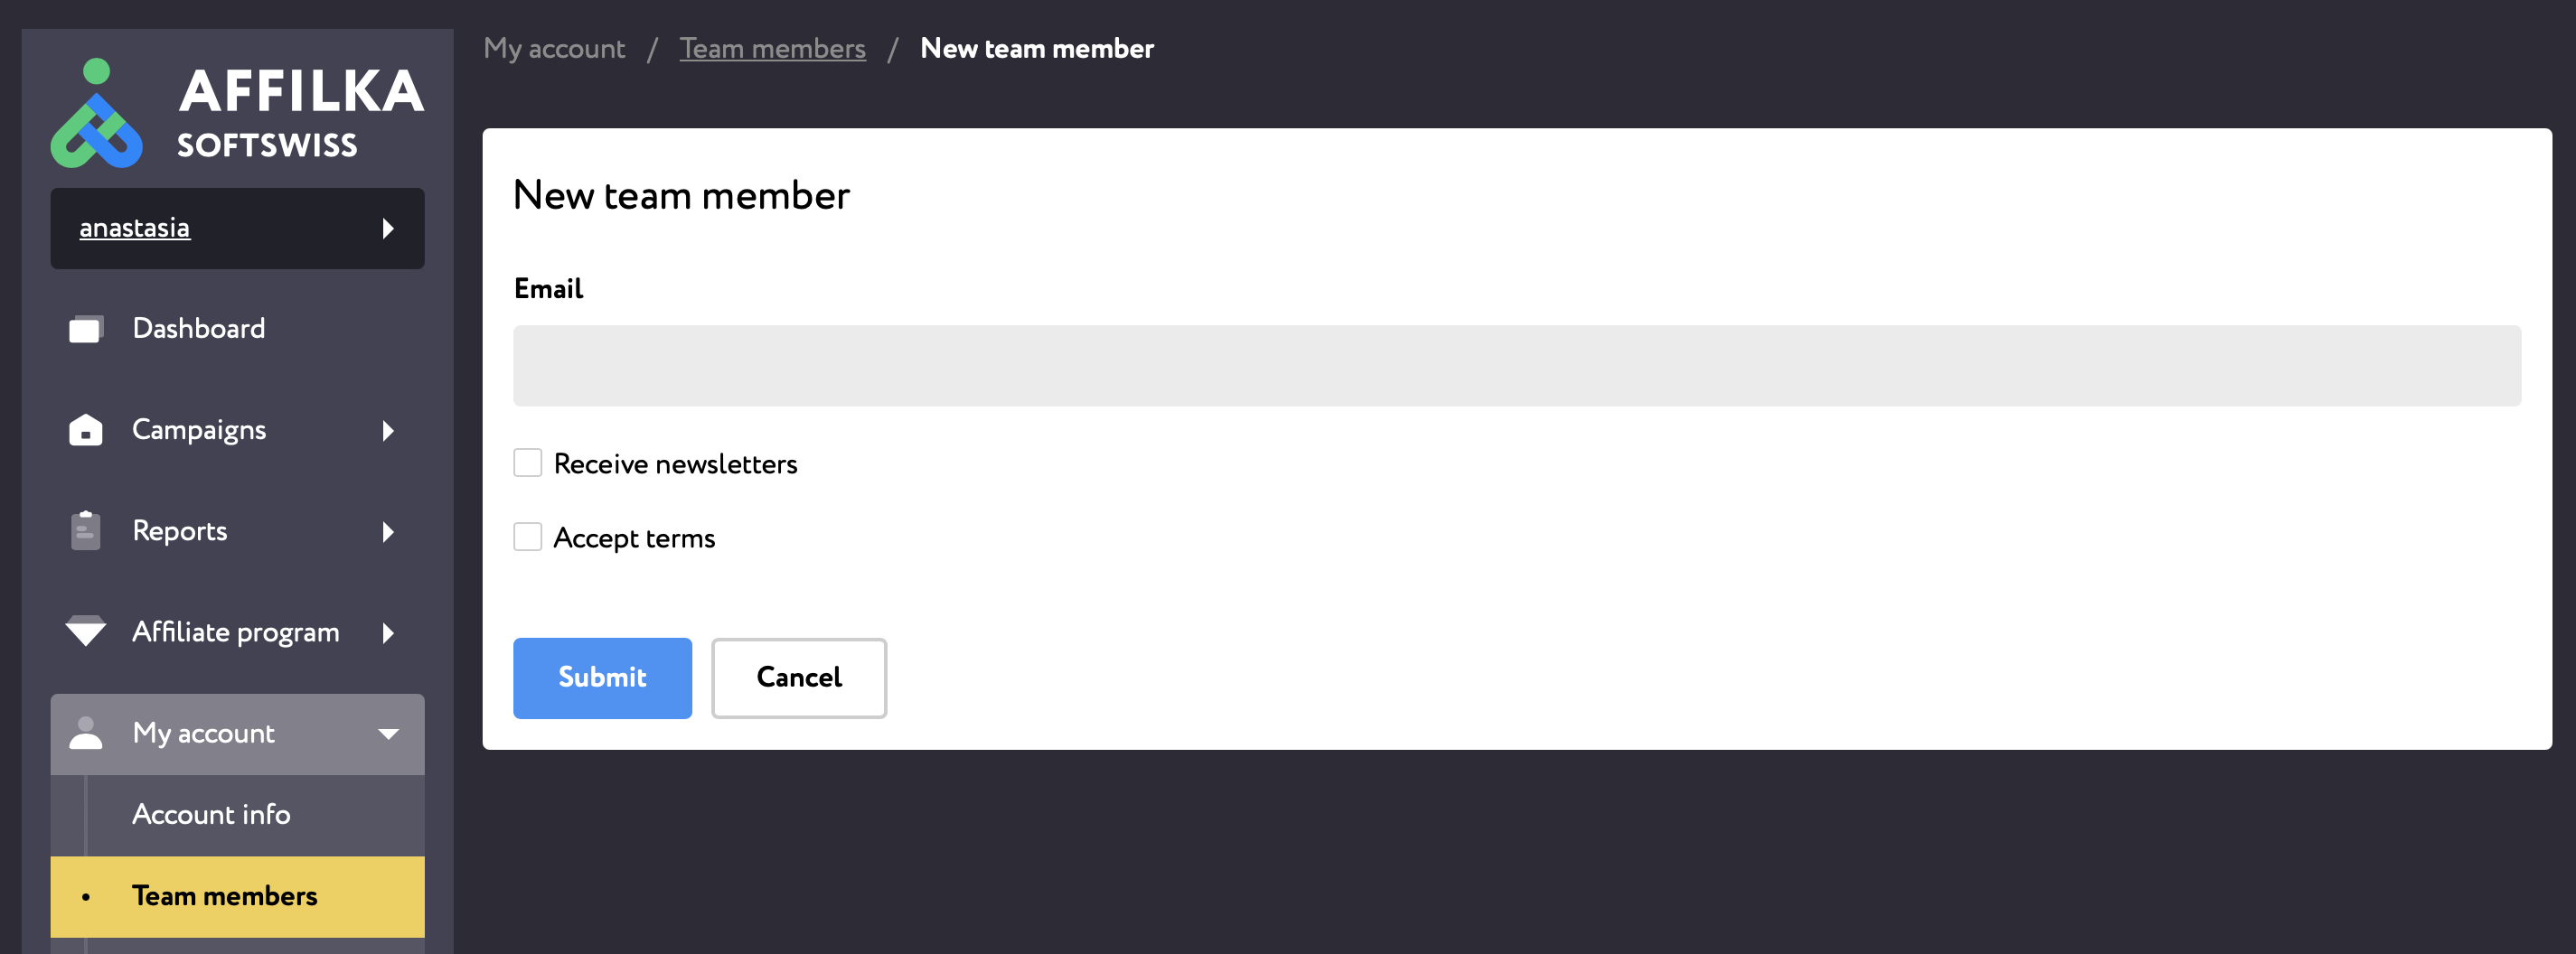
2) Press the “New user” button. You will get redirected to the form to submit your team member's details.
3) Fill in the required fields and press “Submit”. A set up password instruction will be immediately sent to the indicated Email of the Team Member.
4) After setting up the password, your Team Member will be able to Enter Your Partner Account under their own credentials.
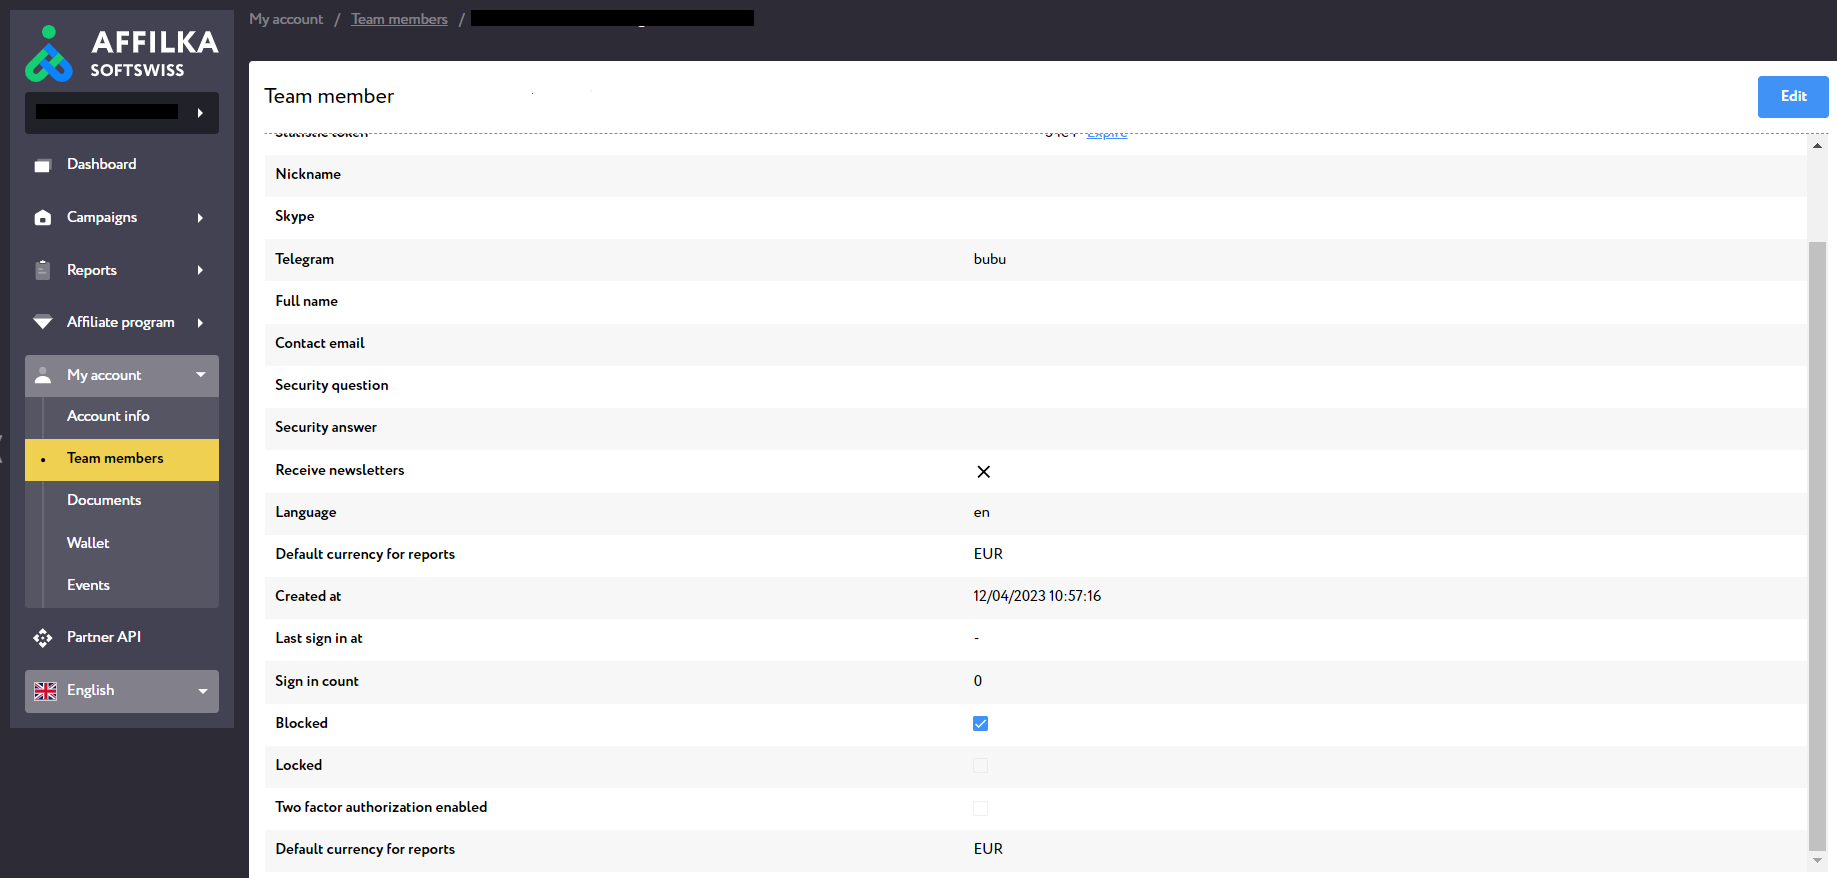
To view team member's account info, press on their email. You'll be redirected to the view mode of your team member's account info page. Here you can view their account info, the time their account was created, their last sign in date and time and whether they have 2fa enabled on their account.
Here you can also block your team member by ticking off the “Blocked” checkbox.If a team member was locked by the system after several unsuccessful login attempts, then you can unlock it by removing a tick next to “Locked”.
¶ Documents
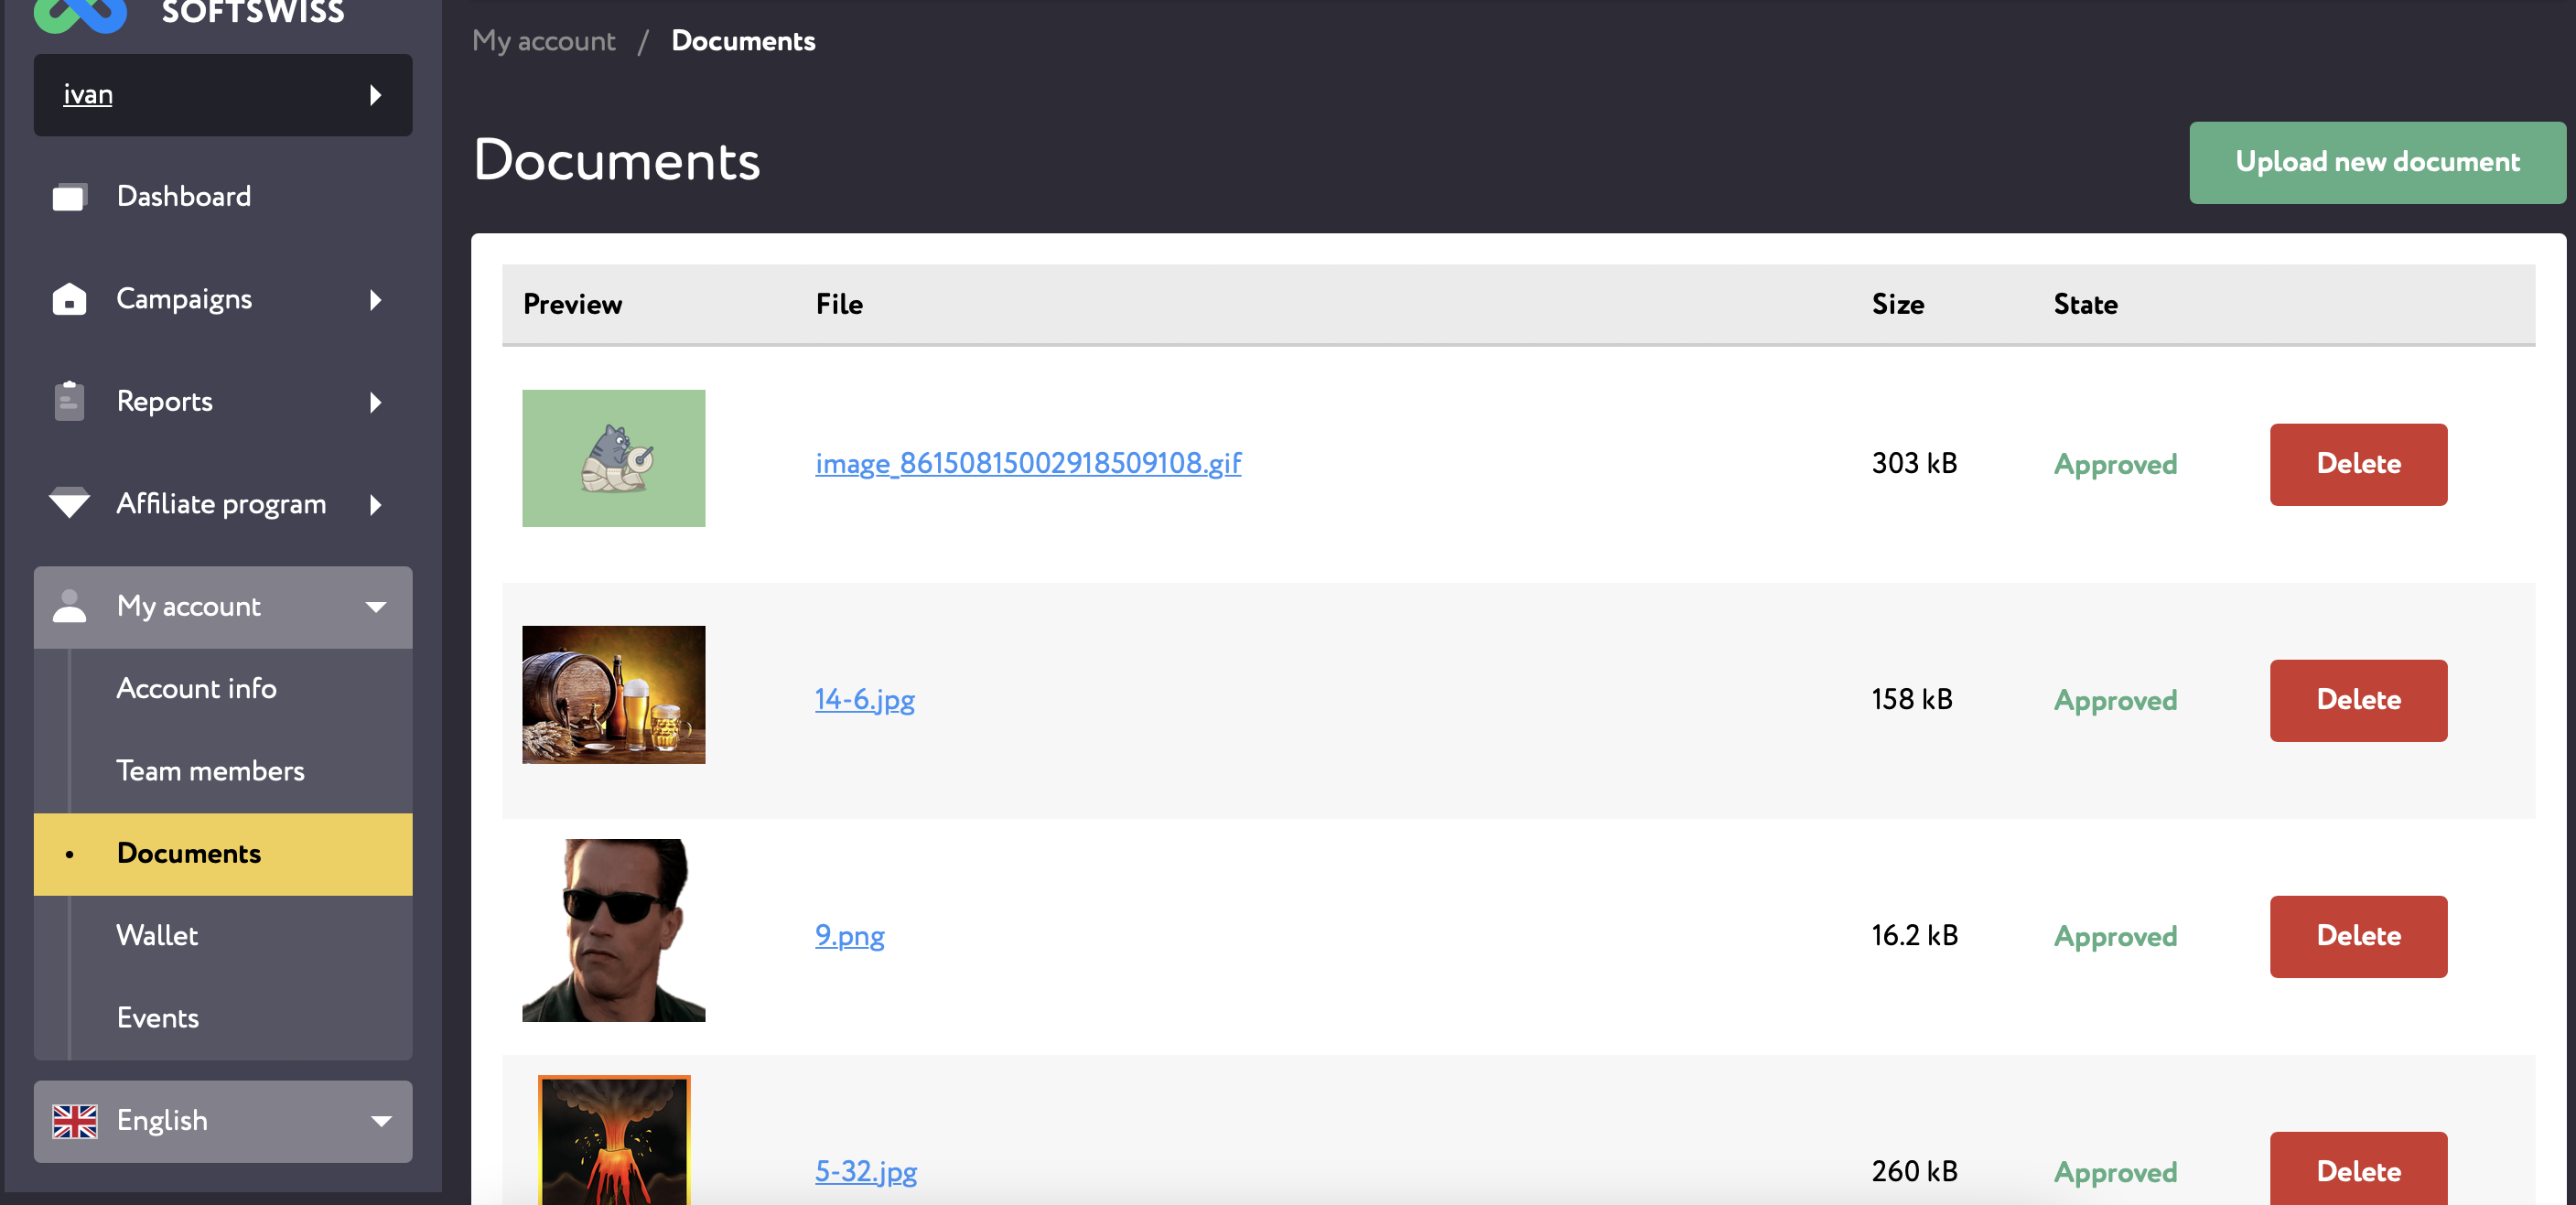
Sometimes the affiliate program may request to verify your documents. Use this tab to upload any docs you want to submit for their review.
All Documents waiting for verification are marked as pending. Verified documents are marked as approved and documents that the affiliate program operator cannot accept will be marked as declined.
If you want to delete a certain document, press "Delete" next to the corresponding document.
To upload a new document, press "Upload new document" button in the top right corner.
To view the document in detail, press on the document name.
¶ Wallet
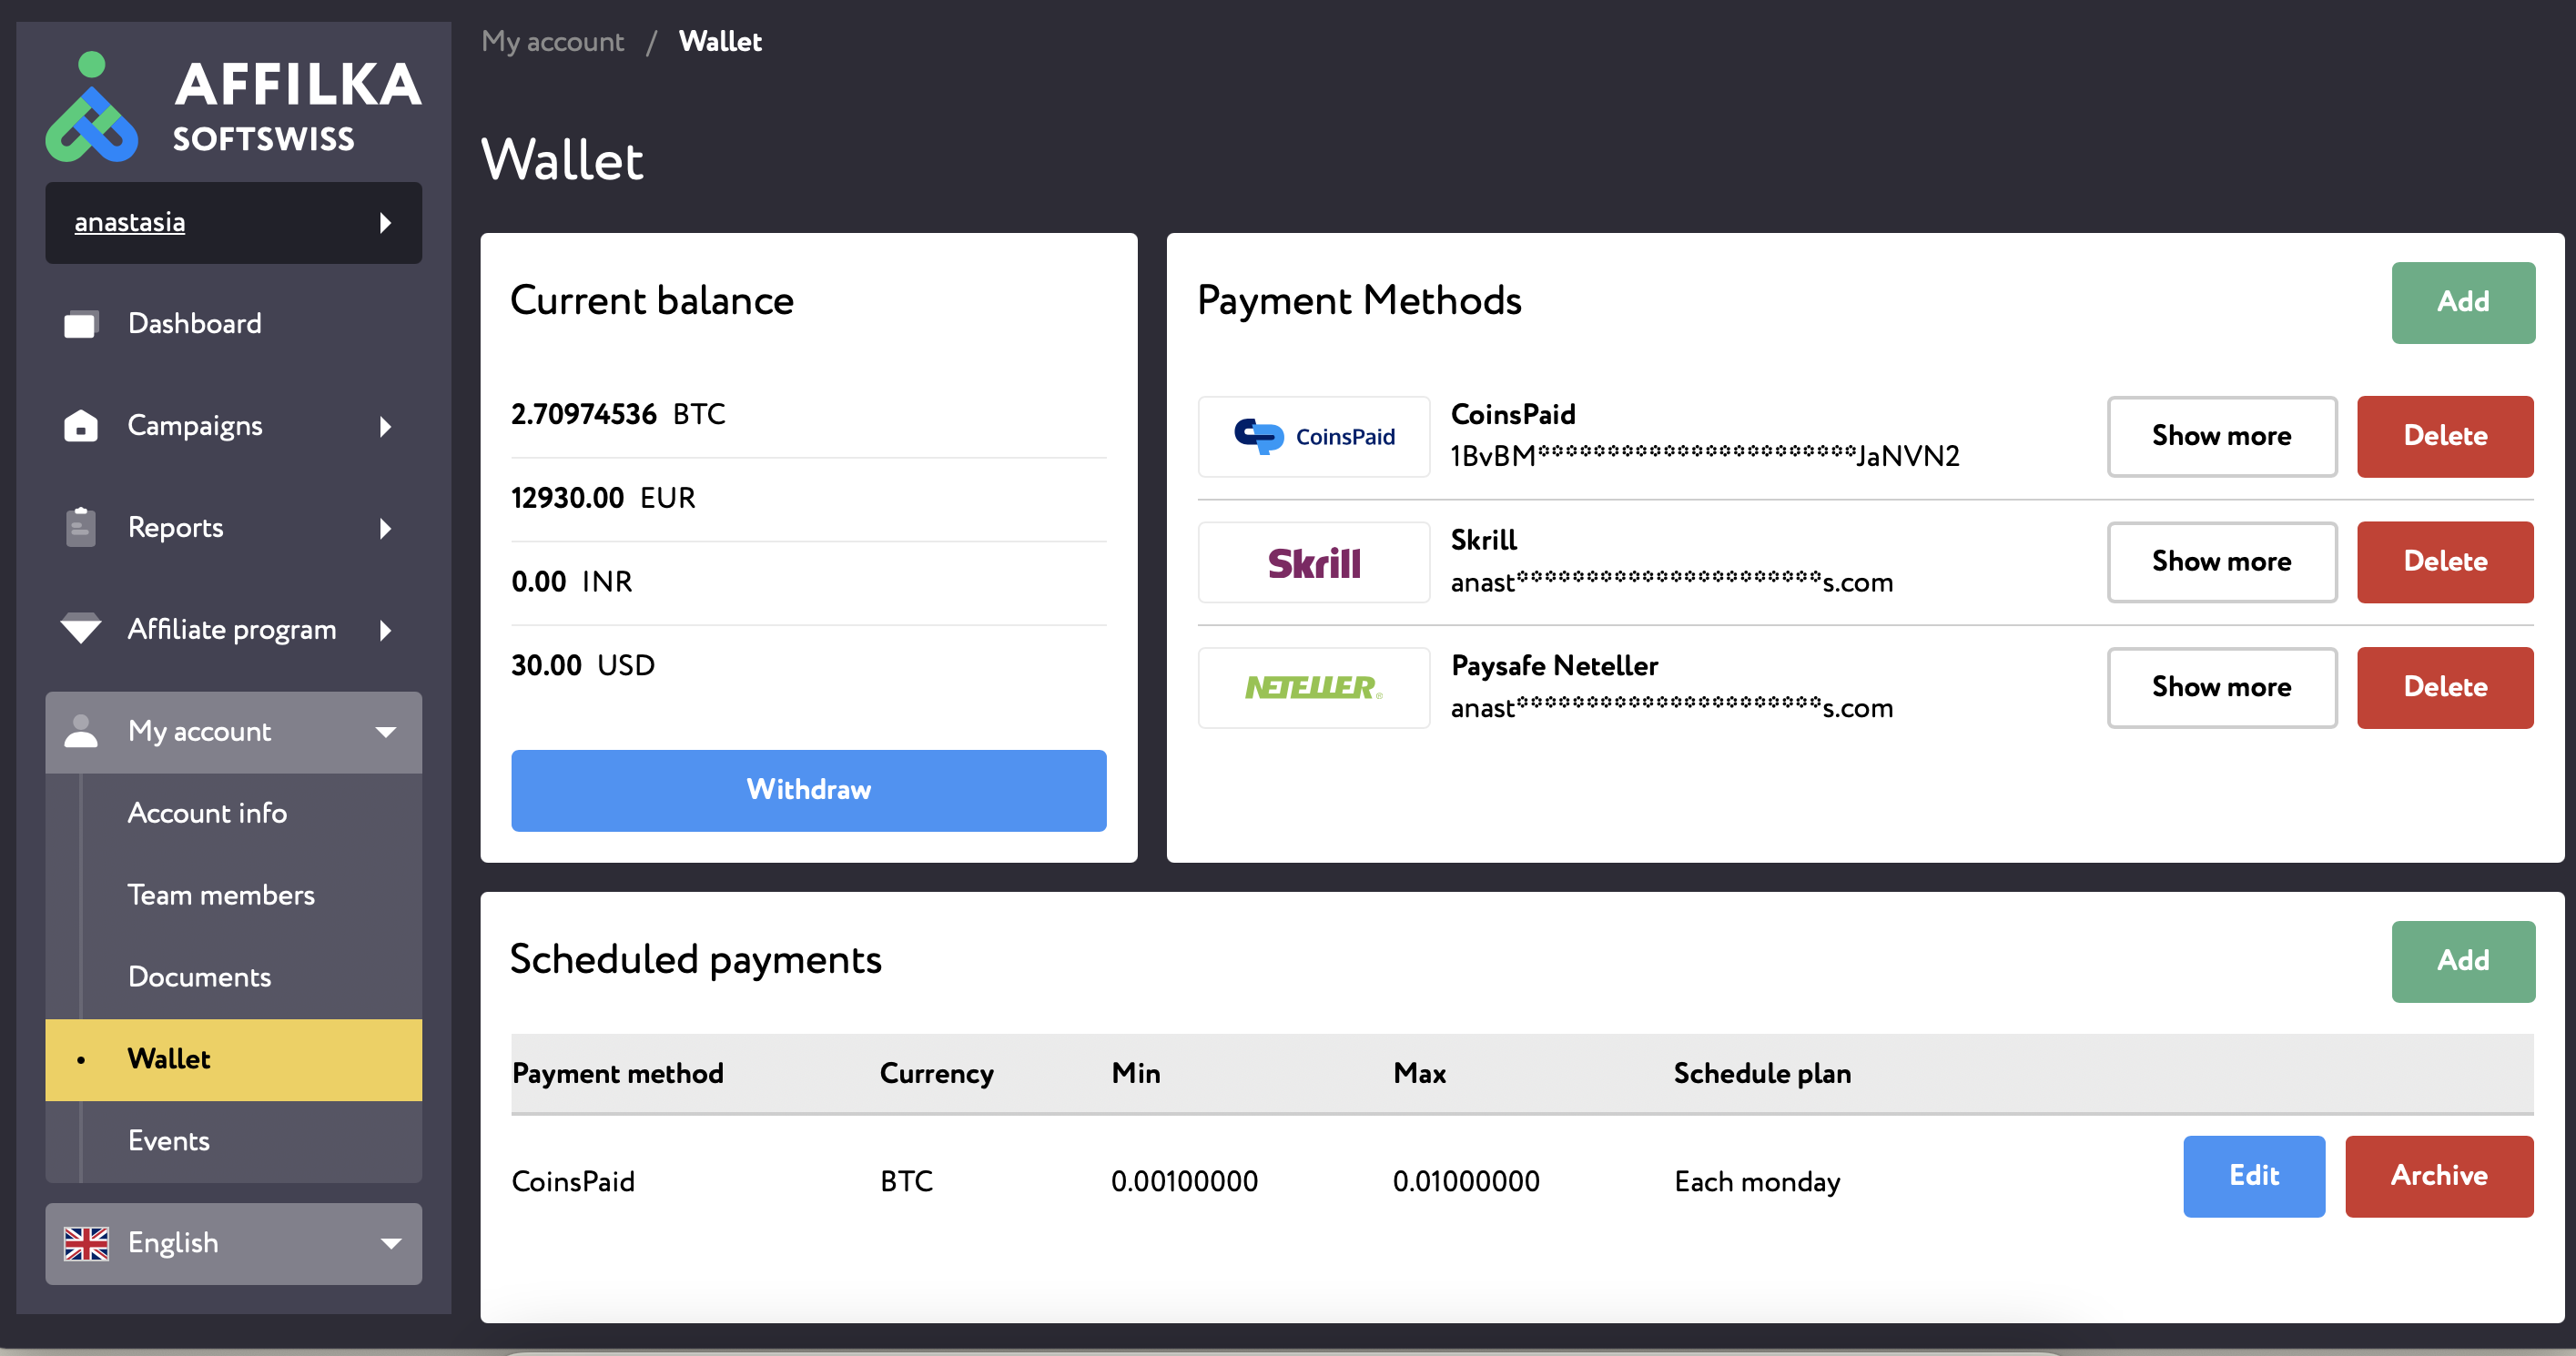
Use the tab /partner/wallet to request cash-outs of the available funds, add or change your payment details as well as set automatic payment schedules. We strongly recommend that you enable 2fa before you start cooperating with the affiliate program to secure your funds and access to your account.
PLEASE NOTE! You will be able to perform financial actions only after you install 2FA authentication. To do this, you need to click on the “Enable 2fa” link, scan the code in the authenticator app, then enter it in the “Code” field and click “Confirm”. If you have any questions, please pay attention to the Security section below.
¶ View Balance.
The Current Balance section shows how much money you have on each currency balance. You can withdraw the funds only in those currencies that are indicated in this section.
¶ Add your Payment Details.
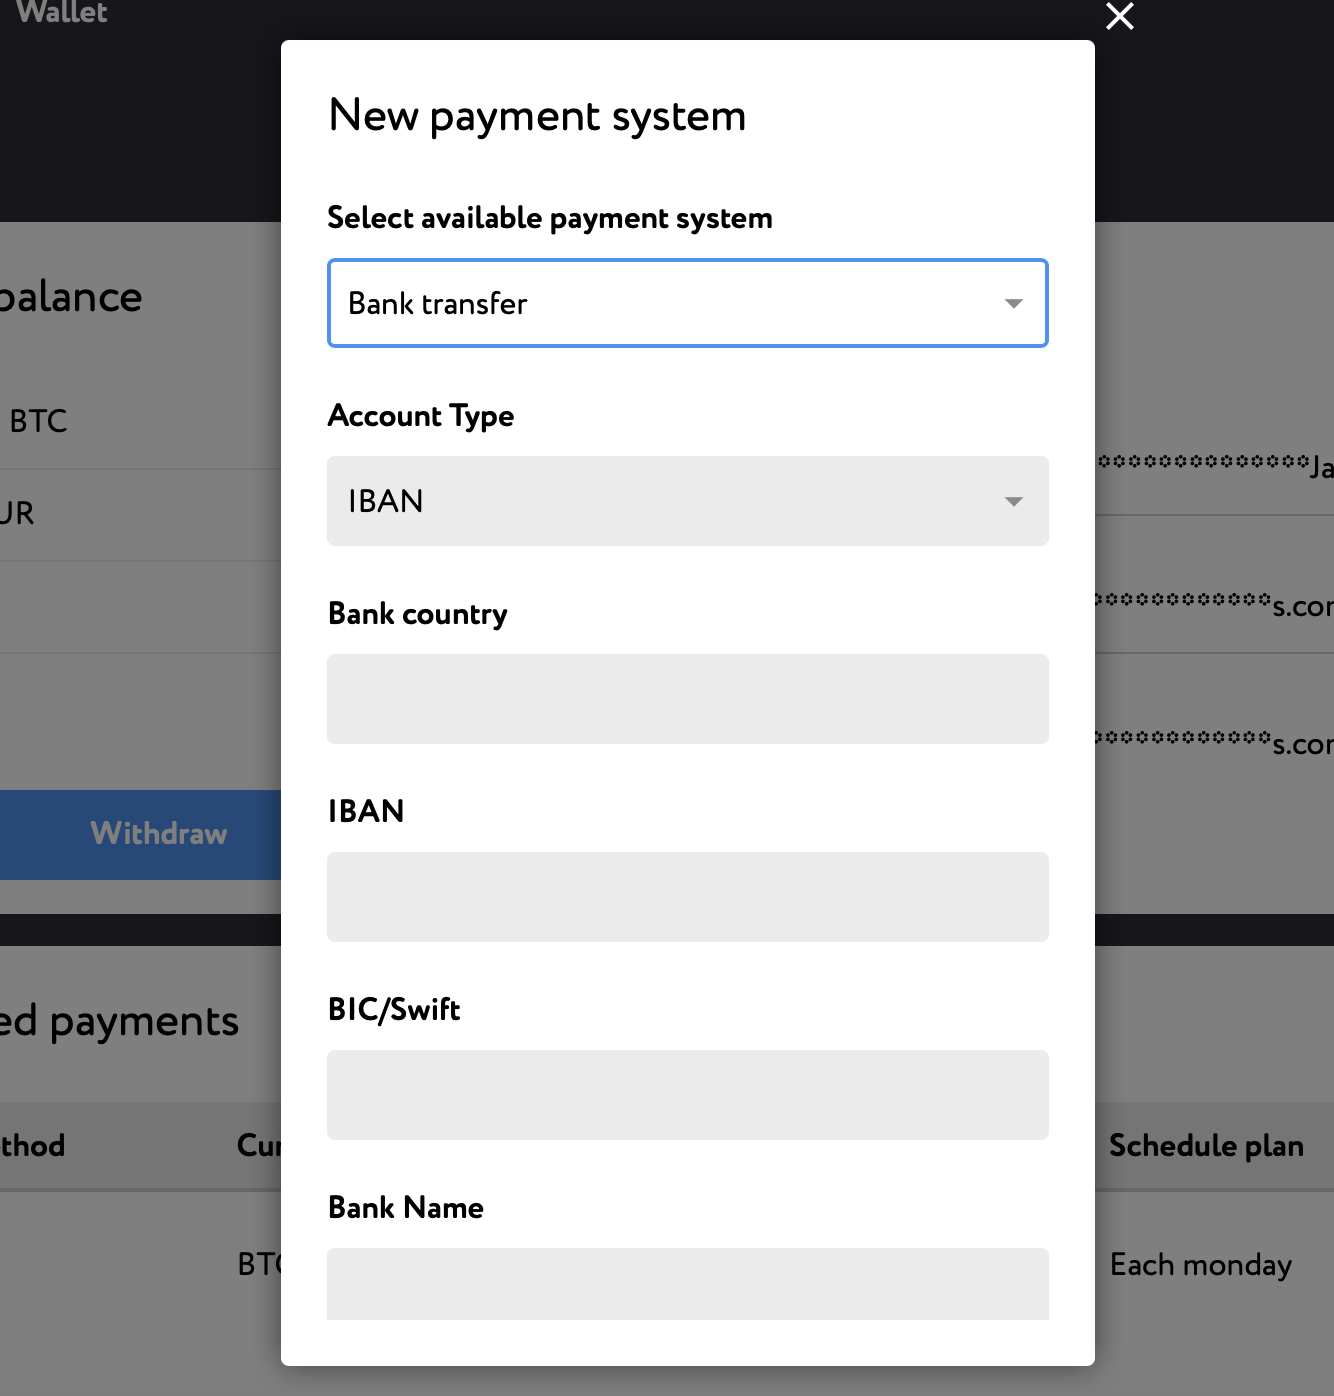
You can add your payment details in the "Payment Methods" section.
Press "Add" and choose one of the available payment options (may differ from one affiliate program to another): Crypto (for both crypto and fiat cash-outs), Neteller, Skrill, Bank transfer, Capitalist, Player Account, Webmoney, or Other. You can add 1 account for each payment method. Fill in the required fields (fields vary based on the PSP used).
For affiliates' cashouts via Bank Transfer, the required fields are:
- IBAN/ Account Number
- BIC/Swift
- Bank name
- Beneficiary name
- Beneficiary country
- Beneficiary address
- Beneficiary city
- Beneficiary postal code
- Bank Address
You can delete an old payment method by clicking on the "Delete" button.
You can view your payment details by clicking on the “Show More” button next to the payment method name. Please, note, that your payment details will be masked.
¶ Request a Cash-out.
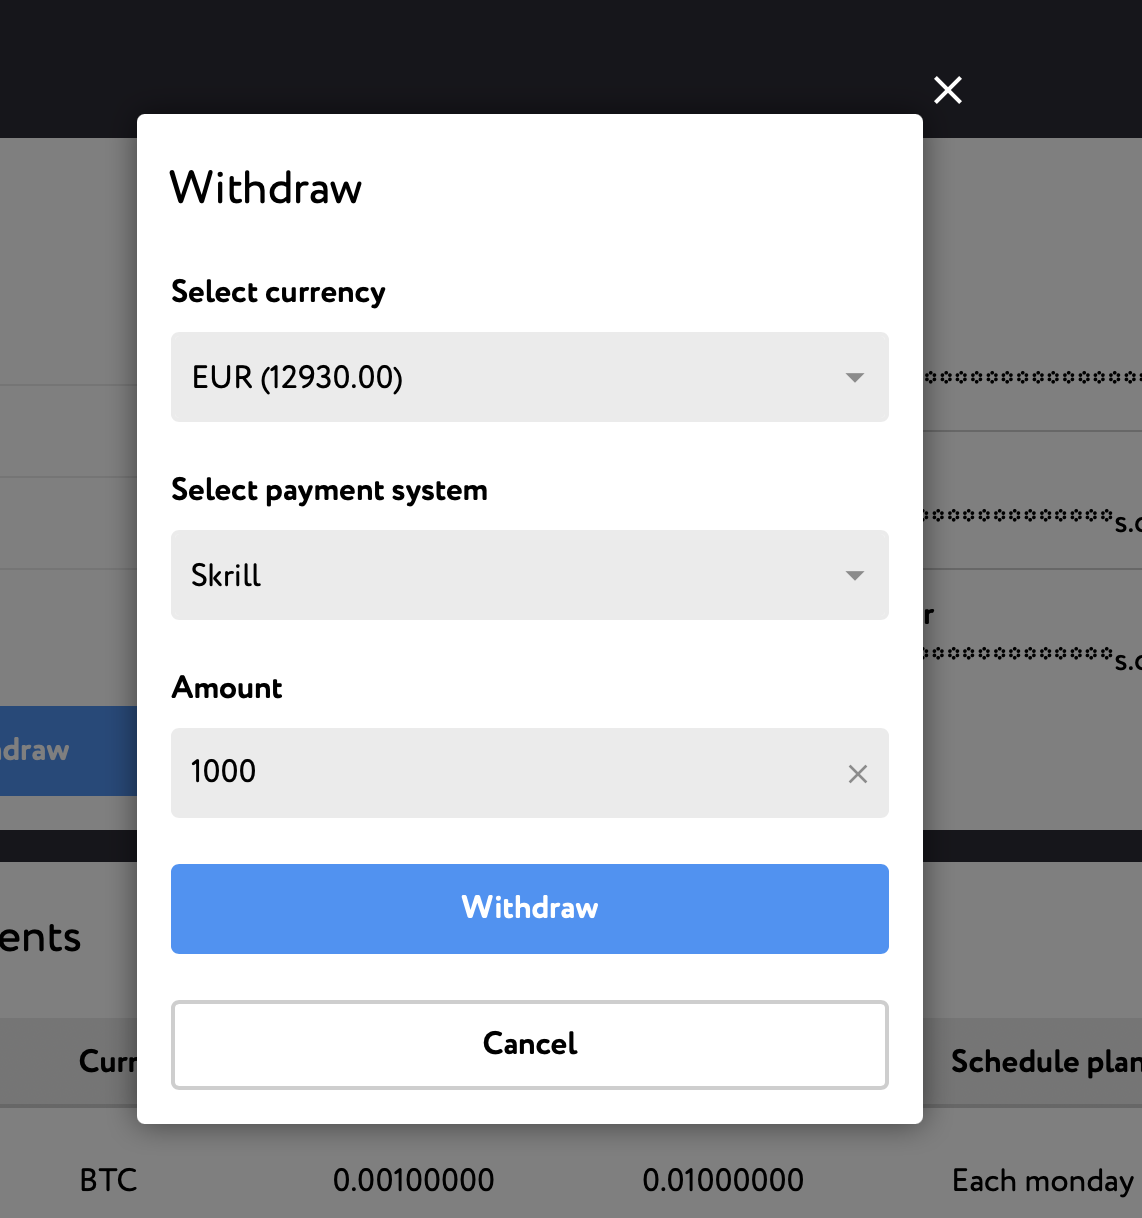
To request a casout, press the “Withdraw” button in the “Current Balance” section. You will see a pop-up window asking you to choose the currency in which you'll be making a withdrawal, select the payment method to withdraw to and indicate the required cashout amount.
If the amount requested is too small or too big for a one-time transaction, you will see a validation error indicating the minimum and the maximum amounts that can be requested via this PSP.
¶ Set Automatic Payment Schedules.
Instead of logging into the system at the end of each billing period to check balance and request a cash-out of the available funds, you can set automatic cash-out schedules for the available balance.
You can indicate minimum and maximum transaction amounts for which the system will create automatic cash-outs for you at a specified time.
The following schedule plans are available: daily, monthly, specific days of the week (e.g. Monday, Tuesday, etc), specific dates of the month (1-31).
Thus, if you set an automatic schedule for payments as once per week on Wednesday and your maximum transaction limit for a specified payment method is 10000 EUR, it means that the system will create automatic cash-out requests for 10000 EUR every week on Wednesday on your behalf, provided that there are available funds on their balance.
Peculiar feature:
- if the cash-out is scheduled for days 29 to 31 and there are no such dates in a month, payment requests will be scheduled for the last day of the month (e.g. February 28, April 30, etc).

¶ Events
Here we log various events that occurred within your affiliate profile. You can view more info on each event by clicking on the corresponding event ID. Currently, the events log consists of the following events:
bill approved:this event notifies you that the bill was approved and contains the information about date and time and its amount.cashout requested, cashout cancelled, cashout accepted: these events show you when a cashout was requested, canceled, or accepted, who requested or canceled it, and which payment details were used to request a withdrawal;refund made: this event notifies you when a payment which had been previously approved was refunded back to your account; the detailed event page contains the info on the refunded amount as well as the original payment on which the refund occurred;payment method added, payment method deleted: these event show you when a new payment method was added to your wallet or an existing payment method was deleted; on a detailed event page you will see the cashout data which was added/deleted;two factor authentication disabled: this event shows you when 2fa was disabled on your account (or your team member's account);two factor authentication enabled: this event shows you when 2fa was enabled on your account (or your team member's account);balance correction made: this event shows you when an Operator manually changed (increased or decreased) your account balance.

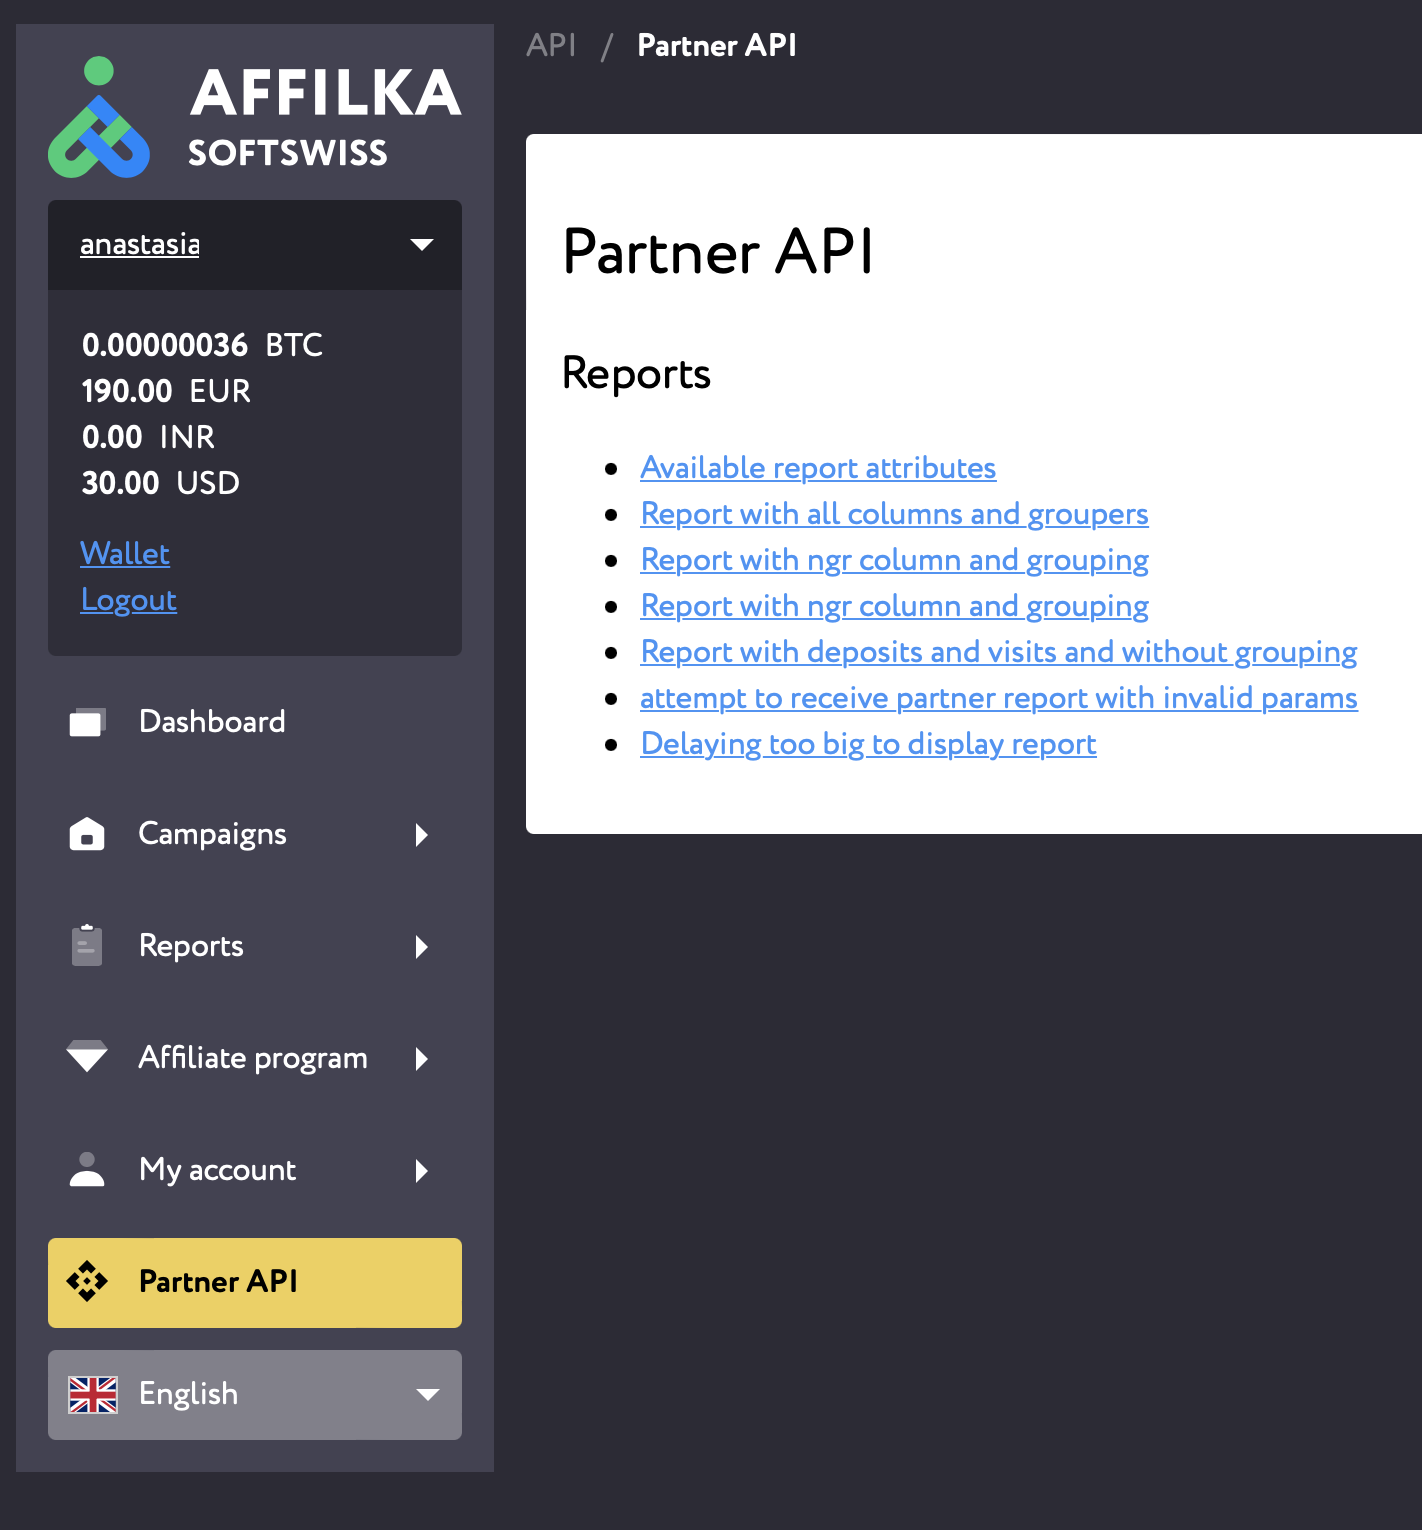
¶ Partner API tab
Use this documentation to get your performance reports. The section is reachable via the /partner/api_docs/customer/partner/index.md link.
Partner Reports are singled out into separate endpoint available via /api/customer/v1/partner/report. When making requests to the Report API, you need to send your user’s unique statistic token in the authorisation header.
Your unique statistic token can be found on the Account Info page. You have an option to expire statistic token for yourself or your teammates. Please, note that the statistic token is unique for each team member.

Your unique statistic token can also be found in XML/JSON feed URLs. For example:

The list of the report attributes available to you is available via the /api/customer/v1/partner/report/attributes.
¶ Security
¶ I am not able to install Two-factor authentication (2FA) on my account. Why?
We recommend you to install 2FA on your account using your PC to enter 2FA code. The code is generated in "Authenticator" app (by Google) right after QR-code scanning using your smartphone.
While setting the 2FA please make sure that:
- the time on the device where you enter the 2FA code and the time on the device where the 2FA codes are generated is the same;
- no additional characters should be used when entering the code. In "Authenticator" app a 2FA code structure is “111 111” but you don't need to put «Space» symbol in the middle, i.e. you need to enter a 2FA code like this “111111”.
¶ I am not able to log in to my account. Why?
Please make sure that:
- you are trying to log in on valid page (example.com/partner/login);
- email, password, 2FA code (if applicable) are 100% correct;
- check if your account is blocked. If your account is blocked, you won't be able to login to your account (see the details below);
- clear cache and cookies.
If the recommendations above did not help please try to try to login to your account using another device.
¶ How to determine if my account is blocked and what to do next?
After a couple of unsuccessful login attempts, your account will be blocked automatically by the system.
To unblock your account you need to follow to your email to which your account is linked and find an email with “Unlock instructions” subject. Inside the email you will find a “Unlock my account” link, by clicking on this link you will unlock your account.
If, however, your account is blocked by the Affiliate Program Operator, you need to contact your dedicated affiliate manager or affiliate program support team to find out the reasons for account block and whether you can be unblocked